Audi A4: Fender
Overview - Fender
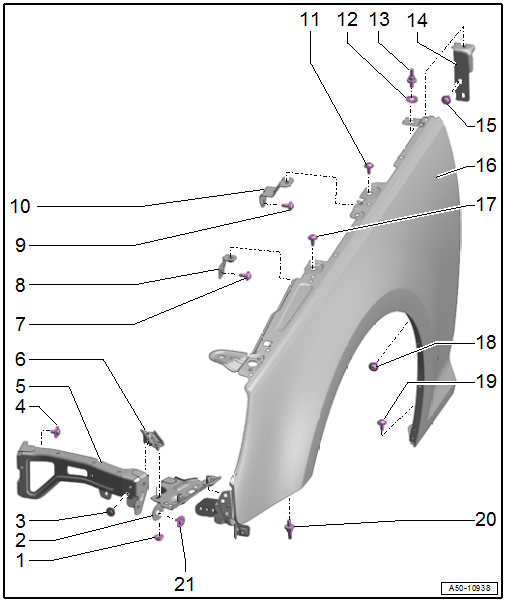
1 - Nut
- 8 Nm
2 - Outer Fender Brace
- Removing and installing. Refer to → Chapter "Brace and Outer Fender Brace, Removing and Installing".
3 - Bolt
- 8 Nm
4 - Bolt
- 8 Nm
- Quantity: 2
5 - Fender Brace
- Removing and installing. Refer to → Chapter "Fender Brace, Removing and Installing".
6 - Brace
- For fender brace
- Removing and installing. Refer to → Chapter "Brace and Outer Fender Brace, Removing and Installing".
7 - Bolt
- 8 Nm
8 - Front Bracket
9 - Bolt
- 8 Nm
10 - Center Bracket
11 - Bolt
- 8 Nm
12 - Washer
13 - Double Bolt
- 8 Nm
14 - Rear Bracket
15 - Bolt
- 8 Nm
16 - Fender
- Removing and installing. Refer to → Chapter "Fender, Removing and Installing".
17 - Bolt
- 8 Nm
18 - Bolt
- 8 Nm
- Quantity: 2
19 - Bolt
- 8 Nm
- Quantity: 2
20 - Double Bolt
- 8 Nm
- Quantity: 2
21 - Bolt
- 8 Nm
- Quantity: 2
Overview - Covers on Fender
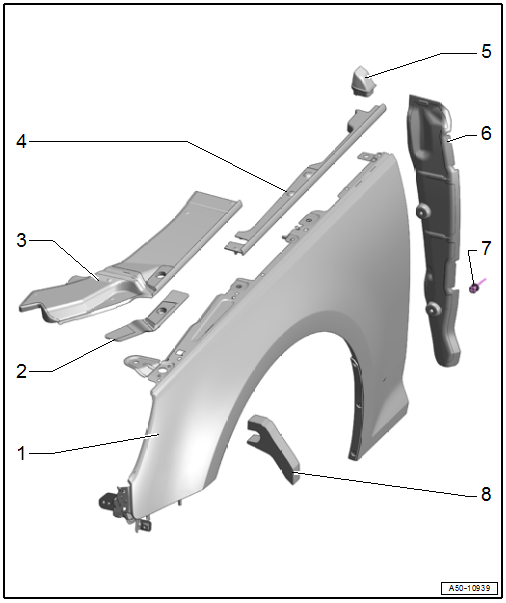
1 - Fender
- Removing and installing. Refer to → Chapter "Fender, Removing and Installing".
2 - Front Cover, Small
- Equipped on some models
- Removing and installing. Refer to → Chapter "Fender Front Cover, Removing and Installing, Small Version".
3 - Front Cover, Large
- Equipped on some models
- Removing and installing. Refer to → Chapter "Fender Front Cover, Removing and Installing, Large Version".
4 - Rear Cover
- Removing and installing. Refer to → Chapter "Rear Fender Cover, Removing and Installing".
5 - Stop Buffer
- For hood
- With cap nut, depending on the version
- Cap nut tightening specification: 6 Nm
- Removing and installing. Refer to → Chapter "Rear Fender Cover, Removing and Installing".
6 - End Panel
- Removing and installing. Refer to → Chapter "End Panel, Removing and Installing".
7 - Expanding Rivet
- Quantity: 2
8 - Seal
- Inside on the fender
Overview - Fender Repair Set

1 - Pop Rivet
2 - Reinforcement
- For the fender
3 - Pop Rivet
- Quantity: 2
4 - Front Bracket
- Preparing for installation.
5 - Pop Rivet
- Quantity: 2
6 - Fender
- Preparing for installation.
7 - Pop Rivet
READ NEXT:
 Fender, Removing and Installing
Special tools and workshop equipment
required
Pop Rivet Nut Pliers -VAS5072A-
Drill
Pop rivets. Refer to the Parts Catalog.
Follow the safety precautions. Refer to
→ Body Interior; Re
Fender Brace, Removing and Installing
Removing
- Remove the front wheel housing liner. Refer to
→ Chapter "Front Wheel Housing Liner, Removing and Installing".
- Remove the front wheel spoiler. Refer to
→ Chapter
Fender Front Cover, Removing and Installing
Fender Front Cover, Removing and Installing, Small Version
Removing
- Loosen the front wheel housing liner in the front and push it to
the side. Refer to
→ Chapter "Front Wheel Housing L
SEE MORE:
General Information
High pressure side are the condenser, receiver/dryer and
restrictor or expansion valve to separate the high and low
pressure liquid ends.
High pressure results from the restrictor or expansion valve
forming a constriction and causing the refrigerant to
accumulate, thus leading to an increase in
General Information
Caution
There is a risk of damaging the threads in the
vehicle body.
The bolts and nuts at all suspension parts must not
be loosened or tightened with an impact wrench.
Always install the bolts and nuts by hand for the
first few turns.
When installing waxed components, contact surf
© 2019-2026 Copyright www.audia4b9.com
