Audi A4: Center Console, Removing and Installing
Removing
- Remove the front footwell center console trim panel. Refer to → Chapter "Front Footwell Center Console Trim Panel, Removing and Installing".
- Remove the front center console storage compartment. Refer to → Chapter "Front Storage Compartment, Removing and Installing".
- Versions with selector lever: Remove the selector mechanism. Refer to → Rep. Gr.34; Selector Mechanism; Selector Mechanism, Removing and Installing.
- Remove the center console rear trim. Refer to → Chapter "Center Console Rear Trim, Removing and Installing".
- Move the front seat all the way forward into its highest position.
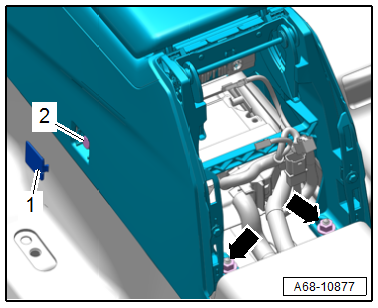
- Pry off the cap -1- with a small screwdriver.
- Remove the bolt -2- underneath.
- Repeat the procedure on the opposite side.
- Remove the nuts -arrows-.
- Equipped on some models: Remove the air duct intermediate piece for the rear vent in the center console.
- Disconnect and free up the connectors and wires.
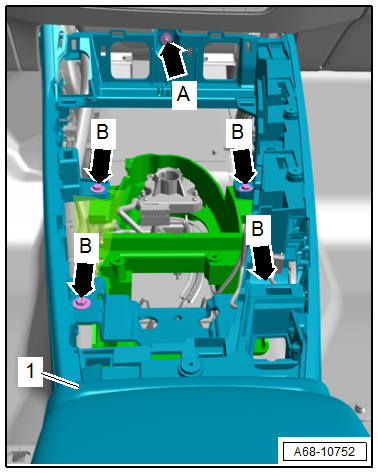
- Remove the nut -arrow A-.
- Remove the bolts -arrows B-.
- Disconnect and free up the connectors and wires.
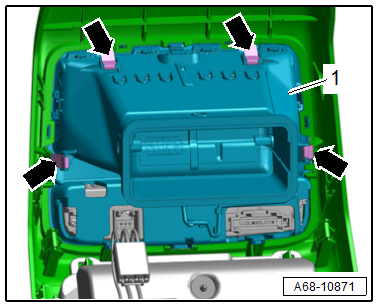
- Lift the back of the center console -1- slightly, pull it toward the rear and remove it.
Installing
Install in reverse order of removal.
Installation instructions: For example tightening specifications, replacing components. Refer to → Chapter "Overview - Center Console".
Center Console Decorative Trim, Removing and Installing
Center Console Decorative Trim, Removing and Installing
Special tools and workshop equipment required
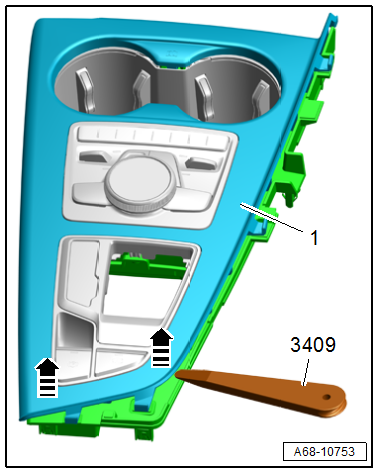
- Trim Removal Wedge -3409-
Removing
- Remove the center console insert (refer to → Chapter "Center Console Insert, Removing and Installing") and place it on a soft surface.
- Remove the bolts -arrows A-.
 Note
Note
Ignore the other -items-.
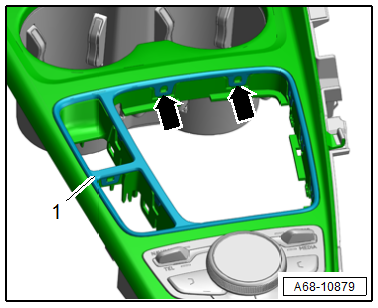
- Starting at the back, unclip the decorative trim -1- from the center console insert -arrows- using the Trim Removal Wedge -3409-.
- Carefully disengage the remaining retainers for the decorative trim and remove the decorative trim.
Installing
Install in reverse order of removal.
Installation instructions: For example tightening specifications, replacing components. Refer to → Chapter "Overview - Center Console, Insert".
Center Console Insert Decorative Trim, Removing and Installing
Special tools and workshop equipment required
- Trim Removal Wedge -3409-
Removing
- Remove the center console insert (refer to → Chapter "Center Console Insert, Removing and Installing") and place it on a soft surface.
- Remove the bolts -arrows A-.
Note
Ignore the other -items-.
- Starting at the back, unclip the decorative trim -1- from the center console insert -arrows- using the Trim Removal Wedge -3409-.
- Carefully disengage the remaining retainers for the decorative trim and remove the decorative trim.
Installing
Install in reverse order of removal.
Installation instructions: For example tightening specifications, replacing components. Refer to → Chapter "Overview - Center Console, Insert".
Center Console Insert Decorative Frame, Removing and Installing
Removing
- Remove the center console insert. Refer to → Chapter "Center Console Insert, Removing and Installing".
- Remove the electromechanical parking brake button. Refer to → Electrical Equipment; Rep. Gr.96; Controls; Electromechanical Parking Brake ButtonE538/-AUTO HOLD- ButtonE540, Removing and Installing.
- Remove the Multimedia Button Module -E817-. Refer to → Communication; Rep. Gr.91; Infotainment System; Component Location Overview - Infotainment System.
- Carefully release the retainers -arrows- using a small screwdriver and press the decorative frame -1- out at the same time.
- Release the remaining retainers and remove the decorative frame.
Installing
Install in reverse order of removal.
Installation instructions: For example tightening specifications, replacing components. Refer to → Chapter "Overview - Center Console, Insert".
Cupholder, Removing and Installing
Removing
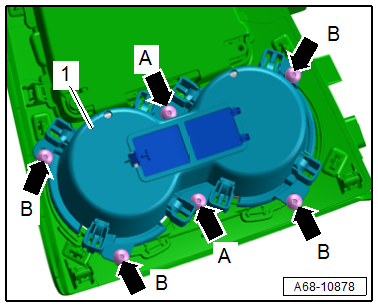
- Remove the center console insert (refer to → Chapter "Center Console Insert, Removing and Installing") and place it on a soft surface.
- Remove the screws -arrows A and B-.
- Remove the cupholder -1-.
Installing
Install in reverse order of removal.
Installation instructions: For example tightening specifications, replacing components. Refer to → Chapter "Overview - Center Console, Insert".
Rear Center Console Vent, Removing and Installing
Special tools and workshop equipment required
- Hook Tool -T40207-
Removing
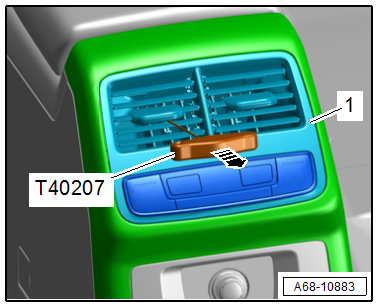
- Carefully guide the -T40207- between the slats and hook it to the rear of the vent -1-.
- Alternating between the sides, carefully remove the vent from the installation opening -arrow-.
- Disconnect the connector.
- If the hook cannot be engaged, remove the center console rear trim. Refer to → Chapter "Center Console Rear Trim, Removing and Installing".
- Release the vent -1- at the clips -arrows- and press it out of the trim at the same time.
Installing
Install in reverse order of removal.
Installation instructions: For example tightening specifications, replacing components. Refer to → Chapter "Overview - Center Console, Storage Compartment".
Center Console Bracket, Removing and Installing
Special tools and workshop equipment required
- Pry Lever -80-200-
Removing
- Remove the center console. Refer to → Chapter "Center Console, Removing and Installing".
- Unclip the wires on the bracket and free them up.
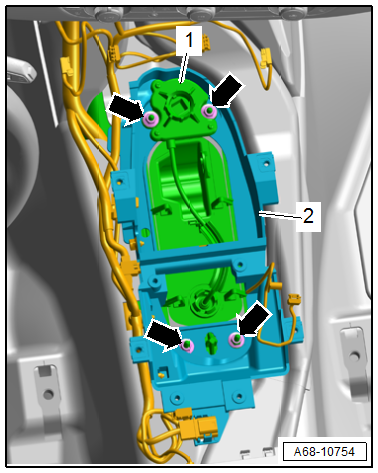
- Remove the nuts -arrows-.
- Remove the parking lock emergency release -1-.
- Remove the center console bracket -2-.
Installing
Install in reverse order of removal.
Installation instructions: For example tightening specifications, replacing components. Refer to → Chapter "Overview - Center Console".
READ NEXT:
 Front Center Armrest
Overview - Front Center Armrest
1 - Center Armrest Support Base
Removing and installing. Refer to
→ Chapter "Front Center Armrest, Removing and Installing".
2 - Front C
Interior Rearview Mirror
Overview - Interior Rearview Mirror
1 - Front Cover
For the mirror base
Press on until it engages audibly
2 - Clip
For the interior rearview mirror
Replace after removing t
SEE MORE:
Fluids in the A/C system
Refrigerant in the A/C system
The sticker in the motor compartment provides
information about the type and amount of refrigerant
used in the vehicle's A/C system. The sticker
is located in the front section of the motor
compartment or at the front or back of the hood.
Warning: the A/C system must on
Vehicles with Restrictor, Reservoir and A/C Compressor Regulator Valve
-N280- (Externally Regulated A/C Compressor), Checking Pressures
Specified Values for the Refrigerant
Circuit Pressures
Note
Connect the Air Conditioning (A/C) service station. Refer to
→ Chapter "A/C Service Station, Connecting".
Observe the test requirements. Refer to
→ Chapter "Pressures, Checking".
- With the ignition switched
