Audi A4: Door Arrester, Removing and Installing
Removing
- Move the door window into the "closed" position.
- Remove the door trim panel. Refer to → Body Interior; Rep. Gr.70; Front Door Trim Panels; Front Door Trim Panel, Removing and Installing.
- Remove the speaker. Refer to → Communication; Rep. Gr.91; Sound System; Component Location Overview - Sound System.
- Tape off the A-pillar in the door arrester area using adhesive tape, so that the paint will not be damaged.
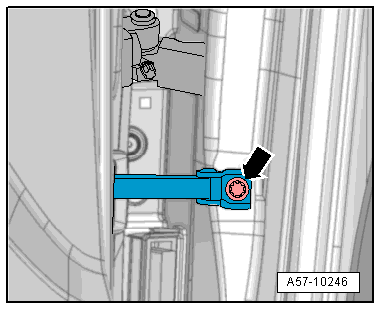
- Remove the door arrester bolt -arrow-.
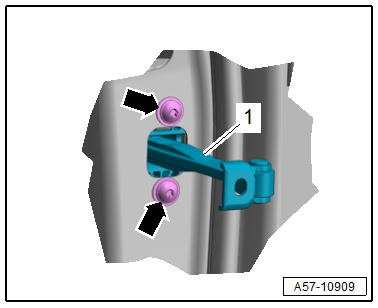
- Remove the bolts -arrows- and remove the door arrester -1- toward the inside.
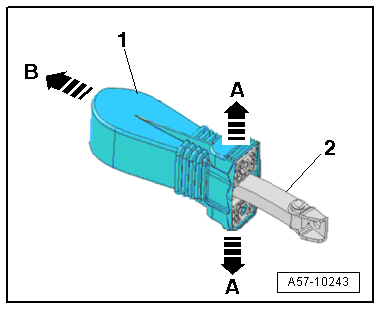
- Pull the cap -1- slightly to the side in the direction of -arrows A- and remove it from the door arrester -2- in the direction of -arrow B-.
Installing
Install in reverse order of removal and note the following:
- Door arrester installation position. Refer to → Fig. "Door Arrester Installation Position".
- Cap installation position. Refer to → Fig. "Cap Installation Position".
Tightening Specifications
- Refer to → Chapter "Overview - Door"
Inner Door Seal, Removing and Installing
Removing
- Remove the A-pillar trim panels. Refer to → Body Interior; Rep. Gr.70; Vehicle Interior Trim Panels; A-Pillar Trim Panel, Removing and Installing.
- Remove the front sill panel. Refer to → Body Interior; Rep. Gr.70; Vehicle Interior Trim Panels; Sill Panel, Removing and Installing.
- Remove the B-pillar trim panels. Refer to → Body Interior; Rep. Gr.70; Vehicle Interior Trim Panels; B-Pillar Trim Panel, Removing and Installing.
- Remove the inner door seal from the body flange.
Installing
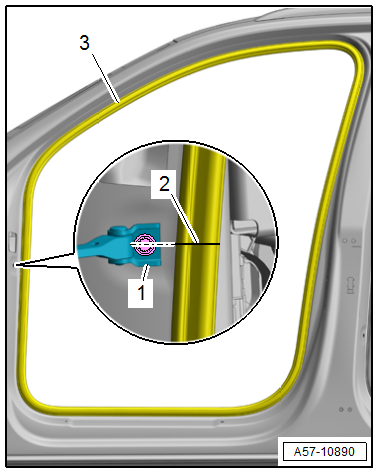
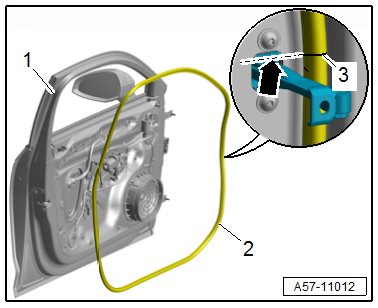
- Place the inner door seal -3- with the vulcanized point -2- in the center of the door arrester -1- on the body flange and push on all around.
Further installation is the reverse order of removal.
Outer Door Seal, Removing and Installing
Special tools and workshop equipment required
- Roller -3356-
- Adhesive Strip Remover -VAS6349-
- Cleaning Solution -D 009 401 04-
- Applicator -D 009 500 25-
- Bonding Agent -D 355 205 A2-
- The following components must be replaced after removal. Refer to → Chapter "Overview - Door Seals".
Removing
- Remove the front window frame trim panel. Refer to → Body Interior; Rep. Gr.70; Front Door Trim Panels; Window Frame Trim Panel, Removing and Installing.
- Mark the position of the outer door seal -1- all around with adhesive tape -2-.
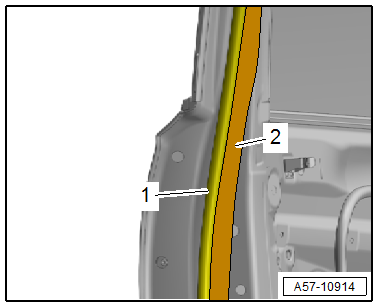
- Tape off the A-pillar in the door arrester area using adhesive tape, so that the paint will not be damaged.
- Remove the door arrester bolt -arrow-.
- Pull the outer door seal -1- slightly away from the top of the door frame and cut it with commercially available scissors.
- Gradually stretch the outer door seal lengthwise in the direction of -bottom arrow- and remove it in the direction of -upper arrow-.
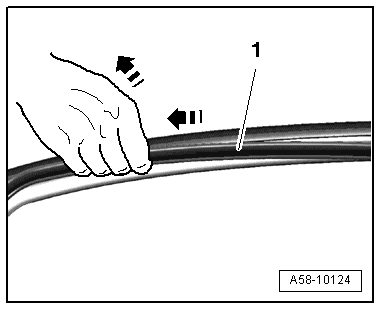
TIP
Pulling the outer door seal lengthwise will loosen the outer door seal adhesive and then it is possible to remove it from the door without any adhesive residue.
- Remove the outer door seal completely.
Installing
- The vehicle and the seal must be at room temperature.
- The adhesive surfaces must be free of dirt and grease.
- If the Bonding Agent -D 355 205 A2- dries longer than 3 hours, then it must be primed again.
- Do not stretch the seal when installing it.
- So that the outer door seal does not loosen or slide, do not close the door for two hours.
- Remove the adhesive residue using -VAS6349-.
- Clean the adhesive surface using the Cleaning Solution -D 009 401 04-.
- Apply Bonding Agent -D 355 205 A2- on the adhesive surface using the Applicator -D 009 500 25- and let dry.
- Remove the protective film from the adhesive tape.
- Position the outer door seal -2- with the vulcanized point -3- centered to the door arrester opening -arrow- on the door body -1- and bond it all around. At the same time, pay attention to the installation position of the previously installed adhesive tape.
- When the outer door seal is positioned correctly, the drain holes in the seal are at the bottom.
- Press the seal on using the -3356-.
- Resting time of the vehicle is a minimum of two hours with the doors open at room temperature.
Continue to install in the reverse order of removal.
READ NEXT:
 Door Components
Overview - Window Regulator
1 -
Nut
7.5 Nm
2 -
Window Regulator
Removing and installing. Refer to
→ Chapter "Window Regulator, Removing and Installing".
3 -&nbs
Window Regulator, Removing and Installing
Removing
- Remove the door window. Refer to
→ Chapter "Front Door Window, Removing and Installing".
- Release the retainers -1 and 3- on
the window regulator threaded pins -2-
usin
Door Handle, Removing and Installing
Removing
- Remove the door handle trim. Refer to
→ Chapter "Door Handle Trim, Removing and Installing".
- Equipped on some models: Remove the exterior door handle
illumination bulb.
SEE MORE:
Operating in the cockpit
Fig. 92 3-zone deluxe automatic climate control system: controls
Press the knobs, buttons or rocker switches to
turn the functions on or off. When the function is
switched on, the LED in the respective button or
knob turns on. Some rocker switches can be assigned
with multiple functions. The variou
Steering Gear End Positions, Adapting
Special tools and workshop equipment required
Vehicle Diagnostic Tester
Note
If the connection between the steering gear and the steering
wheel is disconnected, the end position of the steering gear
must be readapted.
Procedure
- Connect the Vehicle Diagnostic Tester.
- Switch
