Audi A4: Door Components
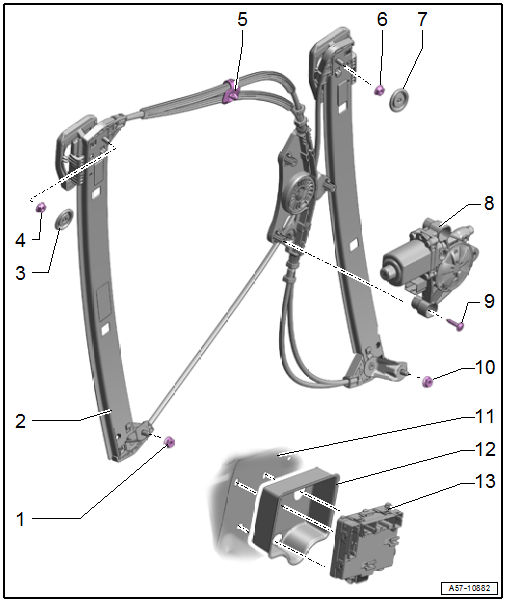
Overview - Window Regulator

1 - Nut
- 7.5 Nm
2 - Window Regulator
- Removing and installing. Refer to → Chapter "Window Regulator, Removing and Installing".
3 - Cap
4 - Nut
- 7.5 Nm
5 - Clip
- For the window regulator cable
6 - Nut
- 7.5 Nm
7 - Cap
8 - Window Regulator Motor
- Driver Window Regulator Motor -V147-
- Front Passenger Window Regulator Motor -V148-
- Removing and installing. Refer to → Chapter "Window Regulator Motor, Removing and Installing".
9 - Bolt
- 3.5 Nm
- Quantity: 3
- Thread cutting
- Position and install by hand
10 - Nut
- 7.5 Nm
11 - Door
12 - Rubber Boot
- For the door control module
13 - Door Control Module
- Component location overview. Refer to → Chapter "Component Location Overview - Central Locking".
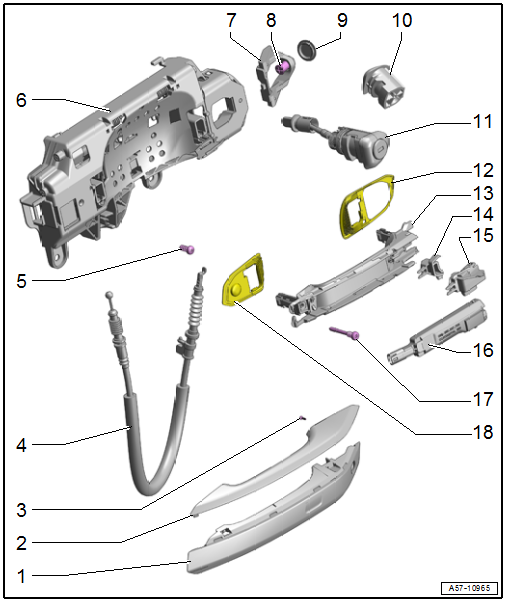
Overview - Door Handle and Door Lock
Door Handle and Mounting Bracket

1 - Door Handle Trim
- There are different versions. Refer to the Parts Catalog.
- Removing and installing. Refer to → Chapter "Door Handle Trim, Removing and Installing".
2 - Trim Molding
- Trim for the door handle
- Equipped on some models
- Removing and installing. Refer to → Chapter "Door Handle Trim Molding, Removing and Installing".
3 - Bolt
- 1 Nm
- For versions with trim molding
4 - Operating Cable
- For outer door operation
- Removing and installing. Refer to → Chapter "Exterior Door Operating Cable, Removing and Installing".
5 - Bolt
- 2.5 Nm
6 - Mounting Bracket
- Removing and installing. Refer to → Chapter "Mounting Bracket, Removing and Installing".
7 - Retaining Bracket
8 - Clamping Screw
- 2.5 Nm
- For lock cylinder/housing
9 - Plugs
10 - Housing
- For the front passenger door
- Removing and installing. Refer to → Chapter "Housing, Removing and Installing".
11 - Lock Cylinder
- For the driver door
- Removing and installing. Refer to → Chapter "Lock Cylinder, Removing and Installing".
12 - Rear Backing Plate
- Removing and installing. Refer to → Chapter "Mounting Bracket, Removing and Installing".
13 - Door Handle
- Removing and installing. Refer to → Chapter "Door Handle, Removing and Installing".
14 - Housing
- For vehicles without an exterior door handle illumination bulb
15 - Exterior Door Handle Illumination Bulb
- Left Front Exterior Door Handle Illumination Bulb -L162-
- Right Front Exterior Door Handle Illumination Bulb -L163-
- Equipped on some models
- Overview. Refer to → Electrical Equipment; Rep. Gr.94; Exterior Door Handle Lamps; Overview - Exterior Door Handle Lamps.
16 - Exterior Door Handle Touch Sensor
- Driver Exterior Door Handle Touch Sensor -G415-
- Front Passenger Exterior Door Handle Touch Sensor -G416-
- Equipped on some models
- Overview. Refer to → Electrical Equipment; Rep. Gr.94; Access/Start Authorization; Component Location Overview - Keyless Access Authorization System.
17 - Bolt
- 2.5 Nm
- Quantity: 2
18 - Front Backing Plate
- Removing and installing. Refer to → Chapter "Mounting Bracket, Removing and Installing".
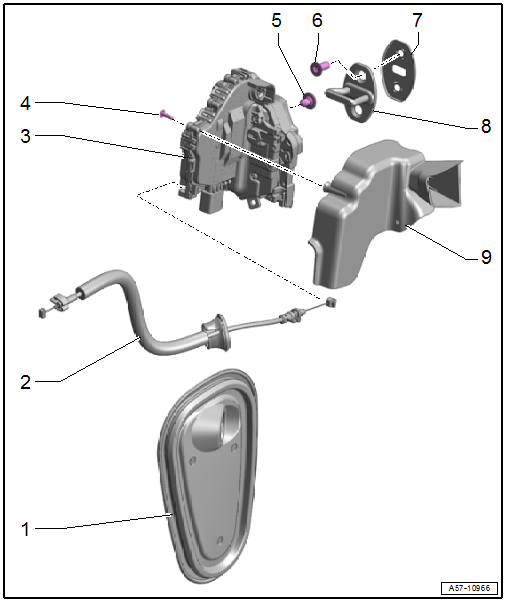
Door Lock and Striker

1 - Door Inner Cover
- Removing and installing. Refer to → Chapter "Door Inner Cover, Removing and Installing".
2 - Operating Cable
- For the interior door mechanism
- Removing and installing. Refer to → Chapter "Interior Door Operating Cable, Removing and Installing".
3 - Door Lock
- Removing and installing. Refer to → Chapter "Door Lock, Removing and Installing".
4 - Bolt
- 1.5 Nm
5 - Bolt
- 19 Nm
- Quantity: 2
6 - Bolt
- 25 Nm
- Quantity: 2
7 - Backing Plate
- Shared component with -8-
8 - Striker
- Removing and installing. Refer to → Chapter "Striker, Removing and Installing".
- Adjusting. Refer to → Chapter "Striker, Adjusting".
9 - Cover
- For the door lock
- Removing and installing. Refer to → Chapter "Door Lock Cover, Removing and Installing".
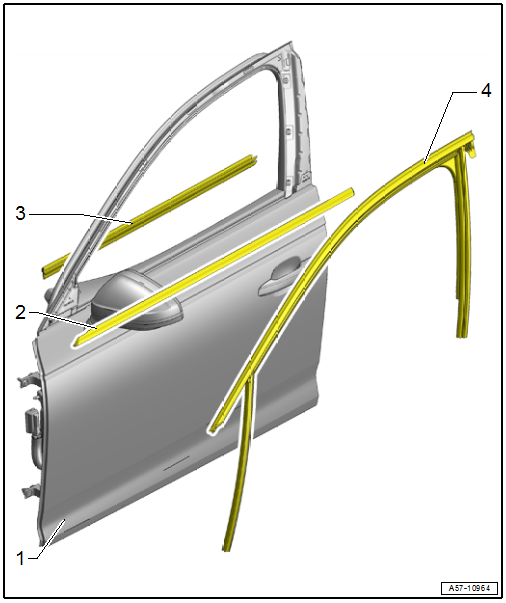
Overview - Window Guides and Window Shaft Strips

1 - Door
2 - Outer Window Shaft Strip
- Removing and installing. Refer to → Chapter "Outer Window Shaft Strip, Removing and Installing".
3 - Inner Window Shaft Strip
- Removing and installing. Refer to → Chapter "Inner Window Shaft Strip, Removing and Installing".
4 - Window Guide
- Removing and installing. Refer to → Chapter "Window Guide, Removing and Installing".

