Audi A4: Mounting Bracket, Removing and Installing
 NOTICE
Risk of damaging the operating cable by deforming it.
- Never sharply bend or kink the operating cable.
Removing
- Move the door window into the "closed" position.
- Remove the door handle. Refer to → Chapter "Door Handle, Removing and Installing".
- Driver side: Remove the lock cylinder. Refer to → Chapter "Lock Cylinder, Removing and Installing".
- Front passenger side: Remove the housing. Refer to → Chapter "Housing, Removing and Installing".
- Remove the door inner cover. Refer to → Chapter "Door Inner Cover, Removing and Installing".
- Remove the door lock. Refer to → Chapter "Door Lock, Removing and Installing".
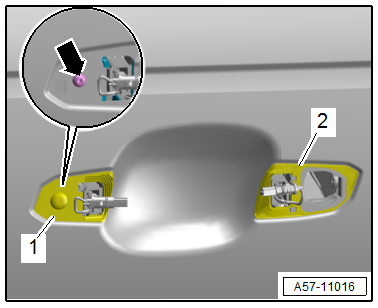
- Remove the backing plates -1 and 2-.
- Remove the bolt -arrow-.
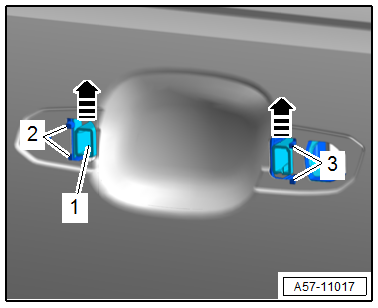
- Lift the mounting brackets -1- until the retainers -2 and 3- are free in the direction of -arrows-.
- Free up the wiring harness.
- Remove the mounting bracket toward the inside and remove it from the door.
Installing
Install in reverse order of removal and note the following:
- Equipped on some models: Install the wiring harness -1- for the exterior door handle touch sensor/exterior door handle illumination on the mounting bracket -3- and on the door lock -2-. Pay attention to the wire routing -arrows-.
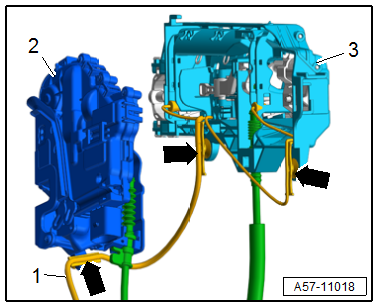
TIP
If the wiring harness is not routed correctly, there may be noises when opening and closing the door window, because the door window grazes the wiring harness.
Tightening Specifications
- Refer to → Chapter "Overview - Door Handle and Door Lock"
Exterior Door Operating Cable, Removing and Installing
NOTICE
Risk of damaging the operating cable by deforming it.
- Never sharply bend or kink the operating cable.
Removing
- Remove the door lock. Refer to → Chapter "Door Lock, Removing and Installing".
- Remove the mounting bracket. Refer to → Chapter "Mounting Bracket, Removing and Installing".
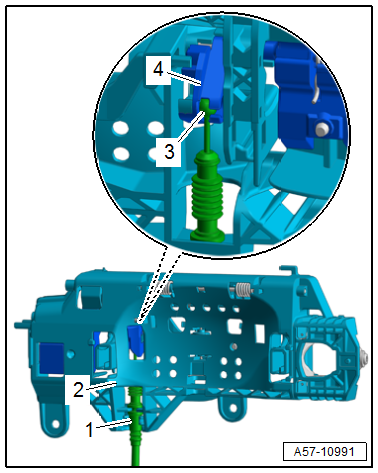
- Loosen the operating cable -1- from the support bracket -2- and disengage the release cable nipple -3- from the release lever -4-.
Installing
Install in reverse order of removal.
Lock Cylinder, Removing and Installing
Removing
- Remove the door handle trim. Refer to → Chapter "Door Handle Trim, Removing and Installing".
- Remove the lock cylinder -1- from the mounting bracket -arrow-.
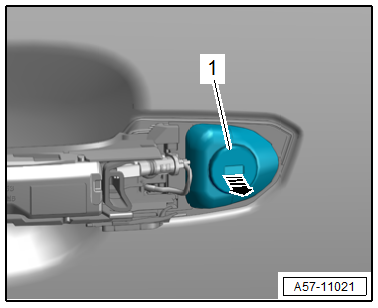
TIP
If the lock cylinder cannot be removed, push the ignition key in the lock cylinder and remove the lock cylinder with the key slightly turned.
Installing
Install in reverse order of removal and note the following:
- Slide the lock cylinder into the mounting bracket and then check if the door lock closing and opening position functions.
Housing, Removing and Installing
Removing
- Remove the door handle trim. Refer to → Chapter "Door Handle Trim, Removing and Installing".
- Remove the housing -1- from the mounting bracket -arrow-.
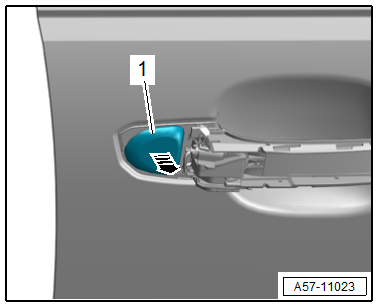
Installing
Install in reverse order of removal.
READ NEXT:
 Door Lock, Removing and Installing
NOTICE
Risk of damaging the operating cable by deforming it.
- Never sharply bend or kink the operating cable.
Removing
- Move the door window into the "closed" position.
- Remo
Window Guide, Removing and Installing
Removing
- Remove the door window. Refer to
→ Chapter "Front Door Window, Removing and Installing".
- Remove the B-pillar trim. Refer to
→ Chapter "B-Pillar Door Trim, Removi
Central Locking
Component Location Overview - Central Locking
1 -
Engine Hood Contact Switch -F266-
In the latch
Removing and installing. Refer to
→ Chapter "Engine Hood Contact Switch -F266-, Re
SEE MORE:
Refresh Charging with Battery Charger -VAS5903-
WARNING
Risk of injury. Follow all warning messages and
safety precautions. Refer to
→ Chapter "Warnings and Safety Precautions".
WARNING
Do not check or charge a Battery -A- when the visual
indicator has "no color or is
bright yellow". Jump starting must not be used!
Th
Rear Side Window, Removing and Installing
Undamaged Side Window, Removing, Sedan
Special tools and workshop equipment
required
Wedge Set -T10383-
Wedge 1 -T10383/1-
Cutting Tool for Bonded Windows -VAS6452-
Bonded Window Tool Kit - Pull Handle -VAG1351/1-
Follow repair instructions. Refer to
→ Chapter "Repair Information".
To co
