Audi A4: Window Guide, Removing and Installing
Removing
- Remove the door window. Refer to → Chapter "Front Door Window, Removing and Installing".
- Remove the B-pillar trim. Refer to → Chapter "B-Pillar Door Trim, Removing and Installing, Front".
- Remove the A-pillar trim. Refer to → Chapter "A-Pillar Trim, Removing and Installing".
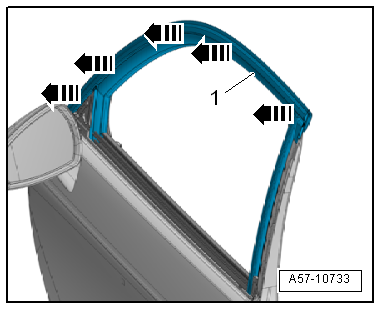
- Remove the window guide -1- outward from the door frame -arrows-.
Installing
Install in reverse order of removal and note the following:
- Install the window guide -A- on the door flange in the sequence -1 through 5-.
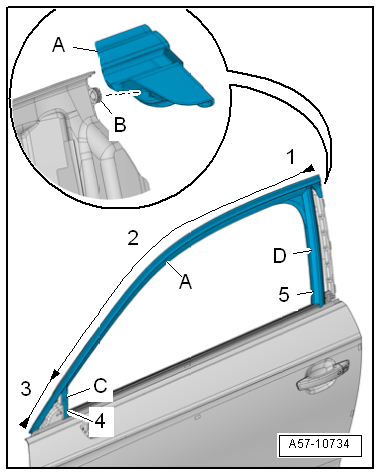
- Position the upper edge of the window guide on the B-pillar door flange
and push it forward in the direction of travel.
- The guide pin -B- must engage in the window guide mount.
- Install the window guide on the door flange.
- Align the window guide on the A-pillar guide rail.
- Insert the seal -C- into the guide rail.
- Install the B-pillar trim and insert the seal -D- into the guide rail.
Inner Window Shaft Strip, Removing and Installing
Removing
- Remove the front window frame trim panel. Refer to → Body Interior; Rep. Gr.70; Front Door Trim Panels.
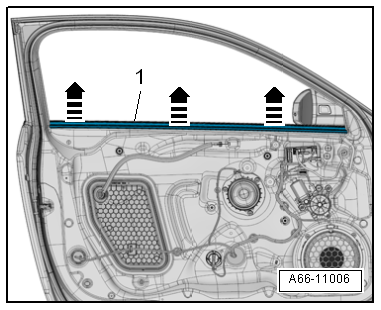
- Remove the window shaft strip -1- upward in the direction of -arrows-.
Installing
Install in reverse order of removal and note the following:
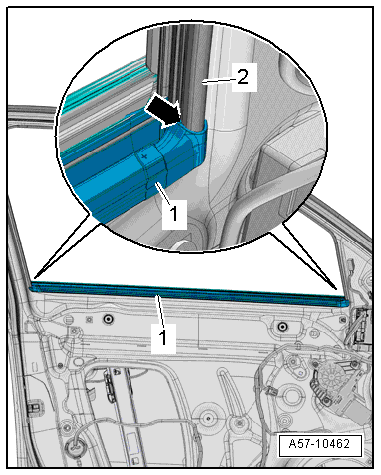
- Position the window shaft strip -1- on the window guide edge -2- at both ends -arrow- and press to the center of the door fold.
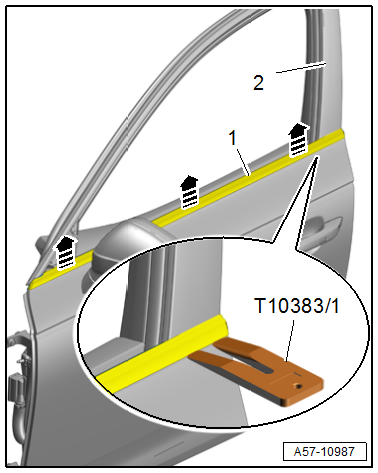
Outer Window Shaft Strip, Removing and Installing
Special tools and workshop equipment required
- Wedge Set -T10383-
- Wedge 1 -T10383/1-
Removing
- Move the door window into the "open" position.
- Remove the A-pillar trim. Refer to → Chapter "A-Pillar Trim, Removing and Installing".
- Using the -T10383/1-, carefully remove the window shaft strip -1- at the B-pillar trim -2- upward from the door flange -arrows-.
- Remove the window shaft strip.
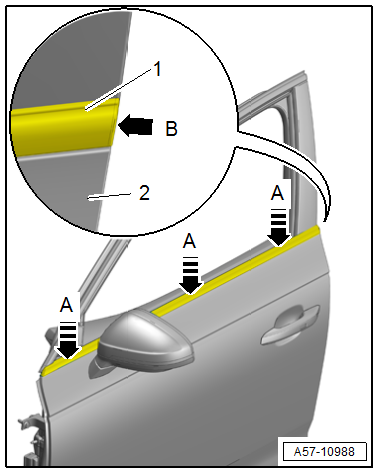
Installing
TIP
The lower edge of the window shaft strip can be coated with tire mounting paste for installation.
- Align the window shaft strip -1- flush to the door body -2--arrow B- and attach it on the door flange all the way to the A-pillar in the direction of -arrows A-.
Further installation is the reverse order of removal.
READ NEXT:
 Central Locking
Component Location Overview - Central Locking
1 -
Engine Hood Contact Switch -F266-
In the latch
Removing and installing. Refer to
→ Chapter "Engine Hood Contact Switch -F266-, Re
Door
Overview - Door
1 -
Door
Removing and installing. Refer to
→ Chapter "Door, Removing and Installing".
2 -
Bolt
33 Nm
3 -
Door Arrester
Removing and insta
SEE MORE:
Lap timer
Introduction
Applies to: vehicles with lap timer
You can record and evaluate lap times with the
lap timer. You can operate the lap timer using the
multifunction steering wheel.
Opening the lap timer
Select in the instrument cluster: Vehicle functions
tab > button > Lap times.
An additiona
Door
Overview - Door
1 -
Door
Removing and installing. Refer to
→ Chapter "Door, Removing and Installing".
2 -
Bolt
33 Nm
3 -
Door Arrester
Removing and installing. Refer to
→ Chapter "Door Arrester, Removing and Installing".
Installation position. R
