Audi A4: Door Handle, Removing and Installing
Removing
- Remove the door handle trim. Refer to → Chapter "Door Handle Trim, Removing and Installing".
- Equipped on some models: Remove the exterior door handle illumination bulb. Refer to → Electrical Equipment; Rep. Gr.94; Exterior Door Handle Lamps; Exterior Door Handle Illumination Bulb, Removing and Installing.
- If equipped, remove the front exterior door handle switch. Refer to → Electrical Equipment; Rep. Gr.94; Access/Start Authorization; Front Exterior Door Handle Switch, Removing and Installing.
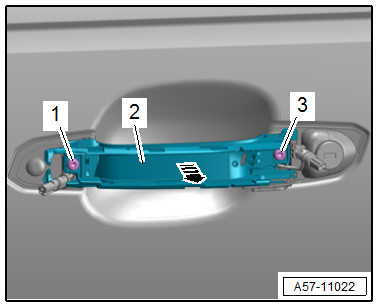
- Remove the bolts -1 and 3-.
- Remove the door handle -2- from the mounting bracket -arrow-.
Installing
Install in reverse order of removal.
Tightening Specifications
- Refer to → Chapter "Overview - Door Handle and Door Lock"
Door Handle Trim, Removing and Installing
Special tools and workshop equipment required
- Angled Screwdriver -VAS6543-
Removing
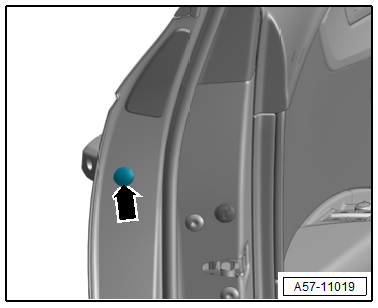
- Remove the cap -arrow-.
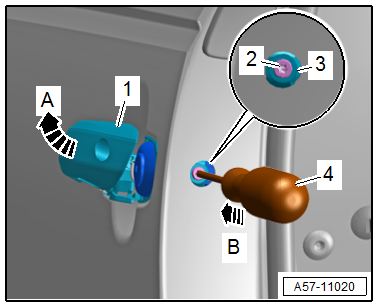
- Pull the door handle -1- all the way in the direction of -arrow A- and hold it.
- Remove the clamping screw -2- all the way using a screwdriver -4-.
- Push the retaining bracket -3- for the lock cylinder inward until it engages in the direction of -arrow B-.
- The door handle is now locked in the "open" position.
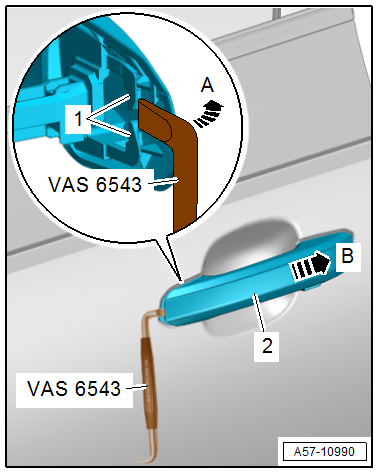
- Using the -VAS6543-, release the retainers -1- in the direction of -arrow A- and push the trim -2- in the direction of -arrow B- at the same time.
- Remove the door handle trim.
Installing
Install in reverse order of removal and note the following:
- Position the trim on the door handle and push it forward in the direction of travel until it engages audibly.
Tightening Specifications
- Refer to → Chapter "Overview - Door Handle and Door Lock"
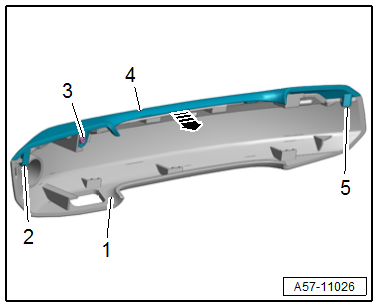
Door Handle Trim Molding, Removing and Installing
Removing
- Remove the door handle trim. Refer to → Chapter "Door Handle Trim, Removing and Installing".
- Remove the bolt -3-.
- Release the retainers -2 and 5-.
- Remove the trim molding -4- from the door handle trim -1- in the direction of -arrow-.
Installing
Install in reverse order of removal.
Tightening Specifications
- Refer to → Chapter "Overview - Door Handle and Door Lock"
READ NEXT:
 Mounting Bracket, Removing and Installing
NOTICE
Risk of damaging the operating cable by deforming it.
- Never sharply bend or kink the operating cable.
Removing
- Move the door window into the "closed" position.
- Remo
Door Lock, Removing and Installing
NOTICE
Risk of damaging the operating cable by deforming it.
- Never sharply bend or kink the operating cable.
Removing
- Move the door window into the "closed" position.
- Remo
Window Guide, Removing and Installing
Removing
- Remove the door window. Refer to
→ Chapter "Front Door Window, Removing and Installing".
- Remove the B-pillar trim. Refer to
→ Chapter "B-Pillar Door Trim, Removi
SEE MORE:
Quick-Release Connections on Refrigerant Lines
WARNING
The quick-release coupling connectors may be
unlocked and opened only if the refrigerant circuit is
empty.
Note
This illustration shows the quick-coupling connection with a
refrigerant pipe with an inner heat exchanger that is installed
in the Audi A4 from MY 2008 and
Peripheral Camera, Calibrating
Calibration System -VAS721001-, Installing and Aligning
After performing service work on the vehicle, it may be
necessary to calibrate the peripheral camera system. In detail,
this is the case after:
Replacing one or more cameras
Peripheral Camera Control Module -J928- replacement
Flash the so
