Audi A4: Wheel Bearing Unit, Servicing
 Note
Note
The wheel bearing and wheel hub are currently only delivered together. As soon as these components are delivered separately, the following instructions will apply.
Special tools and workshop equipment required
- Press Plate -VW401-
- Press Plate -VW402-
- Press Piece - Multiple Use -VW412-
- Hydraulic Press - Bushing Assembly Tool Kit -T10230-
- Hydraulic Press - Bushing Assembly Tool Kit - Sleeve -T10230/3-
- Hydraulic Press - Bushing Assembly Tool Kit - Thrust Piece -T10230/8-
- Pneumatic Hydraulic Press -VAS6654-
- Puller Set VAS701 003 -VAS701003-
- Puller Set - Threaded Spindle -VAS701003/2-
- Puller Set - Clamping Sleeve -VAS701003/1-
- Puller Set - Clamping Handle -VAS701003/4-
- Puller Set - Special Ring Spanner AF36 -VAS701003/5-
- Puller Set - Clamping Pliers, Diameter 66-70 mm -VAS701003/7-
Procedure
- Wheel bearing unit is removed. Refer to → Chapter "Wheel Bearing Unit, Removing and Installing".
Wheel Hub, Removing from Wheel Bearing
- Arrange the special tools as shown.
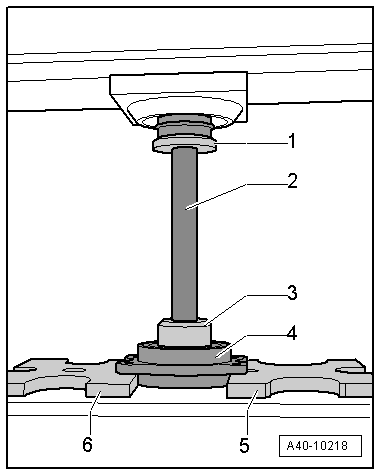
1 - -VW412-
2 - -T10230/3-
3 - -T10230/8-
4 - Wheel Bearing Unit
5 - -VW402-
6 - -VW401-
- Press the wheel hub out of the wheel bearing.
Bearing Inner Race, Removing from Wheel Hub
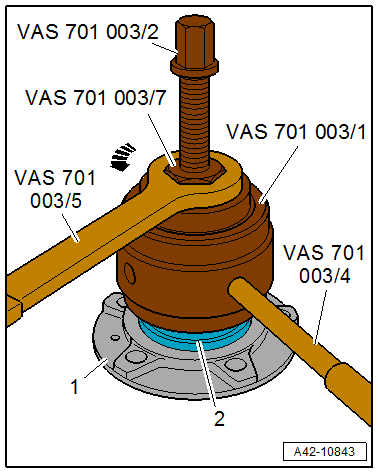
- Prepare the puller from the -VAS701003- as follows:
- Install the -VAS701003/1- on the -VAS701003/7-.
- Install the -VAS701003/2- in the adapter sleeve and attach the -VAS701003/3-.
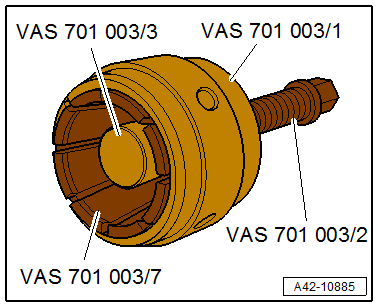
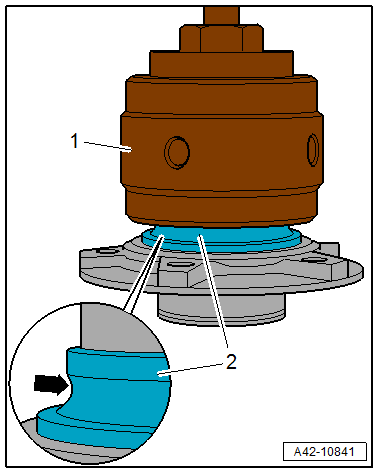
Bearing Inner Race Version 1
- Remove the ball-cage assembly from the bearing inner race -2-.
- Place the puller -1- as shown on the ball bearing race -arrow- of the bearing inner race.
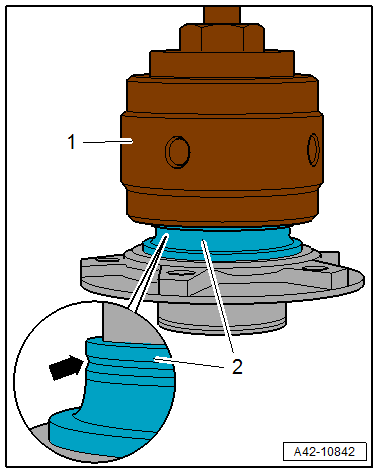
Bearing Inner Race Version 2
- Place the puller -1- on the groove -arrow- of the bearing inner race -2-.
Continuation for All Versions
- Clamp the puller on the bearing inner race -2- by turning the -VAS701003/7- with the -VAS701003/5- in the direction of the -arrow- and counterhold the -VAS701003/1- with the -VAS701003/4-.
- Remove the bearing inner race with the - VAS701003/2- from the wheel hub -1-.
Wheel Hub, Pressing in Wheel Bearing
- Handling the wheel bearing. Refer to → Fig. "Wheel Bearing, Handling".
- Arrange the special tools as shown.
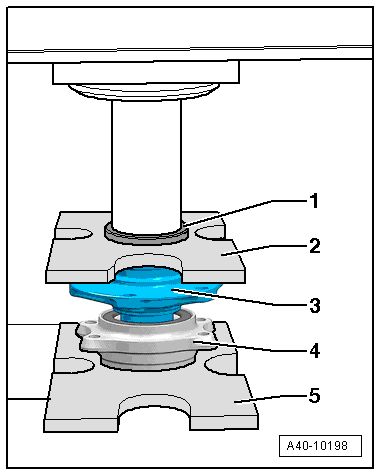
1 - -VW412-
2 - -VW402-
3 - Wheel Hub
4 - Wheel Bearing
5 - -VW401-
- The reworked surface of the wheel bearing outer race faces down.
 Caution
There is a risk of damaging or contaminating the wheel bearing.
When setting down or pressing in, make sure there is no dirt or contaminants between the -VW401- and the wheel bearing.
- Press the wheel hub into the wheel bearing.

