Audi A4: Window Regulator, Removing and Installing
Removing
- Remove the door window. Refer to → Chapter "Front Door Window, Removing and Installing".
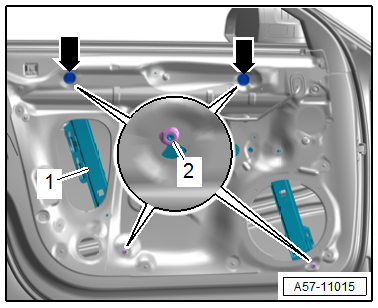
- Release the retainers -1 and 3- on the window regulator threaded pins -2- using an 11 mm socket. To do so, slide the socket onto the threaded pin.
- Unclip the window regulator cable guide.

- Remove the plugs -arrows-.
- Loosen the upper nuts -2- only three turns, and remove the lower nuts.
- Remove the window regulator -1- forward from the speaker opening.
Installing
Install in reverse order of removal and note the following:
- The clips for the window regulator threaded pins must engage audibly in the inner door panel.
- The window regulator cable guide must be clipped into the clip.
Tightening Specifications
- Refer to → Chapter "Overview - Window Regulator"
Window Regulator Motor, Removing and Installing
Removing
TIP
The window regulator motor can be removed or installed with the motor or door window in any position.
- Remove the front door trim panel. Refer to → Body Interior; Rep. Gr.70; Front Door Trim Panels; Front Door Trim Panel, Removing and Installing.
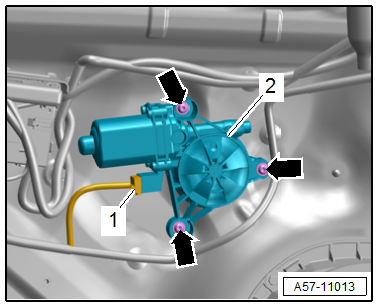
- Disconnect the connector -1-.
- Remove the bolts -arrows- and remove the window regulator motor -2- from the window regulator.
Installing
Further installation is performed in reverse order of removal, while noting the following:
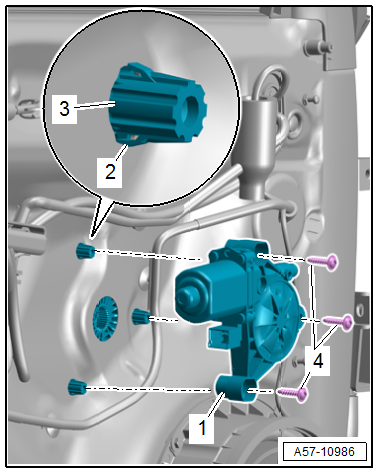
- The clips -2- for the window regulator threaded pins -3- must be engaged in the inner door panel.
- Slide the window regulator motor -1- onto the threaded pins and tighten the bolts -4-.
- Activate the one-touch up/down function for the power window regulators. Refer to the Owner's Manual.
Tightening Specifications
- Refer to → Chapter "Overview - Window Regulator"
READ NEXT:
 Door Handle, Removing and Installing
Removing
- Remove the door handle trim. Refer to
→ Chapter "Door Handle Trim, Removing and Installing".
- Equipped on some models: Remove the exterior door handle
illumination bulb.
Mounting Bracket, Removing and Installing
NOTICE
Risk of damaging the operating cable by deforming it.
- Never sharply bend or kink the operating cable.
Removing
- Move the door window into the "closed" position.
- Remo
Door Lock, Removing and Installing
NOTICE
Risk of damaging the operating cable by deforming it.
- Never sharply bend or kink the operating cable.
Removing
- Move the door window into the "closed" position.
- Remo
SEE MORE:
Seals
Component Location Overview - Gaskets
1 - Input Shaft Seal
Replacing. Refer to
→ Servicing - 7-Speed Dual Clutch Transmission 0CJ, 0CK, 0CL; Rep.
Gr.39; Seals; Input Shaft Seal, Replacing.
2 - Transmission
3 - Left Flange Shaft Seal
Replacing. R
Overview - Sound System
The following systems are offered:
8RM - Basic sound system.
9VD - Standard sound system.
9VS - Premium sound system, Bang & Olufsen.
8RM - Basic Sound System
One speaker in the left and right front doors
One speaker on the left and right side of the instrument
panel
Two
