Audi A4: Emergency Module Antenna, Removing and Installing
Emergency Module Antenna -R263-, Removing and Installing, Vehicles without Tinted Glass
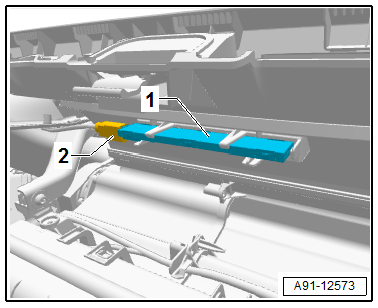
The Emergency Module Antenna -R263- is located in the front center instrument panel (only IW3)
Removing
- Turn off the ignition and all electrical equipment and remove the ignition key.
- Remove the instrument panel. Refer to → Body Interior; Rep. Gr.70; Instrument Panel; Overview - Instrument Panel.
- Disconnect the connector -2-.
- Remove the Emergency Module Antenna -R263--1- from the mount.
Installing
- Installation is identical in reverse order of removal.
Emergency Module Antenna -R263-, Removing and Installing, Vehicles with Tinted Glass, Sedan
The Emergency Module Antenna -R263- is located in the center of the rear shelf (only IW3).
Removing
- Turn off the ignition and all electrical equipment and remove the ignition key.
- Remove the rear shelf. Refer to → Body Interior; Rep. Gr.70; Vehicle Interior Trim Panels; Rear Shelf, Removing and Installing.
- Disconnect the connector.
- Unclip the Emergency Module Antenna -R263- from the mount.
Installing
- Installation is identical in reverse order of removal.
Emergency Module Antenna -R263-, Removing and Installing, Vehicles with Tinted Glass, Avant
The Emergency Module Antenna -R263- is located on the left rear seat belt guide (only IW3).
Removing
- Turn off the ignition and all electrical equipment and remove the ignition key.
- Remove the luggage compartment left trim panel. Refer to → Body Interior; Rep. Gr.70; Luggage Compartment Trim Panels; Luggage Compartment Side Trim Panel, Removing and Installing.
- Disconnect the connector.
- Unclip the Emergency Module Antenna -R263- from the mount.
Installing
- Installation is identical in reverse order of removal.
Roof Antenna, Removing and Installing
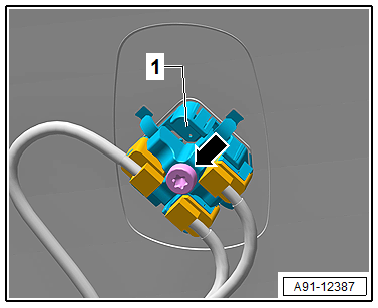
The Roof Antenna -R216- has up to three connectors.
The antenna wires are connected directly to the base of the Roof Antenna -R216-.
The headliner must be removed in order to remove the Roof Antenna -R216-. For the avant the rear headliner is lowered.
Removing
- Turn off the ignition and all electrical equipment and remove the ignition key.
- Remove/lower the headliner. Refer to → Body Interior; Rep. Gr.70; Roof Trim Panels; Headliner, Removing and Installing.
- Release and disconnect the connectors from the antenna wires.
- Loosen the bolt -arrow-.
- Remove the Roof Antenna -R216--1- upward from the roof.
Installing
- Install in reverse order of removal. Note the following:
- Place the Roof Antenna -R216- on the roof and press down on it until it engages.
Tightening Specifications
- Refer to → Chapter "Component Location Overview - Antenna Systems, Sedan, USA"
- Refer to → Chapter "Component Location Overview - Antenna Systems, Avant, USA"
- Refer to → Chapter "Component Location Overview - Antenna Systems, Sedan, Europe and Rest of World"
- Refer to → Chapter "Component Location Overview - Antenna Systems, Avant, Europe and Rest of World"
Bumper Antennas, Removing and Installing
The LTE Antenna 1 -R297- is located on the lower left of the rear bumper cover on the body.
On the right rear bumper the Telephone Antenna -R65- is on the 9ZE/EL3/ER1 and on the 9ZE/EL3/ER3 the LTE Antenna 2 -R306-.
Removing
- Turn off the ignition and all electrical equipment and remove the ignition key.
- Remove the rear bumper cover. Refer to → Body Exterior; Rep. Gr.63; Rear Bumper; Bumper Cover, Removing and Installing.
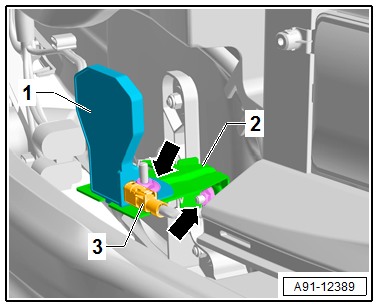
Telephone Antenna -R65-/LTE Antenna 2 -R306- on the rear bumper on the right side
- Release and disconnect the connector -3- for the Telephone Antenna -R65-/LTE Antenna 2 -R306--1-.
- Remove the nut -arrow- for the Telephone Antenna -R65-/LTE Antenna 2 -R306--1-.
- Remove the Telephone Antenna -R65-/LTE Antenna 2 -R306--1- from the bracket -2-.
- Remove the nuts -arrow- for the bracket -2-.
- Remove the bracket -2- from the body.
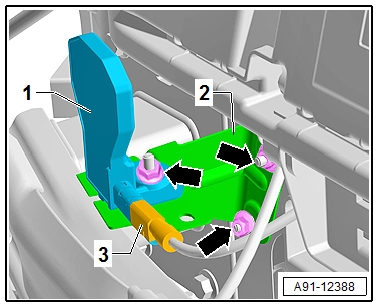
LTE Antenna 1 -R297- on the rear bumper on the left side.
- Release and disconnect the connector -3- for the LTE Antenna 1 -R297--1-.
- Remove the nut -arrow- for the LTE Antenna 1 -R297--1-.
- Remove the LTE Antenna 1 -R297--1- from the bracket -2-.
- Remove the nuts -arrows- for the bracket -2-.
- Remove the bracket -2- from the body.
Installing
- Install in reverse order of removal. Note the following:
Tightening Specifications
- Refer to → Chapter "Component Location Overview - Antenna Systems, Sedan, USA"
- Refer to → Chapter "Component Location Overview - Antenna Systems, Avant, USA"
- Refer to → Chapter "Component Location Overview - Antenna Systems, Sedan, Europe and Rest of World"
- Refer to → Chapter "Component Location Overview - Antenna Systems, Avant, Europe and Rest of World"
READ NEXT:
 Overview - Telephone
Overview - Telephone, Bluetooth Hands-Free
Calling, 9ZX
The Information Electronics Control Module 1 -J794- is
installed with the Microphone Unit In Front Roof Module -R164-
and is exclusively for
Component Location Overview - Telephone System
1 - Center Console Storage Compartment
Removing and installing. Refer to
→ Body Interior; Rep. Gr.68; Center Console; Overview - Center Console.
2 - Telephone
SEE MORE:
Safety belts
General information
Each seat is equipped with a three-point safety
belt. Safety belts that are worn correctly are the
most effective way to reduce the risk of serious or
fatal injuries in a collision. Therefore, wear your
safety belt correctly and make sure that all vehicle
passengers are also wear
General Information
Vehicles with a High Voltage System (Hybrid Vehicles)
Extremely Dangerous Due to High-Voltage
The high-voltage system is under high-voltage. Death or serious
bodily injury by electric shock.
- Individuals with electronic/medical life- and health sustaining
machines in or on their person canno
