Audi A4: Footrest, Removing and Installing
Removing
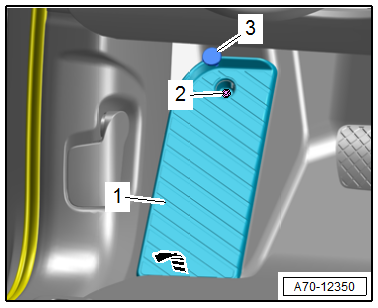
- Pry off the cap -3- with a small screwdriver.
- Remove the bolt -2- underneath.
- Pull the footrest -1- downward in the direction of -arrow- and remove it.
Installing
Install in reverse order of removal.
Installation instructions: For example tightening specifications, replacing components. Refer to → Chapter "Overview - Footrest and Carpet".
Carpet, Removing and Installing
 Note
Note
- As an original part, the left and right front carpets are delivered with connecting pieces in the center.
- Separate the left and right front carpets at the perforation to install.
Removing
- Remove the front seats. Refer to → Chapter "Front Seat, Removing and Installing".
- Remove the center console. Refer to → Chapter "Center Console, Removing and Installing".
- Remove the center console bracket. Refer to → Chapter "Center Console Bracket, Removing and Installing".
- Remove the footrest. Refer to → Chapter "Footrest, Removing and Installing".
- Remove the bench seat / single seats. Refer to → Chapter "Bench Seat/Single Seat, Removing and Installing".
- Remove the front and rear sill panels. Refer to → Chapter "Sill Panel, Removing and Installing".
- Remove the B-pillar lower trim panels. Refer to → Chapter "B-Pillar Lower Trim Panel, Removing and Installing".
- Remove the floor mats.
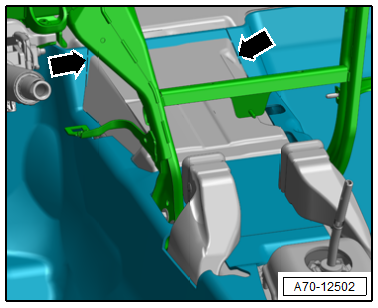
- If required, separate and free up the front carpet on the left and right sides of the center tunnel near the instrument panel central tube at the perforation -arrows-.
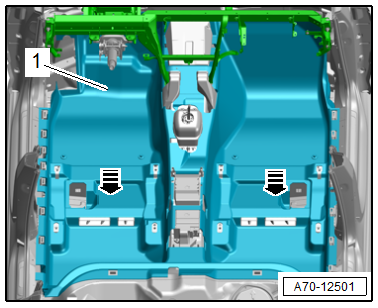
- Lift the rear carpet -1- and pull it toward the rear in the direction of -arrows-.
- Fold and remove the carpet in the center.
Note
Make sure the floor covering does not tear at the openings.
Installing
- For an original part, separate the front carpet at the perforation before installing it.
- Fold the floor covering and lay it in the vehicle.
- Push floor covering forward and align it so that the openings align.
Further installation is the reverse order of removal.
Installation instructions: For example tightening specifications, replacing components. Refer to → Chapter "Overview - Footrest and Carpet".
Rear Shelf, Removing and Installing
Special tools and workshop equipment required
- Pry Lever -80-200-
- Omega Clip Tool -T40280-
Removing
- Fold the rear seat backrest forward.
With Fixed Rear Bench Seat Backrest
- Remove the rear seat backrest. Refer to → Chapter "Rear Seat Backrest, Removing and Installing, Fixed Rear Seat Backrest".
- Remove the rear seat belt guide in the rear shelf. Refer to → Chapter "Rear Seat Belt Guide in Rear Shelf, Removing and Installing".
- Remove the center rear belt end fitting. Refer to → Chapter "Rear Seat Belt Latch, Removing and Installing".
Vehicles with A Sound System
- Remove the speaker trim on the left side on the rear shelf. Refer to → Chapter "Speaker Trim, Removing and Installing".
- Remove the bolts -1 and 2-.
Continued for All Versions
- Remove the D-pillar trim panels. Refer to → Chapter "D-Pillar Trim Panel, Removing and Installing, Sedan".
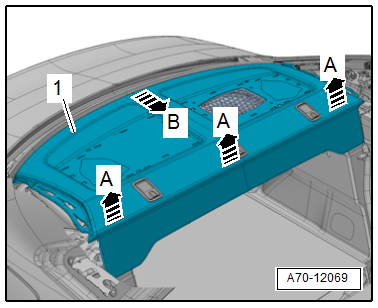
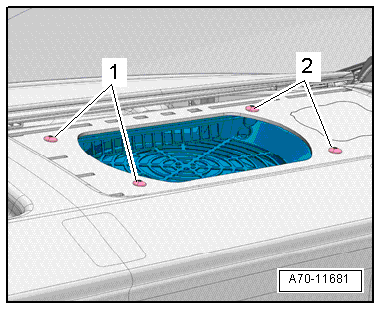
- Unclip rear shelf -1- at the front using the -80-200- in the direction of -arrows A-.
- Pull the rear shelf forward out of its mount in the rear window frame -arrow B- and remove.
Installing
Install in reverse order of removal and note the following:
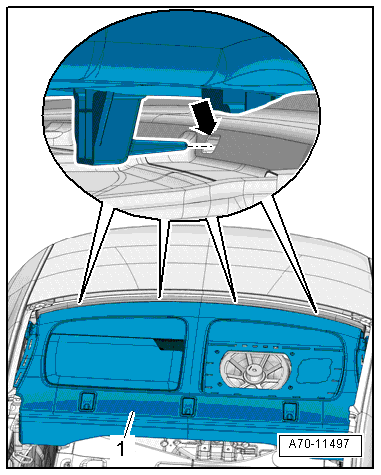
- Insert the rear shelf -1- into the rear window frame and press on it until it engages audibly.
- The pins on the rear shelf must catch on the holding mounts and remain in place -arrow- on the rear window frame.
Installation instructions: For example tightening specifications, replacing components. Refer to → Chapter "Overview - Rear Shelf".
Speaker Trim, Removing and Installing
Special tools and workshop equipment required
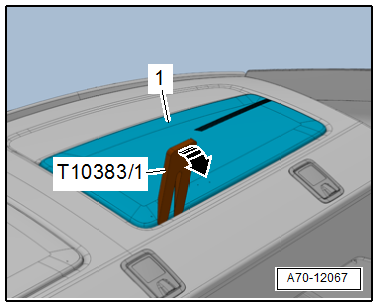
- Wedge Set -T10383-
- Wedge Set - Wedge 1 -T10383/1-
Removing
- Versions with folding rear seat backrest: fold the rear seat backrest forward.
 Caution
There is a risk of damaging the speaker trim.
Proceed very carefully when removing and installing.
- Carefully unclip the speaker trim -1- from the rear shelf in the direction of -arrow- along the seam using the -T10383/1-
- Disengage the remaining tabs for the speaker trim along the seam.
- Vehicles equipped with a speaker: Disconnect the electrical connector and remove the speaker trim in a forward direction.
Installing
Install in reverse order of removal.
Installation instructions: For example tightening specifications, replacing components. Refer to → Chapter "Overview - Rear Shelf".
READ NEXT:
 Luggage Compartment Trim Panels
Component Location Overview - Luggage Compartment Trim Panels
Component Location Overview - Luggage Compartment Trim Panels, Sedan
1 - Lock Carrier Trim
Overview. Refer to
→ Chapt
Rear Lid Lower Trim Panel, Removing and Installing
Lower Rear Lid Trim Panel, Removing and Installing, Sedan
Special tools and workshop equipment required
Pry Lever -80-200-
Trim Removal Wedge -3409-
Removal Wedge -T40233-
Omega Clip Tool -T40280
Luggage Compartment Side Trim Panel, Removing and Installing
Luggage Compartment Side Trim Panel, Removing and Installing, Sedan
Special tools and workshop equipment required
Trim Removal Wedge -3409-
Pliers -T40172C-
Omega Clip Tool -T40280-
Removing
-&nb
SEE MORE:
Transmission Control
Component Location Overview - Transmission Control
1 - DSG Transmission Mechatronic -J743-
Removing and installing. Refer to
→ Chapter "Mechatronic, Removing and Installing".
2 - Transmission Fluid Temperature Sensor -G93-
3 - Temperature Sensor In Control M
Rear Bumper
Overview - Rear Bumper Cover, Standard Equipment
Overview - Bumper Cover
1 -
Bumper Cover Lower Section
There are different versions. Refer to the Parts Catalog.
Removing and installing. Refer to
→ Chapter "Bumper Cover Lower Section, Removing and Installing".
2 -
Re
