Audi A4: Luggage Compartment Trim Panels
Component Location Overview - Luggage Compartment Trim Panels
Component Location Overview - Luggage Compartment Trim Panels, Sedan
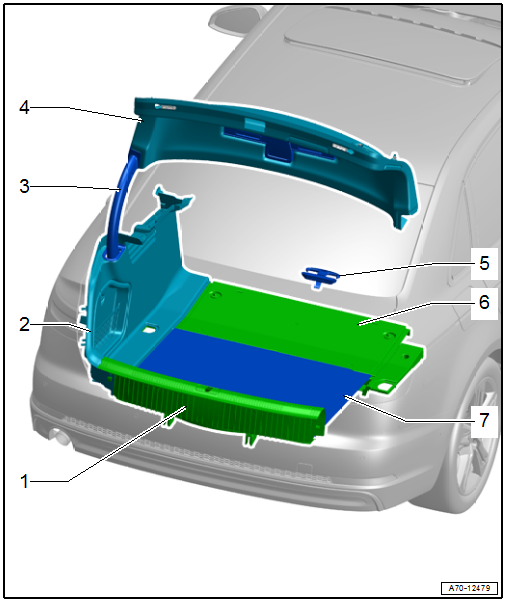
1 - Lock Carrier Trim
- Overview. Refer to → Chapter "Overview - Luggage Compartment Side Trim Panel, Sedan".
2 - Luggage Compartment Side Trim Panel
- Overview. Refer to → Chapter "Overview - Luggage Compartment Side Trim Panel, Sedan".
3 - Rear Lid Hinge Trim Panel
- Overview. Refer to → Chapter "Overview - Lower Rear Lid Trim Panel, Sedan".
4 - Rear Lid Lower Trim Panel
- Overview. Refer to → Chapter "Overview - Lower Rear Lid Trim Panel, Sedan".
5 - Bag Hooks
- Overview. Refer to → Chapter "Overview - Luggage Compartment Side Trim Panel, Sedan".
6 - Rear Panel Sill Frame
- Overview. Refer to → Chapter "Overview - Luggage Compartment Floor".
7 - Luggage Compartment Floor
- Overview. Refer to → Chapter "Overview - Luggage Compartment Floor".
Component Location Overview - Luggage Compartment Trim Panel, Avant
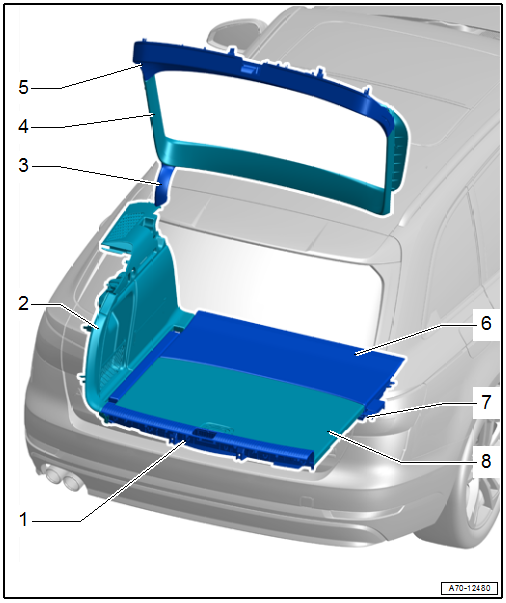
1 - Lock Carrier Trim
- Overview. Refer to → Chapter "Overview - Luggage Compartment Side Trim Panel, Avant".
2 - Luggage Compartment Side Trim Panel
- Overview. Refer to → Chapter "Overview - Luggage Compartment Side Trim Panel, Avant".
3 - Rear Lid Hinge Trim Panel
- Clip onto the rear lid hinge
4 - Rear Lid Upper Trim Panel
- Overview. Refer to → Chapter "Overview - Rear Lid Trim Panel, Avant".
5 - Rear Lid Lower Trim Panel
- Overview. Refer to → Chapter "Overview - Rear Lid Trim Panel, Avant".
6 - Front Luggage Compartment Floor
- Overview. Refer to → Chapter "Overview - Luggage Compartment Floor".
7 - Luggage Compartment Floor Support
- Overview. Refer to → Chapter "Overview - Luggage Compartment Side Trim Panel, Avant".
8 - Rear Luggage Compartment Floor
- Overview. Refer to → Chapter "Overview - Luggage Compartment Floor".
Overview - Luggage Compartment Side Trim Panel
Overview - Luggage Compartment Side Trim Panel, Sedan
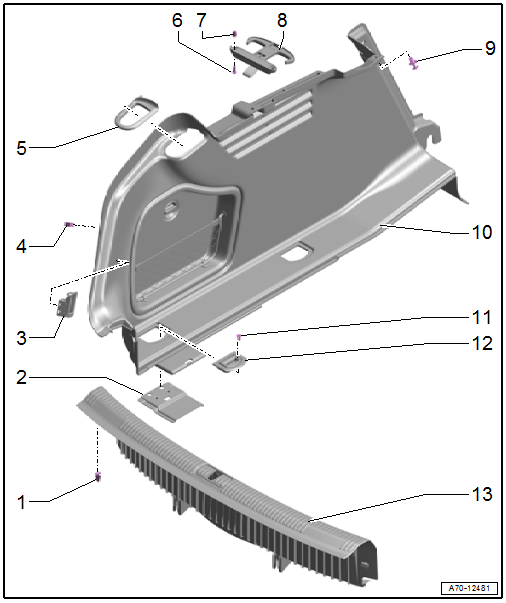
1 - Clip
- Quantity: 4
- Insert in the trim panel
- Remove any remaining clips from the mounting point using the Omega Clip Tool -T40280- and use them to install the trim.
- Replace damaged or deformed clips
2 - Tie Down Bracket
- Removing and installing. Refer to → Chapter "Luggage Compartment Side Trim Panel, Removing and Installing, Sedan".
3 - Trailer Hitch Button Trim
- Equipped on some models
- Removing and installing. Refer to → Electrical Equipment; Rep. Gr.96; Controls; Component Location Overview - Luggage Compartment Controls.
4 - Clip
- Quantity: 2
- Insert in the trim panel
- Remove any remaining clips from the mounting point using the Omega Clip Tool -T40280- and use them to install the trim.
- Replace damaged or deformed clips
5 - Lid Hinge Frame
- Removing and installing. Refer to → Chapter "Luggage Compartment Side Trim Panel, Removing and Installing, Sedan".
- Engage in the trim panel and press on it until it engages audibly
6 - Bolt
- 1.8 Nm
- Quantity: 2
7 - Expanding Nut
- Quantity: 2
- Clipped in the rear shelf
8 - Bag Hooks
- Removing and installing. Refer to → Chapter "Bag Hook, Removing and Installing".
9 - Expanding Clip
- Quantity: 2
- Remove using the Pliers -T40172C-
10 - Luggage Compartment Side Trim Panel
- Removing and installing. Refer to → Chapter "Luggage Compartment Side Trim Panel, Removing and Installing, Sedan".
- Press on until it engages audibly
- Stretch the rear lid seal lip
11 - Bolt
- 9 Nm
- Quantity: 2
12 - Tie Down
- Quantity: 2
- Removing and installing. Refer to → Chapter "Tie Down, Removing and Installing".
13 - Lock Carrier Trim
- Removing and installing. Refer to → Chapter "Lock Carrier Trim Panel, Removing and Installing".
- Must grip into the pins
- Press on until it engages audibly
- Stretch the rear lid seal lip
Overview - Luggage Compartment Side Trim Panel, Avant

1 - Lock Carrier Trim
- Removing and installing. Refer to → Chapter "Lock Carrier Trim Panel, Removing and Installing".
- Must grip into the pins
- Press on until it engages audibly
- Stretch the rear lid seal lip
2 - Clip
- Quantity: 4
- Insert in the trim panel
- Remove any remaining clips from the mounting point using the Omega Clip Tool -T40280- and use them to install the trim.
- Replace damaged or deformed clips
3 - Tie Down Bracket
- Removing and installing. Refer to → Chapter "Luggage Compartment Support, Removing and Installing".
4 - Bolt
- 9 Nm
- Quantity: 2
5 - Trailer Hitch Button Trim
- Equipped on some models
- Removing and installing. Refer to → Electrical Equipment; Rep. Gr.96; Controls; Component Location Overview - Luggage Compartment Controls.
6 - Clip
- Quantity: 2
- Insert in the trim panel
- Remove any remaining clips from the mounting point using the Omega Clip Tool -T40280- and use them to install the trim.
- Replace damaged or deformed clips
7 - Bracket
- Removing and installing. Refer to → Chapter "Luggage Compartment Side Trim Panel, Removing and Installing, Avant".
8 - Bolt
- 4 Nm
9 - Bolt
- 4 Nm
10 - Bag Hooks
- Removing and installing. Refer to → Chapter "Bag Hook, Removing and Installing".
11 - Bolt
- 1.5 Nm
12 - Rubber Grommet
- For the screen separator bracket
- Slide over the bracket and insert into the trim panel
13 - Luggage Compartment Side Trim Panel
- Removing and installing. Refer to → Chapter "Luggage Compartment Side Trim Panel, Removing and Installing, Avant".
- Press on until it engages audibly
- Stretch the rear lid seal lip
14 - Bolt
- 20 Nm
15 - Tie Down
- Quantity: 2
- Removing and installing. Refer to → Chapter "Tie Down, Removing and Installing".
16 - Luggage Compartment Floor Support
- Removing and installing. Refer to → Chapter "Luggage Compartment Support, Removing and Installing".
17 - Tie Down Bracket
- Removing and installing. Refer to → Chapter "Luggage Compartment Support, Removing and Installing".
18 - Bolt
- 55 Nm
19 - Service Cover
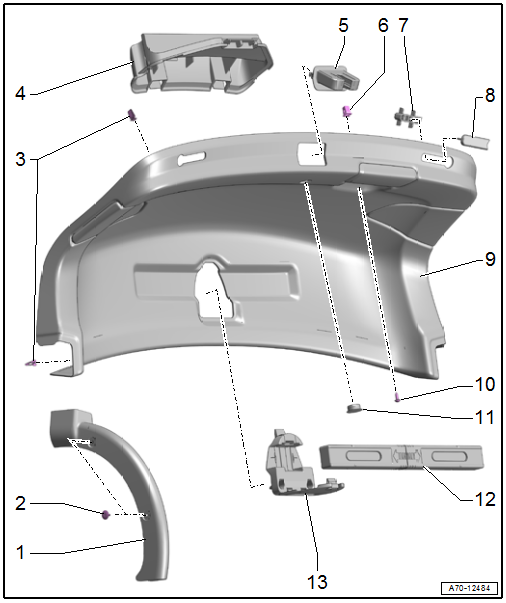
Overview - Luggage Compartment Floor
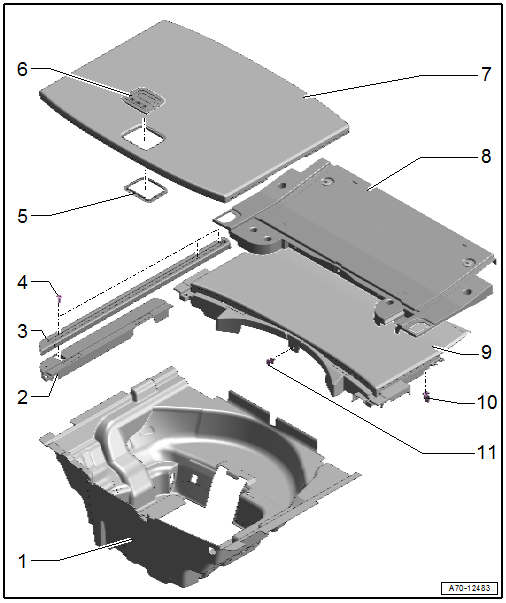
1 - Spare Tire Well Trim, Avant
- Removing and installing. Refer to → Chapter "Spare Wheel Well Trim, Removing and Installing".
2 - Luggage Compartment Floor Support, Avant
- Removing and installing. Refer to → Chapter "Luggage Compartment Support, Removing and Installing".
3 - Rail, Avant
- Equipped on some models
- Removing and installing. Refer to → Chapter "Rail, Removing and Installing".
4 - Bolt
- 12 Nm
- Quantity: 3
5 - Frame
- For the luggage compartment floor panel handle
- Can be pressed down in one position on luggage compartment floor handle.
- Press on until it engages audibly
6 - Handle
- For the luggage compartment floor
- Removing and installing. Refer to → Chapter "Rear Luggage Compartment Floor Handle, Removing and Installing".
7 - Rear Luggage Compartment Floor
8 - Rear Panel Sill Frame, Sedan
- Removing and installing. Refer to → Chapter "Rear Panel Sill Frame, Removing and Installing".
9 - Front Luggage Compartment Floor, Avant
- Removing and installing. Refer to → Chapter "Luggage Compartment Floor, Removing and Installing".
10 - Clip
- Quantity: 2
- Insert into the luggage compartment floor/rear panel sill frame
- Remove any remaining clips in the body mounting points using the Omega Clip Tool -T40280-. To install, insert into the trim panel.
- Replace damaged or deformed clips
11 - Expanding Clip
- Avant quantity: 1; Sedan quantity: 3
- Remove using the Pliers -T40172C-
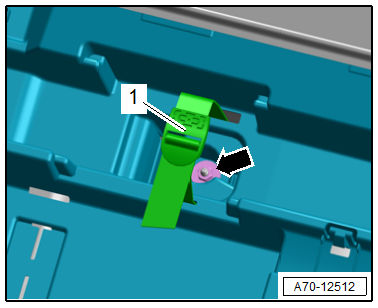
Tightening Specification - Vehicle Jack Retaining Strap
- Tighten the nut -arrow- to 2 Nm.
Overview - Rear Lid Lower Trim Panel
Overview - Lower Rear Lid Trim Panel, Sedan
1 - Rear Lid Hinge Trim Panel
- Quantity: 2
- Removing and installing. Refer to → Chapter "Lower Rear Lid Trim Panel, Removing and Installing, Sedan".
2 - Expanding Clip
- Quantity: 4
3 - Clip
- Quantity: 10
- Insert in the trim panel
- Remove any remaining clips in the rear lid mounting points using the Omega Clip Tool -T40280-. To install, insert into the trim panel.
- Replace damaged or deformed clips
4 - Anti-Theft Protection
- Clip into rear lid
- Removing and installing. Refer to → Chapter "Lower Rear Lid Trim Panel, Removing and Installing, Sedan".
5 - Rear Lid Latch Trim Panel
- Removing and installing. Refer to → Chapter "Lower Rear Lid Trim Panel, Removing and Installing, Sedan".
- Press on until it engages audibly
6 - Expanding Nut
- Clip into rear lid
7 - Stop Strip Bracket
- Quantity: 2
- Clip into rear lid
8 - Stop Strip
- Quantity: 2
- Removing and installing. Refer to → Chapter "Lower Rear Lid Trim Panel, Removing and Installing, Sedan".
- Clip to the bracket
9 - Rear Lid Trim Panel
- Removing and installing. Refer to → Chapter "Lower Rear Lid Trim Panel, Removing and Installing, Sedan".
- Press on until it engages audibly
10 - Bolt
- 2 Nm
11 - Emergency Release Cover
- Unclip using a screwdriver
- Clipped in the rear lid trim panel
12 - Warning Triangle
13 - Warning Triangle Bracket
- Insert in the rear lid and press on it until it engages audibly
Overview - Rear Lid Trim Panel, Avant
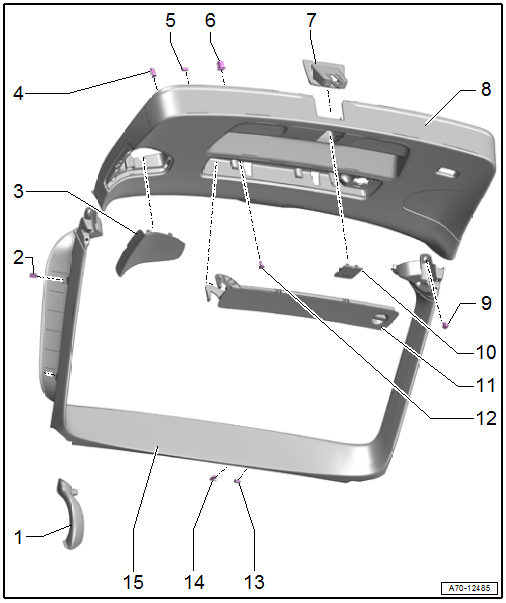
1 - Rear Lid Hinge Trim Panel
- Quantity: 2
- Clip onto the rear lid hinge
2 - Clip
- Quantity: 4
- Insert in the trim panel
- Remove any remaining clips in the rear lid mounting points using the Omega Clip Tool -T40280-. To install, insert into the trim panel.
- Replace damaged or deformed clips
3 - Tail Lamp Cover
- Quantity: 2
- Clipped in the rear lid trim panel
4 - Clip
- Quantity: 10
- Insert in the trim panel
- Remove any remaining clips in the rear lid mounting points using the Omega Clip Tool -T40280-. To install, insert into the trim panel.
- Replace damaged or deformed clips
5 - Rubber Buffer
- Quantity: 6
- Insert in the trim panel
6 - Expanding Nut
- Quantity: 2
- Clip into rear lid
7 - Rear Lid Latch Trim Panel
- Removing and installing. Refer to → Chapter "Lower Rear Lid Trim Panel, Removing and Installing, Avant".
- Press on until it engages audibly
8 - Rear Lid Lower Trim Panel
- Removing and installing. Refer to → Chapter "Lower Rear Lid Trim Panel, Removing and Installing, Avant".
- Press on until it engages audibly
9 - Bolt
- 2 Nm
- Quantity: 2
10 - Emergency Release Cover
- Unclip using the Trim Removal Wedge -3409-
- Clipped in the rear lid trim panel
11 - Emergency Triangle Cover
- Engaged in the rear lid trim panel
12 - Bolt
- 2 Nm
- Quantity: 2
13 - Rubber Buffer
- Quantity: 4
- Insert in the trim panel
14 - Clip
- Quantity: 4
- Insert in the trim panel
- Remove any remaining clips in the rear lid mounting points using the Omega Clip Tool -T40280-. To install, insert into the trim panel.
- Replace damaged or deformed clips
15 - Rear Lid Upper Trim Panel
- Removing and installing. Refer to → Chapter "Rear Lid Upper Trim Panel, Removing and Installing".
- Press on until it engages audibly
READ NEXT:
 Rear Lid Lower Trim Panel, Removing and Installing
Lower Rear Lid Trim Panel, Removing and Installing, Sedan
Special tools and workshop equipment required
Pry Lever -80-200-
Trim Removal Wedge -3409-
Removal Wedge -T40233-
Omega Clip Tool -T40280
Luggage Compartment Side Trim Panel, Removing and Installing
Luggage Compartment Side Trim Panel, Removing and Installing, Sedan
Special tools and workshop equipment required
Trim Removal Wedge -3409-
Pliers -T40172C-
Omega Clip Tool -T40280-
Removing
-&nb
Lock Carrier Trim Panel, Removing and Installing
Special tools and workshop equipment required
Omega Clip Tool -T40280-
Removing
- Remove the rear luggage compartment floor.
- Free up the lock carrier trim panel near the rear lid seal
-
SEE MORE:
Sunroof Frame, Removing and Installing
Sunroof Frame, Removing and Installing, Sedan
Caution
This procedure contains mandatory replaceable parts.
Refer to component overview and parts catalog prior to
starting procedure.
Mandatory Replacement Parts
Foam Seal - for Sunroof Frame
To complete the procedure, a second technician
Introduction
Depending on the vehicle equipment, various
parking aids will help you when parking and maneuvering.
Parking aid
The parking aid plus assists you while parking
using audio and visual signals to warn you about
objects detected in front of, behind, and next to*
the vehicle.
The rearview camera shows
