Audi A4: Lock Carrier Trim Panel, Removing and Installing
Special tools and workshop equipment required
- Omega Clip Tool -T40280-
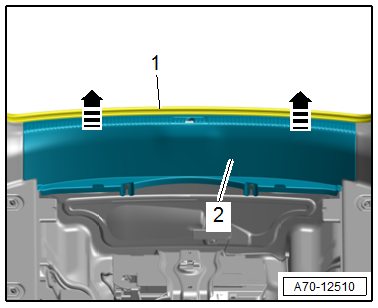
Removing
- Remove the rear luggage compartment floor.
- Free up the lock carrier trim panel near the rear lid seal -1-.
- Grip the trim panel -2- by hand and carefully pull vertically upward -arrows-.
Installing
Install in reverse order of removal.
Installation instructions: For example tightening specifications, replacing components. Refer to → Chapter "Overview - Luggage Compartment Side Trim Panel".
Rear Panel Sill Frame, Removing and Installing
Special tools and workshop equipment required
- Pliers -T40172C-
- Omega Clip Tool -T40280-
Removing
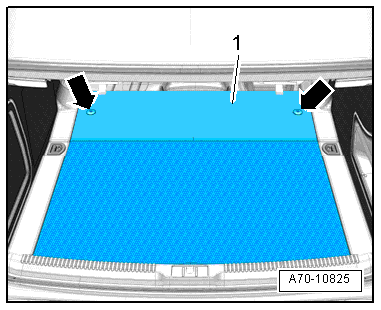
- Unclip the luggage compartment floor -1- from the front brackets -arrows- and remove.
- Remove the luggage compartment side trim panels. Refer to → Chapter "Luggage Compartment Side Trim Panel, Removing and Installing, Sedan".
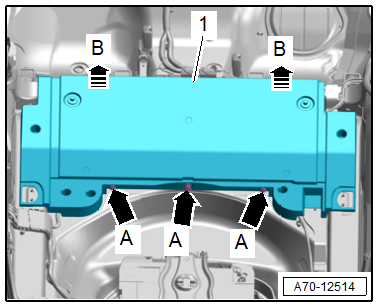
- Remove the expanding clips -arrows A- using the -T40172C-.
- Unclip the front of the rear panel sill frame -1- upward in the direction of -arrows B- and remove it.
Installing
Install in reverse order of removal.
Installation instructions: For example tightening specifications, replacing components. Refer to → Chapter "Overview - Luggage Compartment Floor".
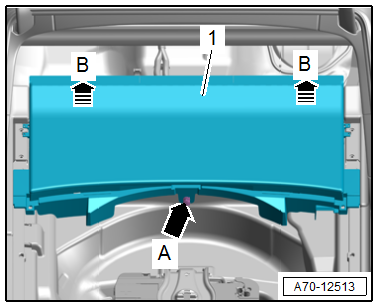
Luggage Compartment Floor, Removing and Installing
Special tools and workshop equipment required
- Pliers -T40172C-
- Omega Clip Tool -T40280-
Removing
- Remove the rear luggage compartment floor.
- Equipped on some models: Remove the rail. Refer to → Chapter "Rail, Removing and Installing".
- Remove the luggage compartment floor support. Refer to → Chapter "Luggage Compartment Support, Removing and Installing".
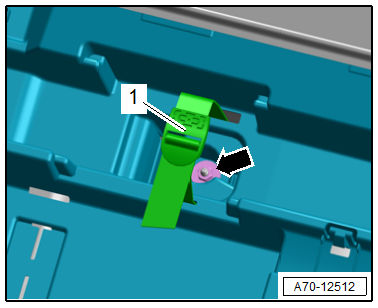
- Equipped on some models: Remove the vehicle jack and remove the nut -arrow- for the retaining strap -1-.
- Remove the expanding clip -arrow A- using the -T40172C-.
- Unclip the front of the luggage compartment floor -1- upward -B arrows- and remove it.
Installing
Install in reverse order of removal.
Installation instructions: For example tightening specifications, replacing components. Refer to → Chapter "Overview - Luggage Compartment Floor".
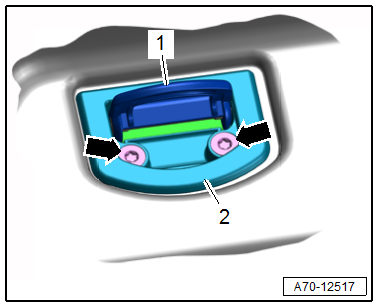
Tie Down, Removing and Installing
Removing, Sedan
- Fold up the bracket -1- all the way.
- Remove the screws -arrows- and remove the tie down -2-.
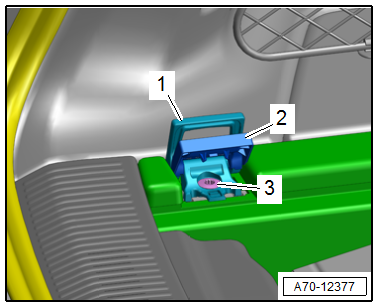
Removing, Avant
- Fold up the bracket -1- all the way.
- Unclip the cover -2- using a screwdriver and unfold all the way.
- Remove the bolt -3- and remove the tie down.
Installing
Install in reverse order of removal.
Installation instructions: For example tightening specifications, replacing components. Refer to → Chapter "Overview - Luggage Compartment Side Trim Panel".
READ NEXT:
 Bag Hook, Removing and Installing
Removing, Sedan
- Remove the bolts -arrows-, and
remove the hook -1-.
Removing, Avant
- Push the bag hook -1- into the bag
hook mount in the direction of -arrow A-.
- At the same tim
Roof Trim Panels
Overview - Headliner
Overview - Headliner, Sedan
1 - Headliner
Removing and installing. Refer to
→ Chapter "Headliner, Removing and Installing, Sedan".
2 - Clip
For v
Headliner, Removing and Installing
Headliner, Removing and Installing, Sedan
Special tools and workshop equipment required
Pry Lever -80-200-
Removal Wedge -T40233-
Omega Clip Tool -T40280-
Removing
WARNING
Risk of injury
SEE MORE:
Thorax Airbags
Overview - Front Thorax Airbag
1 - Front Thorax Airbag
With
Driver Thorax Airbag Igniter -N199-
Front Passenger Thorax Airbag Igniter -N200-
WARNING
Risk of injury due to involuntary deployment.
Pay attention to the safety precautions when working with
pyrotechnic compone
Brake fluid
Fig. 161 Motor compartment: cap on brake fluid reservoir
Observe the safety precautions General
information.
Checking the brake fluid level
The brake fluid reservoir is located under a cover
on the driver's side.
Park the vehicle on a level surface.
Lift the cover fig. 158 at both
openings and
