Audi A4: Roof Trim Panels
Overview - Headliner
Overview - Headliner, Sedan
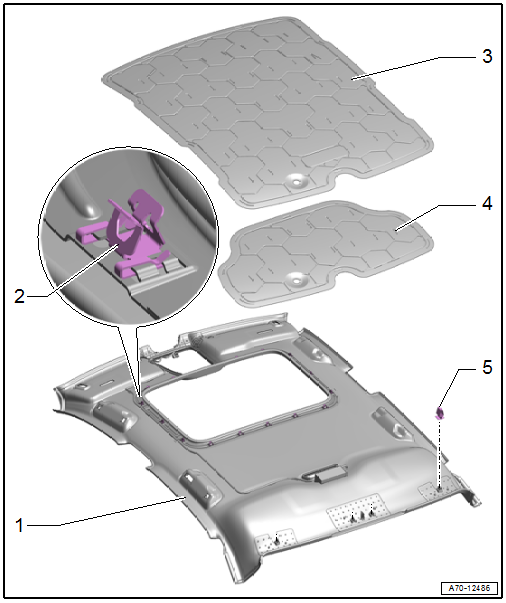
1 - Headliner
- Removing and installing. Refer to → Chapter "Headliner, Removing and Installing, Sedan".
2 - Clip
- For vehicles with sliding sunroof
- Quantity: 15
- Insert in the headliner
- Replace damaged or deformed clips
3 - Roof Reinforcement
- For vehicles without a sliding sunroof
- Install on the body. Refer to → Chapter "Roof Reinforcement, Attaching to Body, Sedan".
4 - Roof Reinforcement
- For vehicles with sliding sunroof
- Install on the body. Refer to → Chapter "Roof Reinforcement, Attaching to Body, Sedan".
5 - Clip
- Quantity: 4
- Insert in the headliner
- Remove any remaining clips in the body mounting points using the Omega Clip Tool -T40280-. To install, insert into the headliner.
- Replace damaged or deformed clips
Overview - Headliner, Avant
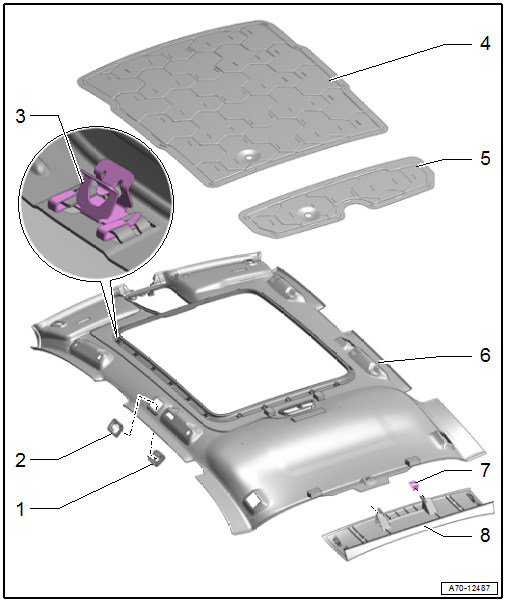
1 - Trim
- For the screen separator mounting eye
- Quantity: 4
- Clipped with the bracket in the headliner
2 - Bracket
- For the mounting eye trim
- Quantity: 4
- Clipped with the trim in the headliner
3 - Clip
- For vehicles with sliding sunroof
- Quantity 21
- Insert in the headliner
- Replace damaged or deformed clips
4 - Front Roof Reinforcement
- For vehicles without a sliding sunroof
- Install on the body. Refer to → Chapter "Roof Reinforcement, Attaching to Body, Avant".
5 - Rear Roof Reinforcement
- For vehicles with sliding sunroof
- Install on the body. Refer to → Chapter "Roof Reinforcement, Attaching to Body, Avant".
6 - Headliner
- Removing and installing. Refer to → Chapter "Headliner, Removing and Installing, Avant".
7 - Clip
- Quantity: 2
- Insert in the roof end strip
- Remove the clips that are still in the mounting points on the body using the Omega Clip Tool -T40280-.
- Replace damaged or deformed clips
8 - Roof End Strip
- Insert in the D-pillar trim panels and press on it until it audibly engages.
- Stretch the rear lid seal lip
- Removing and installing. Refer to → Chapter "Roof End Strip, Removing and Installing".
Roof End Strip, Removing and Installing
Special tools and workshop equipment required
- Trim Removal Wedge -3409-
- Omega Clip Tool -T40280-
Removing
- Free up the roof end strip near the rear lid seal -1-.
- Unclip the roof end strip -2- using the -3409- in the direction of -arrows-.
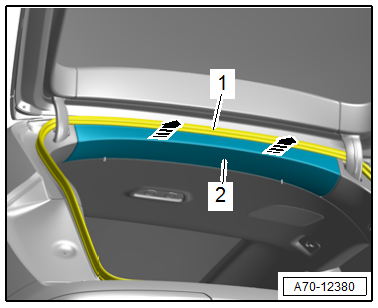
Installing
Install in reverse order of removal.
Installation instructions: For example tightening specifications, replacing components. Refer to → Chapter "Overview - Headliner, Avant".
READ NEXT:
 Headliner, Removing and Installing
Headliner, Removing and Installing, Sedan
Special tools and workshop equipment required
Pry Lever -80-200-
Removal Wedge -T40233-
Omega Clip Tool -T40280-
Removing
WARNING
Risk of injury
Roof Reinforcement, Attaching to Body
Roof Reinforcement, Attaching to Body, Sedan
Special tools and workshop equipment required
Assembly adhesive. Refer to the Parts Catalog.
Procedure
- Remove the headliner. Refer to
→ C
SEE MORE:
Battery Tester with Printer -VAS5097A-
WARNING
Risk of injury. Follow all warning messages and
safety precautions. Refer to
→ Chapter "Warnings and Safety Precautions".
It is not necessary to disconnect or remove the Battery -A-
when using the Battery Tester with Printer -VAS5097A-.
The following Batteries -A- can be t
General Information
Vehicles with a High Voltage System (Hybrid Vehicles)
Extremely Dangerous Due to High-Voltage
The high-voltage system is under high-voltage. Death or serious
bodily injury by electric shock.
- Individuals with electronic/medical life- and health sustaining
machines in or on their person canno
© 2019-2026 Copyright www.audia4b9.com
