Audi A4: Luggage Compartment Side Trim Panel, Removing and Installing
Luggage Compartment Side Trim Panel, Removing and Installing, Sedan
Special tools and workshop equipment required
- Trim Removal Wedge -3409-
- Pliers -T40172C-
- Omega Clip Tool -T40280-
Removing
- Remove the side cushion. Refer to → Chapter "Side Cushion, Removing and Installing".
- Equipped on some models: Remove the fixed rear seat backrest. Refer to → Chapter "Rear Seat Backrest, Removing and Installing, Fixed Rear Seat Backrest".
- Remove the luggage compartment lamp. Refer to → Electrical Equipment; Rep. Gr.96; Lamps; Component Location Overview - Luggage Compartment Lamps.
- If installed, remove the power pivoting trailer hitch button. Refer to → Electrical Equipment; Rep. Gr.96; Controls; Component Location Overview - Luggage Compartment Controls.
- Remove the rear luggage compartment floor.
- Remove the tie down. Refer to → Chapter "Tie Down, Removing and Installing".
- Remove the lock carrier trim panel. Refer to → Chapter "Lock Carrier Trim Panel, Removing and Installing".
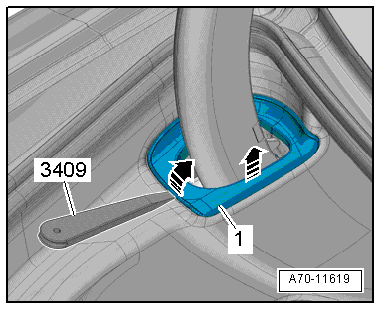
- Unclip the rear lid hinge frame -1- using the -3409- in the direction of -arrows-.
- Remove the frame from the luggage compartment side trim panel, open the locking element and disengage it from the rear lid hinge.
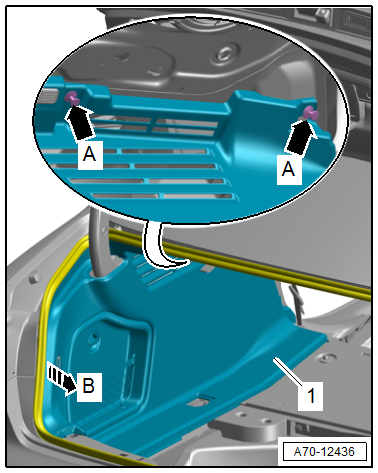
- Remove the expanding clips -arrows A- using the -T40172C-.
- Free up the luggage compartment side trim panel near the rear lid seal.
- Unclip the luggage compartment side trim panel -1- from the body in the direction of -arrow B-.
- Disengage the luggage compartment side trim panel from the rear lid hinge.
- Remove the luggage compartment side trim panel from the catch for the rear seat backrest.
Installing
Install in reverse order of removal.
Installation instructions: For example tightening specifications, replacing components. Refer to → Chapter "Overview - Luggage Compartment Side Trim Panel, Sedan".
Luggage Compartment Side Trim Panel, Removing and Installing, Avant
Special tools and workshop equipment required
- Omega Clip Tool -T40280-
Removing
- Equipped on some models: Remove the luggage compartment roll cover.
- Equipped on some models: Remove the screen separator.
- Remove the side cushion. Refer to → Chapter "Side Cushion, Removing and Installing".
- Remove the luggage compartment floor support. Refer to → Chapter "Luggage Compartment Support, Removing and Installing".
- Remove the luggage compartment lamp. Refer to → Electrical Equipment; Rep. Gr.96; Lamps; Component Location Overview - Luggage Compartment Lamps.
- Equipped on some models: Remove the power pivoting trailer hitch button. Refer to → Electrical Equipment; Rep. Gr.96; Controls; Component Location Overview - Luggage Compartment Controls.
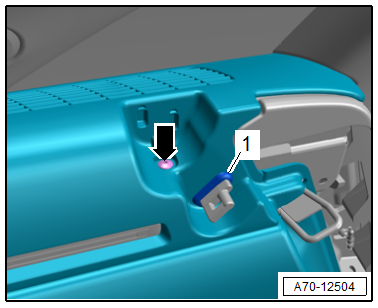
- Remove the bolt -arrow-.
- Remove the rubber grommet -1- on the screen separator bracket.
- Push the bag hook -1- into the bag hook mount in the direction of -arrow A-.
- At the same time, turn the bag hook all the way counter-clockwise in the direction of -arrow B- and remove it.
- Remove the bolt -2-.
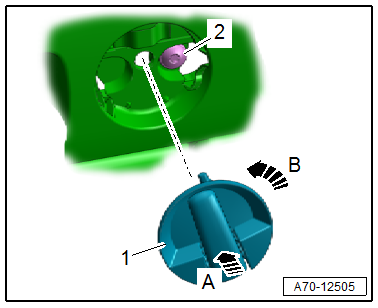
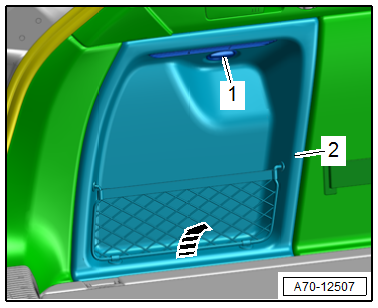
- Turn the quick release -1- 90º counter-clockwise and pivot the service cover inward.
- Disconnect the connector if equipped.
- Remove the service cover -2- upward from the luggage compartment side trim panel in the direction of -arrow-.
- Free up the luggage compartment side trim panel near the rear lid seal.
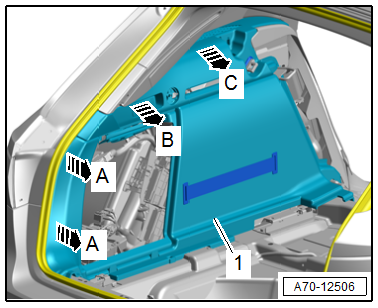
- Starting at the back, unclip the luggage compartment side trim panel -1- from the body and trim panels in the direction of -arrows A, B and C-.
- Disengage the luggage compartment side trim panel from the rear seat backrest catch.
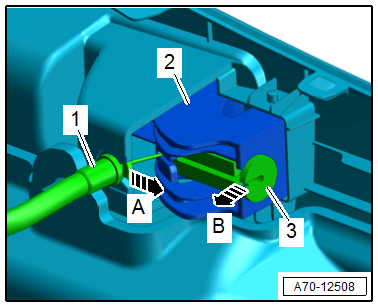
- Pull the luggage compartment side trim panel slightly inward and disengage the release cable for the backrest remote unlock.
- To do so, disengage the release cable support bracket -1- from the mount on the side trim panel in the direction of -arrow A-.
- Disengage the release cable mounting element -3- from the release lever -2- for the backrest remote unlock in the direction of -arrow B-.
- Remove the luggage compartment side trim panel.
Installing
Install in reverse order of removal.
Installation instructions: For example tightening specifications, replacing components. Refer to → Chapter "Overview - Luggage Compartment Side Trim Panel, Avant".
Luggage Compartment Support, Removing and Installing
Removing
- Remove the rear luggage compartment floor.
- Equipped on some models: Remove the rail. Refer to → Chapter "Rail, Removing and Installing".
- Remove the tie-downs. Refer to → Chapter "Tie Down, Removing and Installing".
- Remove the lock carrier trim panel. Refer to → Chapter "Lock Carrier Trim Panel, Removing and Installing".
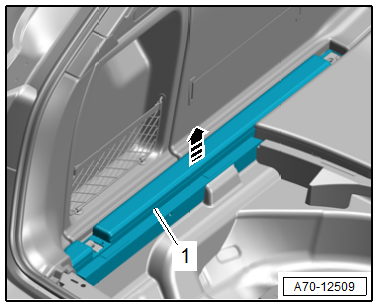
- Remove the luggage compartment floor support -1- upward -arrow-.
Rear Bracket, Removing
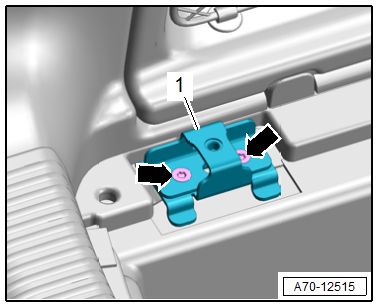
- Remove the bolts -arrows- and the rear bracket -1-.
Front Bracket, Removing
- Remove the luggage compartment side trim panel. Refer to → Chapter "Luggage Compartment Side Trim Panel, Removing and Installing, Avant".
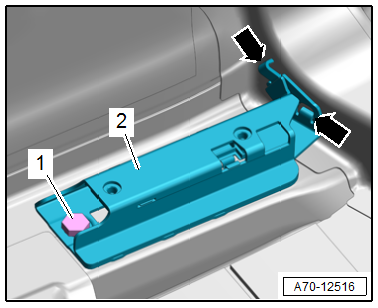
- Remove the bolt -1-.
- Disengage and remove the front bracket -2- from the mounts -arrows-.
Installing
Install in reverse order of removal.
Installation instructions: For example tightening specifications, replacing components. Refer to → Chapter "Overview - Luggage Compartment Side Trim Panel, Avant".

