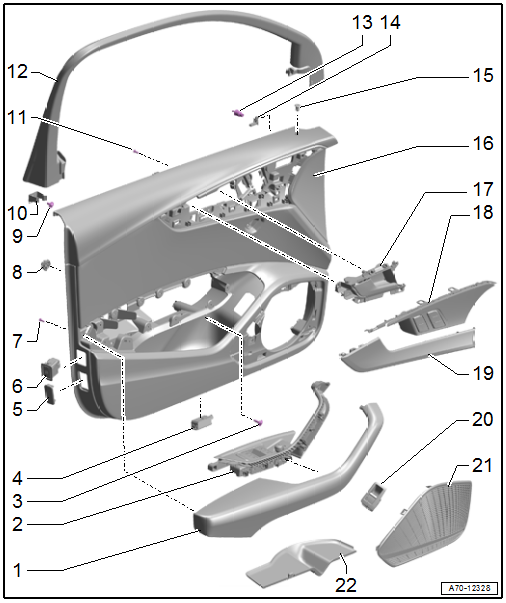
Audi A4: Front Door Trim Panels
Audi A4 (B9) 2016-2026 Service Manual / Body / Body Interior / Interior Trim / Front Door Trim Panels
Overview - Front Door Trim Panel

1 - Pull Handle with Armrest
- Removing and installing. Refer to → Chapter "Front Pull Handle, Removing and Installing".
2 - Switch Mount
- Removing and installing. Refer to → Chapter "Front Pull Handle, Removing and Installing".
3 - Bolt
- 2.5 Nm
- For door trim panel
- Quantity: 3
4 - Entry Lamp
- Driver Side Entry Lamp -W92-
- Passenger Side Entry Lamp -W93-
- Component location overview. Refer to → Electrical Equipment; Rep. Gr.96; Lamps; Component Location Overview - Front Door Lamps.
5 - Rear Reflector
- Vehicles with:
- Driver Exit Warning Lamp -W111-
- Front Passenger Exit Warning Lamp -W112-
- Component location overview. Refer to → Electrical Equipment; Rep. Gr.96; Lamps; Component Location Overview - Front Door Lamps.
6 - Interior Monitoring and Vehicle Inclination Deactivation Button -E616-
- Component location overview. Refer to → Electrical Equipment; Rep. Gr.96; Controls; Component Location Overview - Front Door Controls.
7 - Bolt
- 1.2 Nm
- For the armrest
- Quantity: 15
8 - Clip
- For door trim panel
- Quantity: 8
- Insert in the trim panel
9 - Bolt
- 4 Nm
10 - Clip
- For door trim panel
11 - Bolt
- 1.2 Nm
- For the interior door mechanism
- Quantity: 4
12 - Window Frame Trim Panel
- Removing and installing. Refer to → Chapter "Window Frame Trim, Removing and Installing".
13 - Door Trim Panel Stopper
- 4.5 Nm
14 - Central Locking -Safe- Indicator Lamp -K133-
15 - Sleeve
- For Central Locking -SAFE- Indicator Lamp -K133-
- Driver door only
- When replacing the door trim panel, a hole for the sleeve must be made in the new panel by using the old panel as a model
16 - Door Trim Panel
- Removing and installing. Refer to → Chapter "Front Door Trim Panel, Removing and Installing".
- When replacing the door trim panel, a hole for the sleeve -15- must be made in the new panel using the old panel as a sample.
17 - Interior Door Mechanism
- Removing and installing. Refer to → Chapter "Interior Door Mechanism, Removing and Installing".
18 - Interior Door Mechanism Decorative Trim
- Removing and installing. Refer to → Chapter "Interior Door Mechanism, Removing and Installing".
19 - Decorative Trim
- Removing and installing. Refer to → Chapter "Front Door Trim Panel, Removing and Installing".
20 - Rear Lid Remote Release Button -E233-
- Component location overview. Refer to → Electrical Equipment; Rep. Gr.96; Controls; Component Location Overview - Front Door Controls.
21 - Speaker Trim
- For the bass speaker
- Removing and installing. Refer to → Chapter "Speaker Trim in Door Trim Panels, Removing and Installing".
- Insert in the door trim panel and press on it until it engages audibly.
22 - Door Pocket Trim
- Insert into the door
READ NEXT:
 Front Door Trim Panel, Removing and Installing
Special tools and workshop equipment required
Wedge Set -T10383-
Wedge Set - Wedge 1 -T10383/1-
Removing
- Switch off the ignition.
- Unclip the decorative trim -1-
using the -T10383/1-
 Interior Door Mechanism, Removing and Installing
Removing
- Remove the door trim panel. Refer to
→ Chapter "Front Door Trim Panel, Removing and Installing".
- Place the door trim panel on a soft surface.
- Equipped on some mod
 Rear Door Trim Panels
Overview - Rear Door Trim Panel
1 - Bolt
2.5 Nm
For door trim panel
Quantity: 3
2 - Rear Entry Lamp
Driver Side Rear Entry Lamp -W83-
Passenger Side Rear Entry Lamp -W84-
SEE MORE:
 Parking aid plus
Activating and deactivating
Applies to: vehicles with parking aid plus
Fig. 124 Center console: parking aid button
General information
The parking aid assists when parking and maneuvering
by providing warnings about obstacles. If
the ultrasonic sensors on the vehicle,
fig. 100 detect an obstacle, t
 Electronic Damping
Component Location Overview - Electronic Damping
1 - Front Level Control System Sensor
Left Front Level Control System Sensor -G78-
Right Front Level Control Sensor -G289-
Overview. Refer to
→ Chapter "Overview - Front Level Control System Sensor".
2 - Shock Absor
© 2019-2026 Copyright www.audia4b9.com

