Audi A4: Interior Door Mechanism, Removing and Installing
Removing
- Remove the door trim panel. Refer to → Chapter "Front Door Trim Panel, Removing and Installing".
- Place the door trim panel on a soft surface.
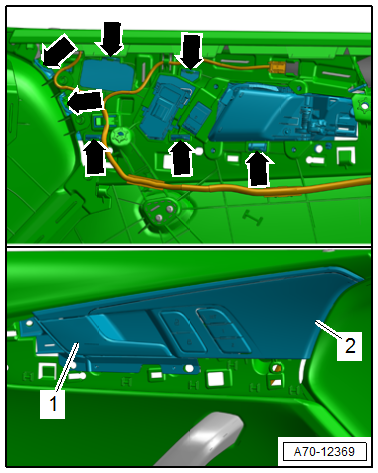
- Equipped on some models: Remove the door ambient lighting lamps -3- on the back of the door trim panel by releasing the retainers and removing the lamp from the fiber-optic cable.
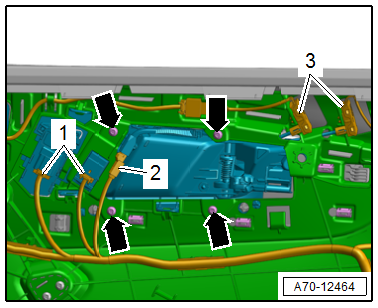
- Disconnect the connectors -1-.
- Remove the interior door handle illumination bulb socket -2- from the fiber-optic cable.
- Remove the bolts -arrows-.
- Detach the trim -2- with the interior door mechanism -1- from the door trim panel, by releasing the retainers -arrows- on the back of the door trim panel.
- Disengage the trim with the interior door mechanism from the door trim panel and remove it.
Installing
Install in reverse order of removal.
Installation instructions: For example tightening specifications, replacing components. Refer to → Chapter "Overview - Front Door Trim Panel".
Window Frame Trim, Removing and Installing
Special tools and workshop equipment required
- Trim Removal Wedge -3409-
Removing
- Lower the door window.
- Remove the door trim panel. Refer to → Chapter "Front Door Trim Panel, Removing and Installing".
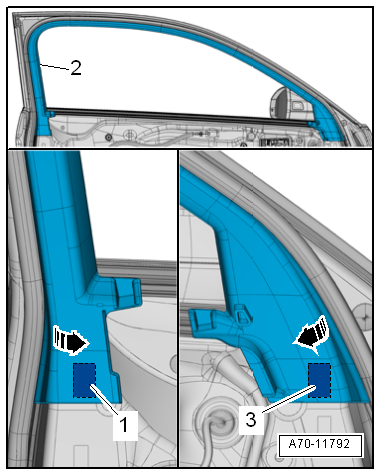
- Loosen the trim on the ends from the adhesive pads -1 and 3- from the door, using the -3409-.
- Pry off the window frame trim -2- starting at the bottom and working along the length of the window guide to the upper rear -arrows-.
- Remove the trim downward from the window frame.
Installing
- Insert window frame trim -1- at upper rear in the window guide -2- in the direction of -arrow-.
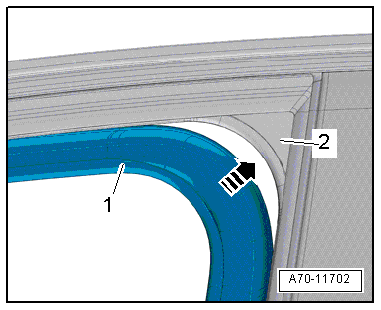
- Install window frame trim -2- along the entire length of the window guide.
- Remove all new part protective foil from the adhesive pads.
- Push the trim in the area of the adhesive pads firmly -1 and 3- against the door.
 Note
Note
Ignore the -arrows-.
Further installation is the reverse order of removal.
Installation instructions: For example tightening specifications, replacing components. Refer to → Chapter "Overview - Front Door Trim Panel".
READ NEXT:
 Rear Door Trim Panels
Overview - Rear Door Trim Panel
1 - Bolt
2.5 Nm
For door trim panel
Quantity: 3
2 - Rear Entry Lamp
Driver Side Rear Entry Lamp -W83-
Passenger Side Rear Entry Lamp -W84-
Speaker Trim in Door Trim Panels, Removing and Installing
Special tools and workshop equipment required
Pry Lever -80-200-
Front Bass Speaker Trim, Removing
- Carefully pry out the speaker trim -1-
along the door trim panel seam using the Pry Lever
Rear Door Trim Panel, Removing and Installing
Special tools and workshop equipment required
Wedge Set -T10383-
Wedge Set - Wedge 1 -T10383/1-
Removing
- Switch off the ignition.
- Unclip the decorative trim -1-
using the -T10383/1-
SEE MORE:
Window Guide, Removing and Installing
Removing
- Remove the door window. Refer to
→ Chapter "Front Door Window, Removing and Installing".
- Remove the B-pillar trim. Refer to
→ Chapter "B-Pillar Door Trim, Removing and Installing, Front".
- Remove the A-pillar trim. Refer to
→ Chapter "A-Pillar Tri
DSG Transmission Mechatronic -J743-
Overview - Mechatronic
1 - Transmission Fluid Pan
Removing and installing. Refer to
→ Chapter "Transmission Fluid Pan, Removing and Installing".
2 - Bolt
Tightening specification and sequence. Refer to
→ Fig. "Transmission Fluid Pan - Tightening Specificat
