Audi A4: Speaker Trim in Door Trim Panels, Removing and Installing
Special tools and workshop equipment required
- Pry Lever -80-200-
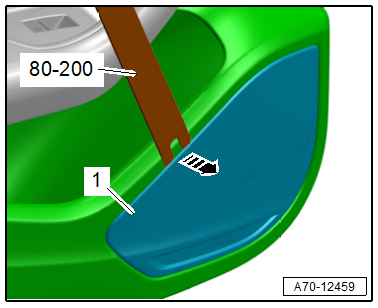
Front Bass Speaker Trim, Removing
- Carefully pry out the speaker trim -1- along the door trim panel seam using the Pry Lever -80-200- in the direction of -arrow A-.
- Disengage the speaker trim at the rear from the door trim panel in the direction of -arrow B- and remove.

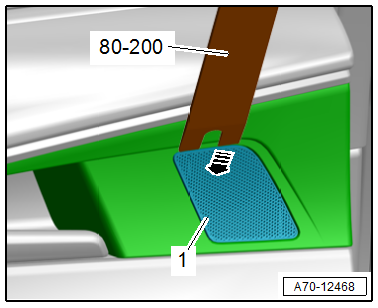
Rear Bass Speaker Trim, Removing
- Carefully pry out the speaker trim -1- along the door trim panel seam using the Pry Lever -80-200--arrow- and remove it.
Rear Treble Speaker Trim, Removing
- Carefully pry the speaker trim -1- out of the door trim panel using the Pry Lever -80-200--arrow- and remove it.
Installing
Install in reverse order of removal.
Installation instructions: tightening specifications, replacing body parts. Refer to → Chapter "Overview - Front Door Trim Panel" and → Chapter "Overview - Rear Door Trim Panel".
Interior Door Mechanism, Removing and Installing
Removing
- Remove the door trim panel. Refer to → Chapter "Rear Door Trim Panel, Removing and Installing".
- Place the door trim panel on a soft surface.
- Equipped on some models: Remove the door ambient lighting lamps -2- on the back of the door trim panel by releasing the retainers and removing the lamp from the fiber-optic cable.
- Remove the interior door handle illumination bulb socket -1- from the fiber-optic cable.
- Remove the bolts -arrows-.
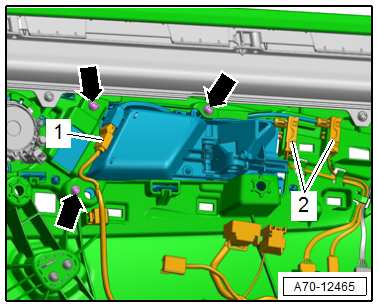
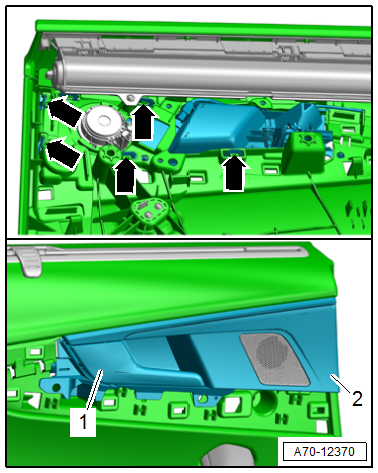
- Detach the trim -2- with the interior door mechanism -1- from the door trim panel, by releasing the retainers -arrows- on the back of the door trim panel.
- Disengage the trim with the interior door mechanism from the door trim panel and remove it.
Installing
Install in reverse order of removal.
Installation instructions: For example tightening specifications, replacing components. Refer to → Chapter "Overview - Rear Door Trim Panel".
READ NEXT:
 Rear Door Trim Panel, Removing and Installing
Special tools and workshop equipment required
Wedge Set -T10383-
Wedge Set - Wedge 1 -T10383/1-
Removing
- Switch off the ignition.
- Unclip the decorative trim -1-
using the -T10383/1-
Instrument Panel
Overview - Instrument Panel
1 - Screw/Expanding Clip
1.5 Nm
2 - Light Switch Trim
Removing and installing. Refer to
→ Chapter "Light Switch Trim, Removing and Install
Instrument Panel Side Cover, Removing and Installing
Special tools and workshop equipment required
Trim Removal Wedge -3409-
Removing
- Pry off the cover -1- for the
instrument panel side cover using the -3409- in the direction of
-arrow-.
-&nb
SEE MORE:
Receiver/Dryer or Accumulator and Restrictor, Replacing after Cleaning
Refrigerant Circuit
Note
Cleaning the refrigerant circuit means flushing it with
refrigerant R134a. Refer to
→ Chapter "Refrigerant Circuit, Cleaning (Flushing), with
Refrigerant R134a" or blowing through with compressed
air and nitrogen. Refer to
→ Chapter "Refrigerant Circuit, Flushing with
Rear Seat Covers and Cushions
Overview - Cover and Cushion
Overview - Cover and Cushion, Sport Bench Seat
1 - Seat Frame
With the molded piece
2 - Upholstery Clip
For securing the cover to the cushion
Replace
Install at the same location with Upholstery Clip Pliers -VAG1634-.
3 - Wire
Cov
