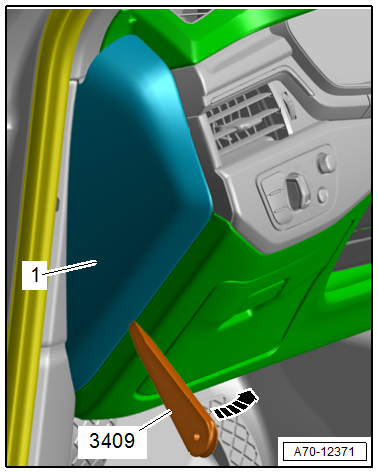
Audi A4: Instrument Panel Side Cover, Removing and Installing
Special tools and workshop equipment required
- Trim Removal Wedge -3409-
Removing
- Pry off the cover -1- for the instrument panel side cover using the -3409- in the direction of -arrow-.
- Release the remaining retainers, pull the instrument panel cover out of the A-pillar gap cover and remove it.
Installing
Install in reverse order of removal.
Installation instructions: For example tightening specifications, replacing components. Refer to → Chapter "Overview - Instrument Panel".
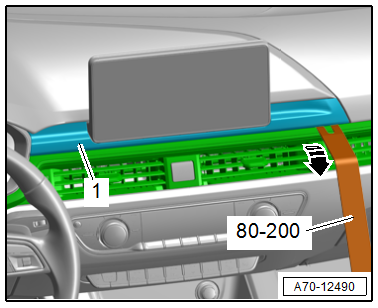
MMI Screen Cover, Removing and Installing
Special tools and workshop equipment required
- Pry Lever -80-200-
Removing
- Unclip the MMI screen cover -1- using the Pry Lever -80-200- in the direction of -arrow- by positioning the -80-200- carefully on the cover.
- Release the remaining retainers for the MMI screen cover and remove the cover.
Installing
Install in reverse order of removal.
Installation instructions: For example tightening specifications, replacing components. Refer to → Chapter "Overview - Instrument Panel".
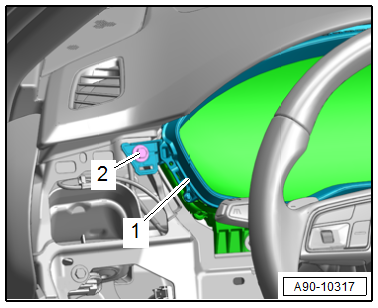
Instrument Cluster Trim, Removing and Installing
Special tools and workshop equipment required
- Trim Removal Wedge -3409-
Removing
- Move the steering wheel as far to the rear and down as possible. Use the full steering column adjustment range for this.
- Remove the instrument panel vent on the driver side. Refer to → Chapter "Driver Side Instrument Panel Vent, Removing and Installing".
- Remove front passenger side instrument panel vent. Refer to → Chapter "Passenger Side Instrument Panel Vent, Removing and Installing".
- Remove the bolt -2-.
- Remove the screw on the opposite side.
- Remove the instrument cluster trim -1-.
Installing
Install in reverse order of removal.
Installation instructions: For example tightening specifications, replacing components. Refer to → Chapter "Overview - Instrument Panel".
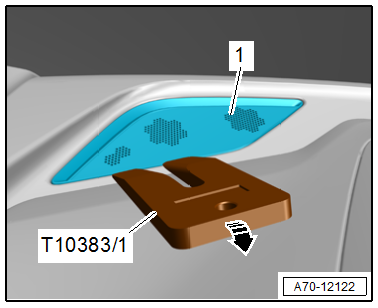
Speaker Trim, Removing and Installing
Special tools and workshop equipment required
- Wedge Set -T10383-
- Wedge Set - Wedge 1 -T10383/1-
Center Speaker Trim, Removing
 Caution
There is a risk of damaging the speaker trim.
Proceed very carefully when removing and installing.
- Carefully detach the speaker trim -1- using the -T10383/1- in the direction of -arrow- by sliding the wedge approximately 2 mm in the seam under the speaker trim.
- Disengage the remaining tabs for the speaker trim along the seam.
- If necessary, insert a long screwdriver forward under the speaker trim and disengage the front retaining pin.
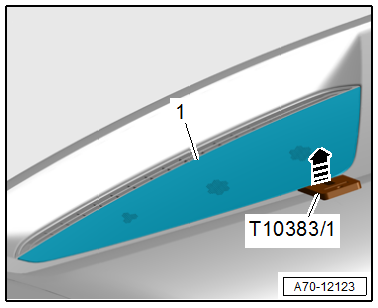
Outer Speaker Trim, Removing
Caution
There is a risk of damaging the speaker trim.
Proceed very carefully when removing and installing.
- Carefully detach the speaker trim -1- using the -T10383/1- along the seam in the direction of -arrow-, to do this push the wedge approximately 2 mm in the seam under the speaker trim.
- Release the remaining retainers for the speaker trim and remove it.
Installing
Install in reverse order of removal.
Installation instructions: For example tightening specifications, replacing components. Refer to → Chapter "Overview - Instrument Panel".
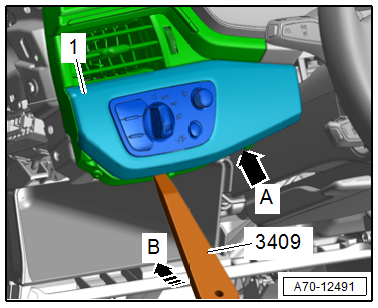
Light Switch Trim, Removing and Installing
Special tools and workshop equipment required
- Trim Removal Wedge -3409-
Removing
- Remove the instrument panel cover on the driver side. Refer to → Chapter "Driver Side Instrument Panel Cover, Removing and Installing".
- Remove the expanding clip/screw -arrow A-.
- Unclip the light switch trim -1- with the light switch using the Trim Removal Wedge -3409- in the direction of -arrow B-.
- Disconnect the connector and remove the light switch trim with the light switch.
Installing
Install in reverse order of removal.
Installation instructions: For example tightening specifications, replacing components. Refer to → Chapter "Overview - Instrument Panel".
READ NEXT:
 Instrument Panel, Removing and Installing
Removing
- Move the steering wheel as far to the rear and down as possible.
Use the full steering column adjustment range for this.
- Move the front seats all the way back and tilt backrest
Instrument Panel Vent, Removing and Installing
Driver Side Instrument Panel Vent, Removing and Installing
Special tools and workshop equipment required
Trim Removal Wedge -3409-
Removing
- Move the steering wheel as far up and backward as
Instrument Panel Central Tube
Overview - Instrument Panel Central Tube
1 - Bolt
20 Nm
Quantity: 2
The mounting threads and contact surface must be free of paint, coating,
and corrosion. The threaded connection serv
SEE MORE:
Glossary of tire and loading
terminology
Accessory weight
means the combined weight (in
excess of those standard items
which may be replaced) of automatic
transmission, power steering,
power brakes, power windows,
power seats, radio, and
heater, to the extent that these
items are available as factory-installed
equipment (whether installed
Component Location Overview - Telephone System
1 - Center Console Storage Compartment
Removing and installing. Refer to
→ Body Interior; Rep. Gr.68; Center Console; Overview - Center Console.
2 - Telephone Baseplate -R126-
Removing and installing. Refer to
→ Chapter "Telephone Baseplate -R126-,
