Audi A4: Instrument Panel Vent, Removing and Installing
Driver Side Instrument Panel Vent, Removing and Installing
Special tools and workshop equipment required
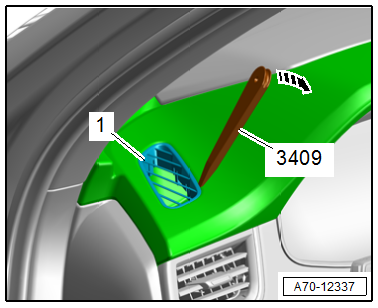
- Trim Removal Wedge -3409-
Removing
- Move the steering wheel as far up and backward as possible to be able to use the full steering column adjustment range.
- Remove the light switch trim. Refer to → Chapter "Light Switch Trim, Removing and Installing".
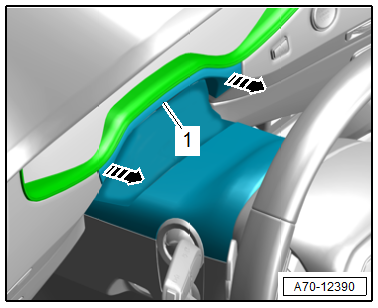
- Using the -3409-, unclip the instrument cluster gap cover -1- from the instrument panel vent in the direction of -arrows-.
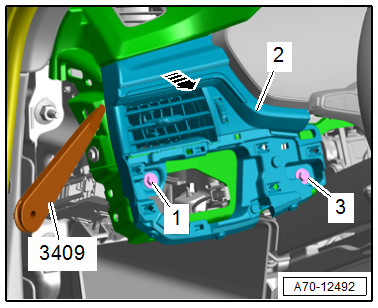
- Remove the bolts -1 and 3-.
- Unclip the instrument panel vent -2- using the -3409- in the direction of -arrow-.
- Disengage the remaining retainers, carefully remove the instrument panel vent and disconnect the connectors.
Installing
Install in reverse order of removal.
Installation instructions: For example tightening specifications, replacing components. Refer to → Chapter "Overview - Instrument Panel".
Passenger Side Instrument Panel Vent, Removing and Installing
Special tools and workshop equipment required
- Trim Removal Wedge -3409-
Removing
- Move the steering wheel as far up and backward as possible to be able to use the full steering column adjustment range.
- Remove the A/C display control head trim. Refer to → Chapter "Display Control Head Trim, Removing and Installing".
- Using the -3409-, unclip the instrument cluster gap cover -1- from the instrument panel vent in the direction of -arrows-.
- Remove the MMI screen cover. Refer to → Chapter "MMI Screen Cover, Removing and Installing".
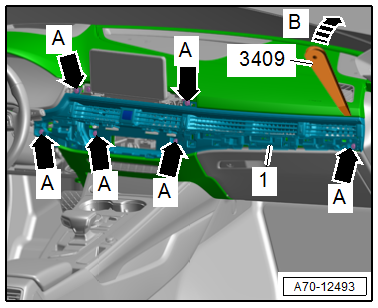
- Remove the bolts -arrows A-.
- Unclip the instrument panel vent -1- using the -3409- in the direction of -arrow B-.
- Disengage the remaining retainers, carefully remove the instrument panel vent and disconnect the connectors.
Installing
Install in reverse order of removal.
Installation instructions: For example tightening specifications, replacing components. Refer to → Chapter "Overview - Instrument Panel".
Front Center Defroster Vent, Removing and Installing
Special tools and workshop equipment required
- Trim Removal Wedge -3409-
- Wedge Set -T10383-
- Wedge Set - Wedge 1 -T10383/1-
Removing
- Remove the speaker trim. Refer to → Chapter "Speaker Trim, Removing and Installing".
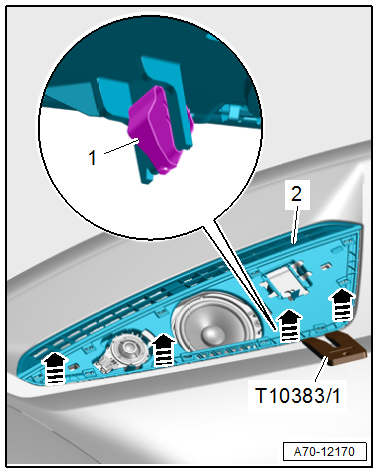
- Carefully pry out the defroster vent -2- at the retainers -1- using the -T10383/1--arrows-.
- Carefully release the remaining retainers using the -3409- if necessary, remove the defroster vent upward and disconnect the connector.
Installing
Install in reverse order of removal.
Installation instructions: For example tightening specifications, replacing components. Refer to → Chapter "Overview - Instrument Panel".
Side Defroster Vent, Removing and Installing
Special tools and workshop equipment required
- Trim Removal Wedge -3409-
Removing
- Unclip the defroster vent -1- using the -3409- in the direction of -arrow-.
- Disengage the remaining retainers and remove the defroster vent.
Installing
Install in reverse order of removal.
Installation instructions: For example tightening specifications, replacing components. Refer to → Chapter "Overview - Instrument Panel".
READ NEXT:
 Instrument Panel Central Tube
Overview - Instrument Panel Central Tube
1 - Bolt
20 Nm
Quantity: 2
The mounting threads and contact surface must be free of paint, coating,
and corrosion. The threaded connection serv
Vehicle Interior Trim Panels
Component Location Overview - Vehicle Interior Trim Panels
Component Location Overview - Vehicle Interior Trim Panels, A3 Sedan
1 - D-Pillar Trim Panel
Overview. Refer to
→ Chapte
Sill Panel, Removing and Installing
Front Sill Panel Strip, Removing and Installing
Special tools and workshop equipment required
Trim Removal Wedge -3409-
Omega Clip Tool -T40280-
Removing
- Move the front seat all the way bac
SEE MORE:
DSG Transmission Mechatronic -J743-
Overview - Mechatronic
1 - Transmission Fluid Pan
Removing and installing. Refer to
→ Chapter "Transmission Fluid Pan, Removing and Installing".
2 - Bolt
Tightening specification and sequence. Refer to
→ Fig. "Transmission Fluid Pan - Tightening Specificat
Component Location Overview - Antenna Systems
Component Location Overview - Antenna Systems, Sedan, USA
1 - Antenna Amplifier -R24-
Removing and Installing. Refer to
→ Chapter "Antenna Amplifier -R24-, Removing and Installing, Sedan".
TV Antenna Amplifier 1 -R82-
Removing and Installing. Refer to
