Audi A4: Sill Panel, Removing and Installing
Front Sill Panel Strip, Removing and Installing
Special tools and workshop equipment required
- Trim Removal Wedge -3409-
- Omega Clip Tool -T40280-
Removing
- Move the front seat all the way back.
- Remove the instrument panel side cover. Refer to → Chapter "Instrument Panel Side Cover, Removing and Installing".
- Unclip the A-pillar gap cover -1- using the Trim Removal Wedge -3409- in the direction of -arrow A- and disengage at the A-pillar upper trim panel in the direction of -arrow B-.
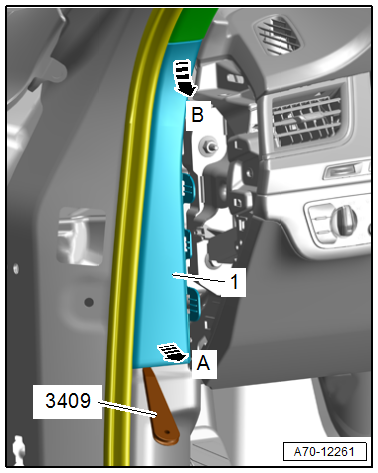
Driver Side
- Remove the latch release lever for the release cable. Refer to → Body Exterior; Rep. Gr.55; Hood; Latch Release Lever, Removing and Installing.
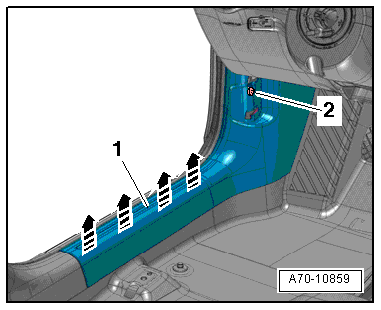
- Remove the bolt -2-.
Continuation for Both Vehicle Sides
- Free up the sill panel in the area of the door seal.
- Unclip the front side sill strip -1- from the side sill starting at the back using the Trim Removal Wedge -3409- in the direction of -arrows- and remove it toward the rear.
- Remove the front sill panel strip.
Installing
Install in reverse order of removal.
Installation instructions: For example tightening specifications, replacing components. Refer to → Chapter "Overview - Sill Panel".
Rear Sill Panel, Removing and Installing
Special tools and workshop equipment required
- Trim Removal Wedge -3409-
- Omega Clip Tool -T40280-
Removing
- Remove the rear bench seat. Refer to → Chapter "Bench Seat/Single Seat, Removing and Installing".
- Remove the side cushion. Refer to → Chapter "Side Cushion, Removing and Installing".
- Equipped on some models: Remove the fixed rear seat backrest. Refer to → Chapter "Rear Seat Backrest, Removing and Installing, Fixed Rear Seat Backrest".
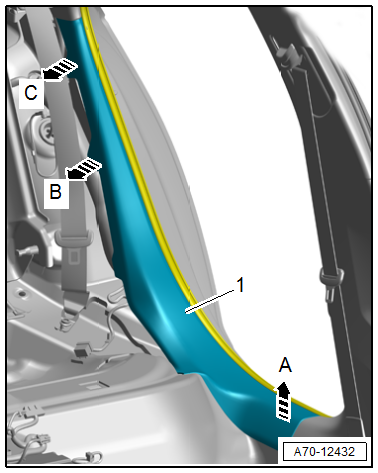
- Starting at the front, unclip the sill panel -1- from the side sill and the side panel using the -3409--arrows A, B and C-.
- Pull the sill panel strip downward off the C-pillar trim and remove it.
Installing
Install in reverse order of removal.
Installation instructions: For example tightening specifications, replacing components. Refer to → Chapter "Overview - Sill Panel".
READ NEXT:
 A-Pillar Trim Panel, Removing and Installing
Special tools and workshop equipment required
Trim Removal Wedge -3409-
Lever - Fuel Line -T10468-
Omega Clip Tool -T40280-
Caution
This procedure contains mandatory replaceable parts.
Footrest, Removing and Installing
Removing
- Pry off the cap -3- with a small
screwdriver.
- Remove the bolt -2- underneath.
- Pull the footrest -1- downward in
the direction of -arrow- and remove
it.
Installing
Ins
Luggage Compartment Trim Panels
Component Location Overview - Luggage Compartment Trim Panels
Component Location Overview - Luggage Compartment Trim Panels, Sedan
1 - Lock Carrier Trim
Overview. Refer to
→ Chapt
SEE MORE:
Automatic luggage compartment lid
Applies to: vehicles with automatic luggage compartment lid
Fig. 32 Luggage compartment lid: 1 closing button*, 2
lock button* (vehicles with convenience key*)
The luggage compartment lid can be opened and
closed automatically > in General information.
Opening the luggage compartment lid
When
Overview - Suspension Strut, Shock Absorber, Spring
Overview - Spring
1 - Rear Lower Transverse Link
Removing and installing. Refer to
→ Chapter "Rear Lower Transverse Link, Removing and Installing".
2 - Coil Spring
Removing and installing. Refer to
→ Chapter "Spring, Removing and Installing".
Installation p
