Audi A4: A-Pillar Trim Panel, Removing and Installing
Special tools and workshop equipment required
- Trim Removal Wedge -3409-
- Lever - Fuel Line -T10468-
- Omega Clip Tool -T40280-
 Caution
This procedure contains mandatory replaceable parts. Refer to component overview and parts catalog prior to starting procedure.
Mandatory Replacement Parts
- Clip - A-Pillar Trim Panel
Removing
- Remove the instrument panel side cover. Refer to → Chapter "Instrument Panel Side Cover, Removing and Installing".
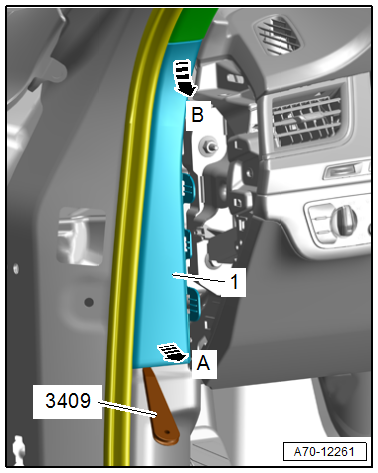
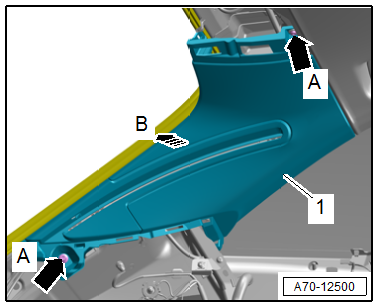
- Unclip the A-pillar gap cover -1- using the -3409- in the direction of -arrow A- and disengage at the A-pillar upper trim panel in the direction of -arrow B-.
 WARNING
Risk of injury due to involuntary deployment.
Pay attention to the safety precautions when working with pyrotechnic components. Refer to → Chapter "Safety Precautions when Working with Pyrotechnic Components".
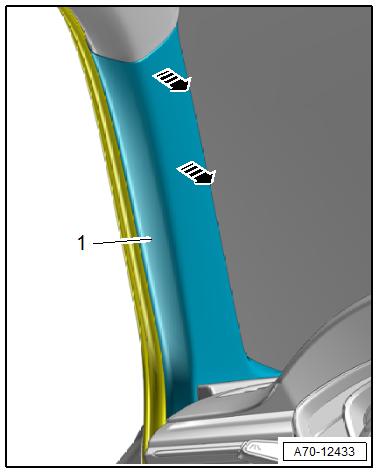
- Free up the A-pillar trim panel -1- in the door seal area.
- Detach the A-pillar trim panel using the -3409- up to the first retainer in the direction of -arrows-.
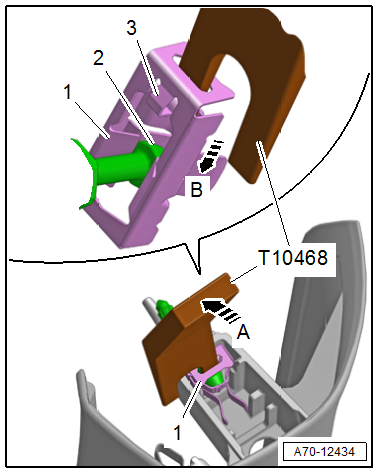
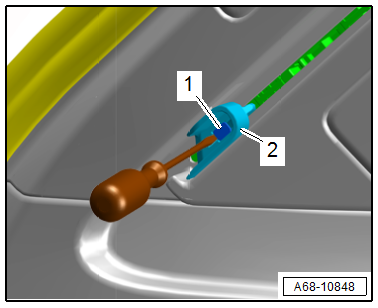
- To disengage the trim panel from the retaining pin on the A-pillar, remove the clip with the hook -1- using the Lever - Fuel Line -T10468-.
- To do so, insert the Lever - Fuel Line -T10468- through the clip opening and release the retainer -3- in the direction of -arrow A-.
- At the same time, push the clip downward in the trim panel in the direction of -arrow B-. This will move the pin head -2- out of the clip hooks.
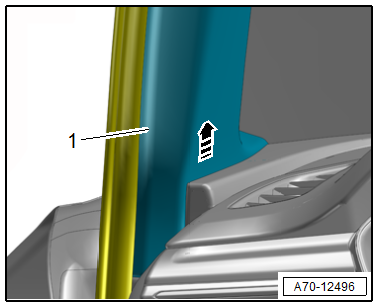
- Carefully remove the trim panel -1- upward out of the instrument panel in the direction of -arrow-.
- Equipped on some models: disconnect the connector for the treble speaker.
Installing
 WARNING
Risk of injury due to involuntary deployment.
- Pay attention to the safety precautions when working with pyrotechnic components. Refer to → Chapter "Safety Precautions when Working with Pyrotechnic Components".
- Do not pinch the head curtain airbag when installing the upper A-pillar trim panel.
- To install the trim panel, insert the new clip with the hooks into the trim panel and bring it into its installation position.
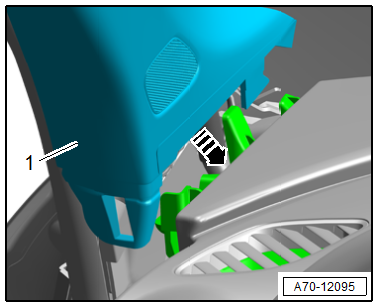
- Insert the A-pillar trim panel -1- in the mount on the instrument panel in the direction of -arrow-.
Further installation is the reverse order of removal.
Installation instructions: For example tightening specifications, replacing components. Refer to → Chapter "Overview - A-Pillar Trim Panel".
B-Pillar Trim Panel, Removing and Installing
B-Pillar Upper Trim Panel, Removing and Installing
Special tools and workshop equipment required
- Trim Removal Wedge -3409-
Removing
 WARNING
Risk of injury due to involuntary deployment.
Pay attention to the safety precautions when working with pyrotechnic components. Refer to → Chapter "Safety Precautions when Working with Pyrotechnic Components".
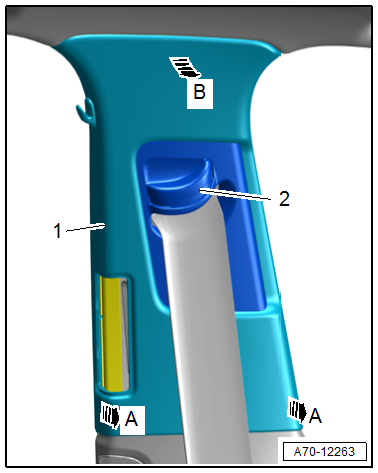
- Move seat belt height adjuster -2- to the lowest position.
- Free up the B-pillar trim panel -1- near the door seals, disengage at the B-pillar and unclip from the bracket in the direction of -arrows A-.
- Remove the B-pillar upper trim panel from the mount on the body in the direction of -arrow B- by tilting the trim panel inward and pulling it downward at the same time.
- Remove the B-pillar trim panel with the seat belt still threaded through.
 Note
Note
To replace the B-pillar upper trim panel, remove the front belt end fitting. Refer to → Chapter "Front Belt End Fitting, Removing and Installing".
Bracket, Removing
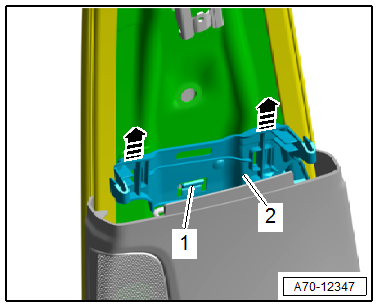
- Release the catch -1- using a screwdriver and pull the bracket -2- for the B-pillar trim panel upward out of the mounts -arrows-.
Installing
 WARNING
Risk of injury due to involuntary deployment.
- Pay attention to the safety precautions when working with pyrotechnic components. Refer to → Chapter "Safety Precautions when Working with Pyrotechnic Components".
- Do not pinch the head curtain airbag when installing the B-pillar trim.
- Guide the belt webbing and seat belt latch in through the slide for the seat belt height adjuster.
 Note
Note
Make sure that the belt height adjuster is in the lowest position.
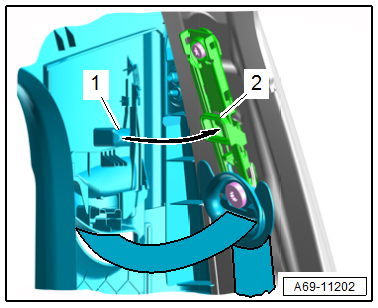
- First, insert the B-pillar trim panel upward into the mount on the roof.
- The retaining pin -1- for the sliding piece on the B-pillar trim panel must engage in the mount -2- on the seat belt height adjuster -arrow-.
Further installation is the reverse order of removal.
Installation instructions: For example tightening specifications, replacing components. Refer to → Chapter "Overview - B-Pillar Trim Panel".
B-Pillar Lower Trim Panel, Removing and Installing
Special tools and workshop equipment required
- Pry Lever -80-200-
- Omega Clip Tool -T40280-
Removing
- Remove the B-pillar upper trim panel. Refer to → Chapter "B-Pillar Upper Trim Panel, Removing and Installing".
- Unclip the front and rear of the sill panel from the B-pillar lower trim panel. Refer to → Chapter "Sill Panel, Removing and Installing".
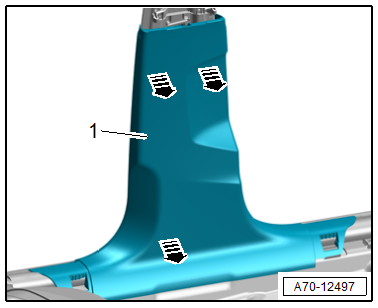
- Free up the B-pillar lower trim panel -1- near the door seals and disengage it sideways from the B-pillar.
- Starting at the top, unclip the B-pillar trim panel from the B-pillar using the -80-200- in the direction of -arrows-.
Installing
Further installation is the reverse order of removal.
Installation instructions: For example tightening specifications, replacing components. Refer to → Chapter "Overview - B-Pillar Trim Panel".
C-Pillar Trim Panel, Removing and Installing
C-Pillar-Trim Panel, Removing and Installing, Sedan
Special tools and workshop equipment required
- Pry Lever -80-200-
- Pliers -T40172C-
- Omega Clip Tool -T40280-
Removing
- Remove the D-pillar trim panels. Refer to → Chapter "D-Pillar Trim Panel, Removing and Installing, Sedan".
- Remove the side cushion. Refer to → Chapter "Side Cushion, Removing and Installing".
- Equipped on some models: Remove the fixed rear seat backrest. Refer to → Chapter "Rear Seat Backrest, Removing and Installing, Fixed Rear Seat Backrest".
- Remove the rear shelf. Refer to → Chapter "Rear Shelf, Removing and Installing".
- Remove the rear outer belt guide. Refer to → Chapter "Rear Seat Belt Guide, Removing and Installing, Sedan".
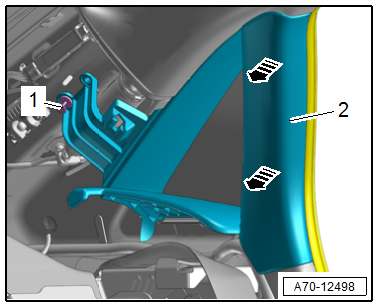
- Remove the expanding clip -1- with the Pliers -T40172C-.
- Free up the C-pillar trim panel -2- near the door seal, disengage at the front of the C-pillar and unclip from the C-pillar using the -80-200- in the direction of -arrows-.
Installing
Install in reverse order of removal.
Installation instructions: For example tightening specifications, replacing components. Refer to → Chapter "Overview - C-Pillar Trim Panel".
C-Pillar Trim Panel, Removing and Installing, Avant
Special tools and workshop equipment required
- Pry Lever -80-200-
- Omega Clip Tool -T40280-
Removing
- Remove the luggage compartment side trim panel. Refer to → Chapter "Luggage Compartment Side Trim Panel, Removing and Installing, Avant".
- Remove the rear outer belt guide. Refer to → Chapter "Outer Rear Belt Guide, Removing and Installing, Avant".
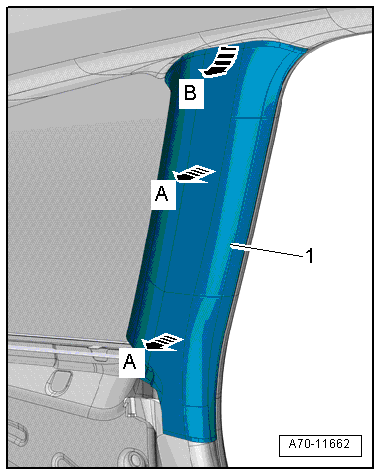
- Free up the C-pillar trim panel -1- near the door seal and disengage it at the front of the C-pillar.
- Unclip the C-pillar trim panel from the C-pillar in the direction of -arrows A- using the -80-200-.
- Remove the upper C-pillar trim from the mount on the body in the direction of -arrow B- by moving the trim toward the inside and pulling it downward at the same time.
Installing
Install in reverse order of removal.
Installation instructions: For example tightening specifications, replacing components. Refer to → Chapter "Overview - C-Pillar Trim Panel".
D-Pillar Trim Panel, Removing and Installing
D-Pillar Trim Panel, Removing and Installing, Sedan
Special tools and workshop equipment required
- Pry Lever -80-200-
- Omega Clip Tool -T40280-
Removing
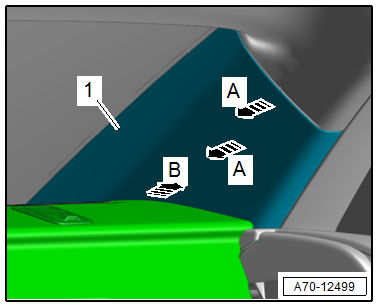
- Unclip the D-pillar trim panel -1- from the D-pillar in the direction of -arrows A- using the Pry Lever -80-200-.
- Pull the D-pillar trim panel upward from the rear shelf in the direction of -arrow B- and remove it.
Installing
Install in reverse order of removal.
Installation instructions: For example tightening specifications, replacing components. Refer to → Chapter "Overview - D-Pillar Trim Panel".
D-Pillar Trim Panel, Removing and Installing, Avant
Special tools and workshop equipment required
- Pry Lever -80-200-
- Omega Clip Tool -T40280-
Removing
- Remove the expanding pin -1- for the catch using a small screwdriver and remove the roll cover catch -2- using pliers.
- Remove the luggage compartment side trim panel. Refer to → Chapter "Luggage Compartment Side Trim Panel, Removing and Installing, Avant".
- Remove the roof end strip. Refer to → Chapter "Roof End Strip, Removing and Installing".
- Remove the bolts -arrows A-.
- Free up the D-pillar trim panel -1- near the rear lid seal, disengage at the rear of the D-pillar and unclip from the D-pillar using the -80-200- in the direction of -arrow B-.
Installing
Install in reverse order of removal.
Installation instructions: For example tightening specifications, replacing components. Refer to → Chapter "Overview - D-Pillar Trim Panel".

