Audi A4: Vehicle Interior Trim Panels
Component Location Overview - Vehicle Interior Trim Panels
Component Location Overview - Vehicle Interior Trim Panels, A3 Sedan
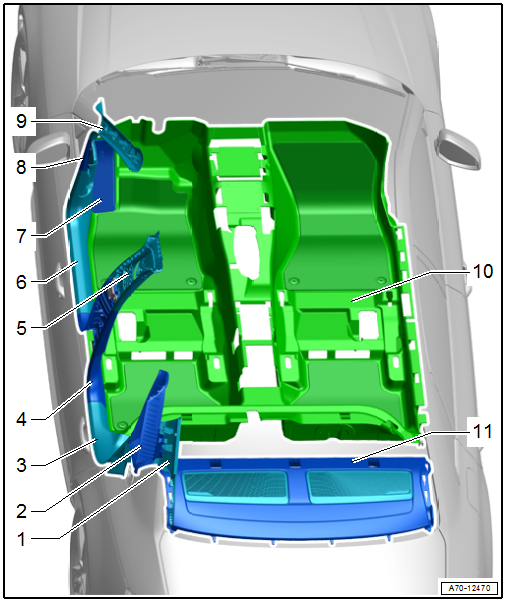
1 - D-Pillar Trim Panel
- Overview. Refer to → Chapter "Overview - D-Pillar Trim Panel".
2 - C-Pillar Trim Panel
- Overview. Refer to → Chapter "Overview - C-Pillar Trim Panel".
3 - Rear Sill Panel
- Overview. Refer to → Chapter "Overview - Sill Panel".
4 - B-Pillar Lower Trim Panel
- Overview. Refer to → Chapter "Overview - B-Pillar Trim Panel".
5 - B-Pillar Upper Trim Panel
- Overview. Refer to → Chapter "Overview - B-Pillar Trim Panel".
6 - Front Sill Panel
- Overview. Refer to → Chapter "Overview - Sill Panel".
7 - Footrest
- Removing and installing. Refer to → Chapter "Footrest, Removing and Installing".
8 - A-Pillar Gap Cover
- Removing and installing. Refer to → Chapter "A-Pillar Trim Panel, Removing and Installing".
9 - A-Pillar Trim Panel
- Overview. Refer to → Chapter "Overview - A-Pillar Trim Panel".
10 - Carpet
- Overview. Refer to → Chapter "Overview - Footrest and Carpet".
11 - Rear Shelf
- Overview. Refer to → Chapter "Overview - Rear Shelf".
Component Location Overview - Vehicle Interior Trim Panels, Avant
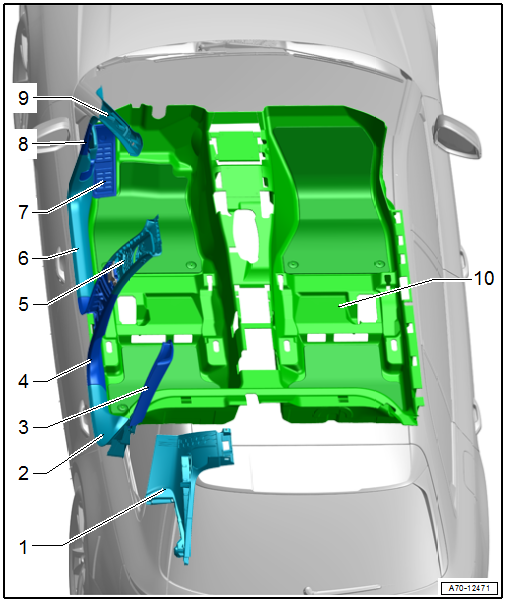
1 - D-Pillar Trim Panel
- Overview. Refer to → Chapter "Overview - D-Pillar Trim Panel".
2 - Rear Sill Panel
- Overview. Refer to → Chapter "Overview - Sill Panel".
3 - C-Pillar Trim Panel
- Overview. Refer to → Chapter "Overview - C-Pillar Trim Panel".
4 - B-Pillar Lower Trim Panel
- Overview. Refer to → Chapter "Overview - B-Pillar Trim Panel".
5 - B-Pillar Upper Trim Panel
- Overview. Refer to → Chapter "Overview - B-Pillar Trim Panel".
6 - Front Sill Panel
- Overview. Refer to → Chapter "Overview - Sill Panel".
7 - Footrest
- Removing and installing. Refer to → Chapter "Footrest, Removing and Installing".
8 - A-Pillar Gap Cover
- Removing and installing. Refer to → Chapter "A-Pillar Trim Panel, Removing and Installing".
9 - A-Pillar Trim Panel
- Overview. Refer to → Chapter "Overview - A-Pillar Trim Panel".
10 - Carpet
- Overview. Refer to → Chapter "Overview - Footrest and Carpet".
Overview - Sill Panel
1 - Rear Sill Panel
- Removing and installing. Refer to → Chapter "Rear Sill Panel, Removing and Installing".
- Press on until it engages audibly
- Stretch the door seal lip over
2 - Clip
- Quantity: 2
- Insert in the sill panel
- Remove any remaining clips in the body mounting points using the Omega Clip Tool -T40280-. To install, insert into the sill panel strip.
- Replace damaged or deformed clips
3 - A-Pillar Gap Cover
- Removing and installing. Refer to → Chapter "A-Pillar Trim Panel, Removing and Installing".
- Clip into the A-pillar upper trim panel and the sill panel
- Stretch the door seal lip over
4 - Bolt
- 2.5 Nm
- Only driver side
5 - Front Sill Panel
- Removing and installing. Refer to → Chapter "Front Sill Panel Strip, Removing and Installing".
- Press on until it engages audibly
- Stretch the door seal lip over
6 - Clip
- Quantity: 4
- Insert in the sill panel
- Remove any remaining clips in the body mounting points using the Omega Clip Tool -T40280-. To install, insert into the sill panel strip.
- Replace damaged or deformed clips
7 - Clip
- Insert in the sill panel
- Remove any remaining clips in the body mounting points using the Omega Clip Tool -T40280-. To install, insert into the sill panel strip.
- Replace damaged or deformed clips
8 - Clip
- Insert in the sill panel
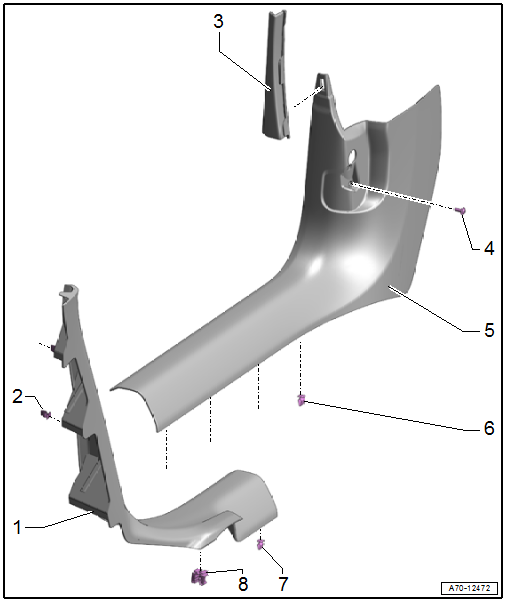
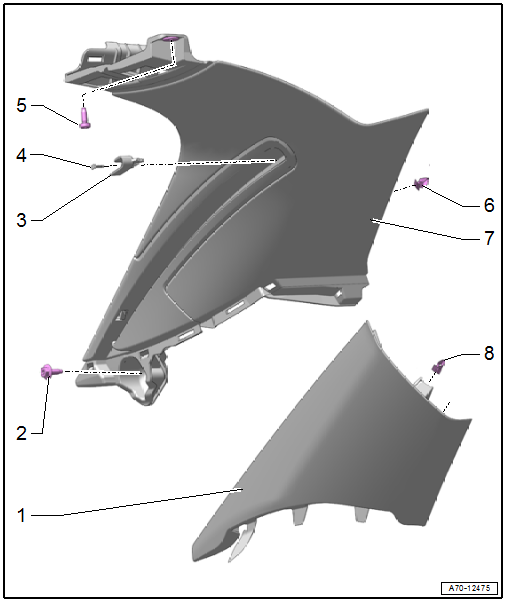
Overview - A-Pillar Trim Panel
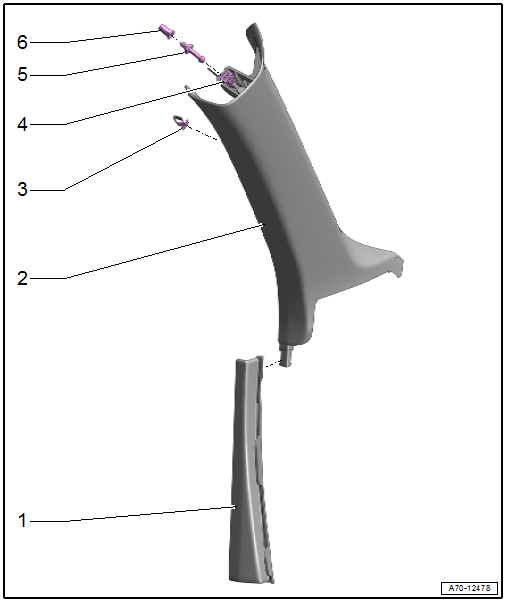
1 - A-Pillar Gap Cover
- Removing and installing. Refer to → Chapter "A-Pillar Trim Panel, Removing and Installing".
- Clip into the A-pillar upper trim panel and the sill panel
- Stretch the door seal lip over
2 - A-Pillar Trim Panel
- Removing and installing. Refer to → Chapter "A-Pillar Trim Panel, Removing and Installing".
- Press on until it engages audibly
- Stretch the door seal lip over
3 - Clip
- Insert in the trim panel
- Remove the clips that are still in the mounting points on the body using the Omega Clip Tool -T40280-.
- Replace damaged or deformed clips
4 - Clip
- With hooks
- Replace after removing the A-pillar trim panel
- Insert in the trim panel
5 - Retaining Pin
- 3.5 Nm
6 - Pop Rivet Nut
- Riveted into the A-pillar
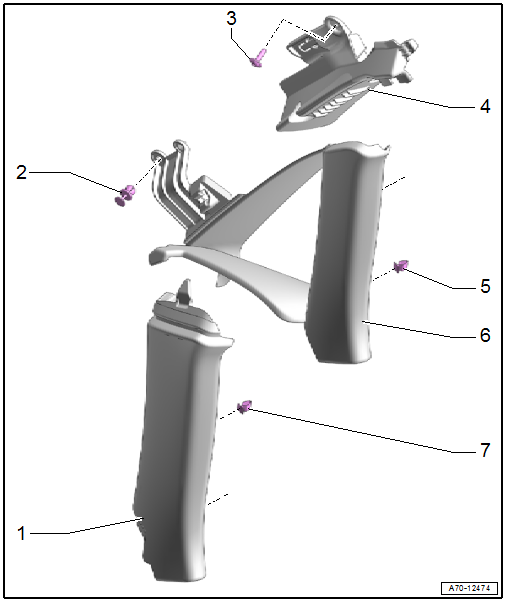
Overview - B-Pillar Trim Panel
1 - B-Pillar Lower Trim Panel
- Removing and installing. Refer to → Chapter "B-Pillar Lower Trim Panel, Removing and Installing".
- Clipped in the B-pillar
- Press on until it engages audibly
- Stretch the door seal lip over.
2 - Clip
- Quantity: 3
- Insert in the trim panel
- Remove any remaining clips in the body mounting points using the Omega Clip Tool -T40280-. To install, insert into the trim panel.
- Replace damaged or deformed clips
3 - Bracket
- Removing and installing. Refer to → Chapter "B-Pillar Upper Trim Panel, Removing and Installing".
- Clipped in the B-pillar
- Press on it until it locks
4 - B-Pillar Upper Trim Panel
- Removing and installing. Refer to → Chapter "B-Pillar Upper Trim Panel, Removing and Installing".
- Insert in the upper part of the mounting points on the roof and clip into the bracket
- Press on until it engages audibly
- Stretch the door seal lip over.
Overview - C-Pillar Trim Panel
1 - C-Pillar Trim Panel, Avant
- Removing and installing. Refer to → Chapter "C-Pillar Trim Panel, Removing and Installing, Avant".
- Insert at the top in the mounting points on the roof
- Press on until it engages audibly
- Stretch the door seal lip over
2 - Expanding Clip
- Remove using the Pliers -T40172C-
3 - Bolt
- 5 Nm
4 - Head Curtain Airbag Guide, Sedan
- Insert in the mounting points on the roof
5 - Clip
- Quantity: 2
- Insert in the trim panel
- Remove any remaining clips in the body mounting points using the Omega Clip Tool -T40280-. To install, insert into the trim panel.
- Replace damaged or deformed clips
6 - C-Pillar Trim Panel, Sedan
- Removing and installing. Refer to → Chapter "C-Pillar-Trim Panel, Removing and Installing, Sedan".
- Press on until it engages audibly
- Stretch the door seal lip over
7 - Clip
- Quantity: 2
- Insert in the trim panel
- Remove any remaining clips in the body mounting points using the Omega Clip Tool -T40280-. To install, insert into the trim panel.
- Replace damaged or deformed clips
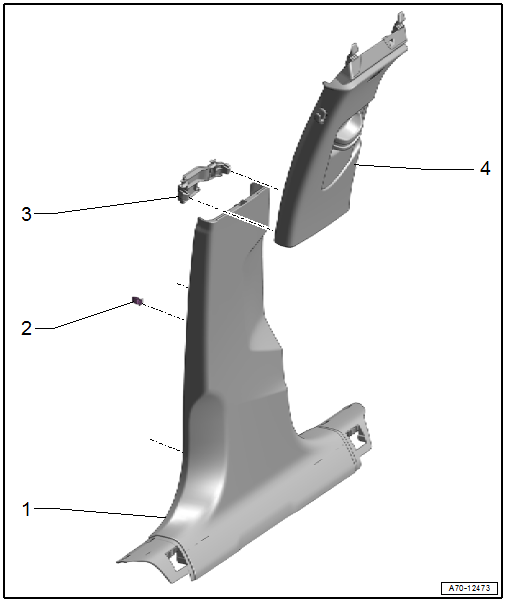
Overview - D-Pillar Trim Panel
1 - D-Pillar Trim Panel, Sedan
- Removing and installing. Refer to → Chapter "D-Pillar Trim Panel, Removing and Installing, Sedan".
- Engage in the rear shelf and press it onto the D-pillar until it engages audibly
2 - Bolt
- 2.5 Nm
3 - Roll Cover Catch
- Clipped into the guide rails
- Removing and installing. Refer to → Chapter "D-Pillar Trim Panel, Removing and Installing, Avant".
4 - Expanding Pin
- Insert into the catch and push on it
5 - Bolt
- 6 Nm
6 - Clip
- Insert in the trim panel
- Remove any remaining clips in the body mounting points using the Omega Clip Tool -T40280-. To install, insert into the trim panel.
- Replace damaged or deformed clips
7 - D-Pillar Trim Panel, Avant
- Removing and installing. Refer to → Chapter "D-Pillar Trim Panel, Removing and Installing, Avant".
- Press on until it engages audibly
- Stretch the rear lid seal lip
8 - Clip
- Quantity: 2
- Insert in the trim panel
- Remove any remaining clips in the body mounting points using the Omega Clip Tool -T40280-. To install, insert into the trim panel.
- Replace damaged or deformed clips
Overview - Footrest and Carpet
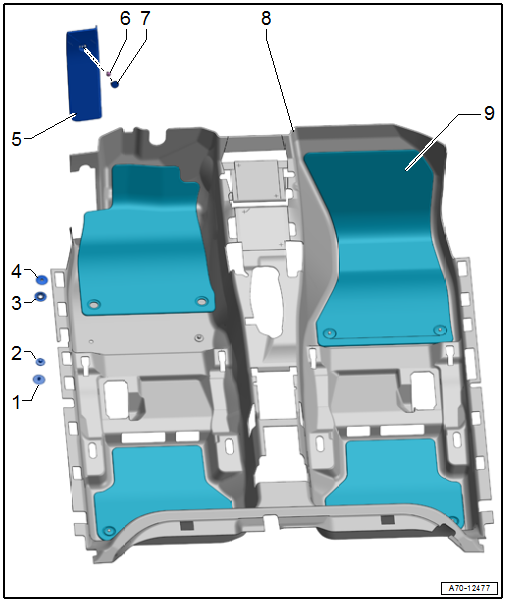
1 - Bracket
- For floor mat
- Quantity: 2
- Insert from below into the carpet
2 - Cap
- For floor mat
- Quantity: 2
- Unclip with Pry Lever -80-200-
- Press into the bracket until it clicks into place
3 - Bracket
- For floor mat
- Quantity: 2
- Insert from below into the floor mat
4 - Cap
- For floor mat
- Quantity: 2
- Unclip with Pry Lever -80-200-
- Press into the bracket until it clicks into place
5 - Footrest
- Removing and installing. Refer to → Chapter "Footrest, Removing and Installing".
- Engage in the relay and fuse panel
6 - Bolt
- 3 Nm
7 - Cap
- Press on until it engages audibly
8 - Carpet
- One piece
- With perforation
- Removing and installing. Refer to → Chapter "Carpet, Removing and Installing".
9 - Floor Mat
- Quantity: 4
Overview - Rear Shelf
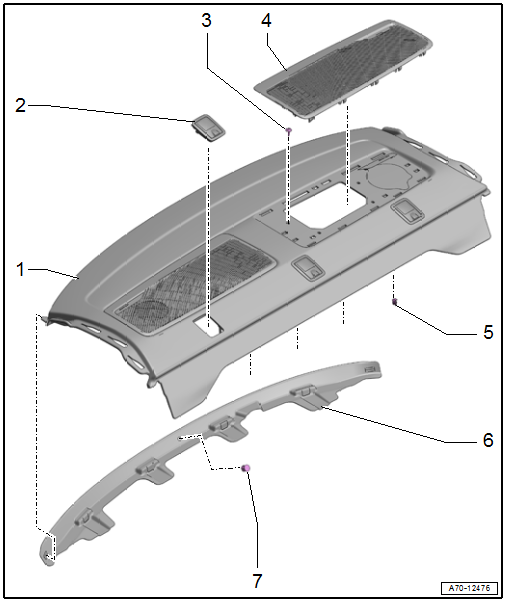
1 - Rear Shelf
- Removing and installing. Refer to → Chapter "Rear Shelf, Removing and Installing".
- Insert the rear shelf in the rear window frame and press on the shelf until it audibly latches into place.
2 - Child Seat Anchor Cap
- Quantity: 2 or 3; equipped on some models
- Removing and installing. Refer to → Chapter "Upper Child Seat Anchor Cover in Rear Shelf, Removing and Installing".
- Press on until it engages audibly
3 - Bolt
- 2 Nm
- Quantity: 4
4 - Speaker Trim
- Quantity: 2
- Equipped on some models
- Removing and installing. Refer to → Chapter "Speaker Trim, Removing and Installing".
- Insert in the rear shelf and press on it until it audibly latches.
5 - Clip
- Quantity: 4
- Insert in the rear shelf
- Remove any remaining clips in the body mounting points using the Omega Clip Tool -T40280-. To install, insert into the trim panel.
- Replace damaged or deformed clips
6 - Rear Window Frame Trim Panel
- Removing and installing. Refer to → Chapter "Rear Shelf, Removing and Installing".
7 - Expanding Clip
- Quantity: 3
- Remove using the Pliers -T40172C-
READ NEXT:
 Sill Panel, Removing and Installing
Front Sill Panel Strip, Removing and Installing
Special tools and workshop equipment required
Trim Removal Wedge -3409-
Omega Clip Tool -T40280-
Removing
- Move the front seat all the way bac
A-Pillar Trim Panel, Removing and Installing
Special tools and workshop equipment required
Trim Removal Wedge -3409-
Lever - Fuel Line -T10468-
Omega Clip Tool -T40280-
Caution
This procedure contains mandatory replaceable parts.
Footrest, Removing and Installing
Removing
- Pry off the cap -3- with a small
screwdriver.
- Remove the bolt -2- underneath.
- Pull the footrest -1- downward in
the direction of -arrow- and remove
it.
Installing
Ins
SEE MORE:
Front Door Trim Panel, Removing and Installing
Special tools and workshop equipment required
Wedge Set -T10383-
Wedge Set - Wedge 1 -T10383/1-
Removing
- Switch off the ignition.
- Unclip the decorative trim -1-
using the -T10383/1- in the direction of
-arrow A-.
- Release the remaining retainers, disengage the decorative tr
Battery Tester -VAS6161-
General Description:
WARNING
Risk of injury. Follow all warning messages and
safety precautions. Refer to
→ Chapter "Warnings and Safety Precautions".
It is not necessary to disconnect or remove the Battery -A-
when using the Battery Tester -VAS6161-.
The Battery Tester -VAS6161-
