Audi A4: Rear Door Trim Panels
Audi A4 (B9) 2016-2026 Service Manual / Body / Body Interior / Interior Trim / Rear Door Trim Panels
Overview - Rear Door Trim Panel
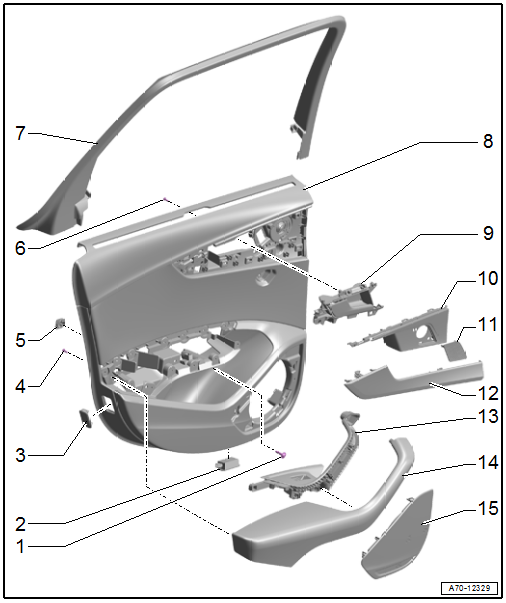
1 - Bolt
- 2.5 Nm
- For door trim panel
- Quantity: 3
2 - Rear Entry Lamp
- Driver Side Rear Entry Lamp -W83-
- Passenger Side Rear Entry Lamp -W84-
- Component location overview. Refer to → Electrical Equipment; Rep. Gr.96; Lamps; Component Location Overview - Rear Doors Lamps.
3 - Rear Reflector
- Vehicles with:
- Driver Side Rear Exit Warning Lamp -W113-
- Passenger Side Rear Exit Warning Lamp -W114-
- Component location overview. Refer to → Electrical Equipment; Rep. Gr.96; Lamps; Component Location Overview - Rear Doors Lamps.
4 - Bolt
- 1.2 Nm
- For pull handle with armrest
- Quantity: 15
5 - Clip
- For door trim panel
- Quantity: 7
- Insert in the trim panel
6 - Bolt
- 1.2 Nm
- For the interior door mechanism
- Quantity: 3
7 - Window Frame Trim Panel
- Removing and installing. Refer to → Chapter "Window Frame Trim Panel, Removing and Installing".
8 - Door Trim Panel
- Removing and installing. Refer to → Chapter "Rear Door Trim Panel, Removing and Installing".
9 - Interior Door Mechanism
- Removing and installing. Refer to → Chapter "Interior Door Mechanism, Removing and Installing".
10 - Interior Door Mechanism Decorative Trim
- Removing and installing. Refer to → Chapter "Interior Door Mechanism, Removing and Installing".
11 - Speaker Trim
- For high range speaker
- Removing and installing. Refer to → Chapter "Speaker Trim in Door Trim Panels, Removing and Installing".
- Press on until it engages audibly
12 - Decorative Trim
- Removing and installing. Refer to → Chapter "Rear Door Trim Panel, Removing and Installing".
13 - Switch Mount
- Removing and installing. Refer to → Chapter "Rear Pull Handle, Removing and Installing".
14 - Pull Handle with Armrest
- Removing and installing. Refer to → Chapter "Rear Pull Handle, Removing and Installing".
15 - Speaker Trim
- For the bass speaker
- Removing and installing. Refer to → Chapter "Speaker Trim in Door Trim Panels, Removing and Installing".
- Insert in the door trim panel and press on it until it engages audibly.
READ NEXT:
 Speaker Trim in Door Trim Panels, Removing and Installing
Special tools and workshop equipment required
Pry Lever -80-200-
Front Bass Speaker Trim, Removing
- Carefully pry out the speaker trim -1-
along the door trim panel seam using the Pry Lever
Rear Door Trim Panel, Removing and Installing
Special tools and workshop equipment required
Wedge Set -T10383-
Wedge Set - Wedge 1 -T10383/1-
Removing
- Switch off the ignition.
- Unclip the decorative trim -1-
using the -T10383/1-
Instrument Panel
Overview - Instrument Panel
1 - Screw/Expanding Clip
1.5 Nm
2 - Light Switch Trim
Removing and installing. Refer to
→ Chapter "Light Switch Trim, Removing and Install
SEE MORE:
ATF Circuit
Overview - ATF Circuit
Caution
Risk of damaging the transmission.
Remove all the plugs on the ATF lines and on the
transmission that were installed during removal.
The ATF cooling function will not work and the transmission
will be damaged if the plugs are forgotten.
WARNING
Wiring Harness Repair Set
Wiring Harness Repair Set -VAS1978-
The Wiring Harness Repair Set -VAS1978- makes optimal repair
quality possible in the realm of vehicle electronics. Using the
tools, repairs affecting harness connectors and for breaks in
wiring can be performed. For this purpose, complete repair wires
with ter
© 2019-2026 Copyright www.audia4b9.com
