Audi A4: Front Seats
Component Location Overview - Electric and Electronic Components
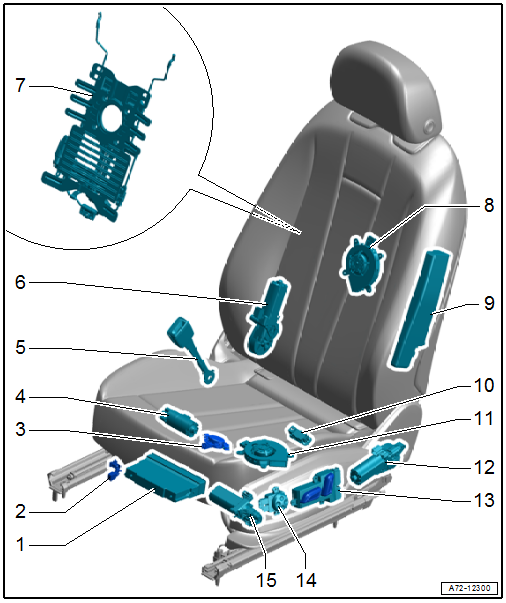
1 - Memory Seat/Steering Column Adjustment Control Module
- Memory Seat/Steering Column Adjustment Control Module -J136-
- Front Passenger Memory Seat Control Module -J521-
- Equipped on some models: Integrated seat ventilation and seat heating function
- Removing and installing. Refer to → Chapter "Seat Functions Control Module, Removing and Installing".
2 - Seat Position Sensor
- Driver Seat Position Sensor -G553-
- Front Passenger Seat Position Sensor -G554-
- Overview. Refer to → Chapter "Overview - Seat Position Sensor".
3 - Front Passenger Occupant Detection Sensor -G128-
- For the front passenger seat only
- Removing and installing. Refer to → Chapter "Front Passenger Occupant Detection Sensor -G128-, Removing and Installing".
4 - Seat Forward/Back Adjustment Motor
- Driver Seat Forward/Back Adjustment Motor -V28-
- Front Passenger Seat Forward/Back Adjustment Motor -V31-
- Integrated in the seat pan; Replace if the seat pan is faulty. Refer to → Chapter "Seat Forward/Back Adjuster, Removing and Installing, Seat Forward/Back Adjustment Motor"
5 - Seat Belt Switch
- Driver Seat Belt Switch -E24-
- Front Passenger Seat Belt Switch -E25-
- Removing and installing. Refer to → Chapter "Front Seat Belt Latch, Removing and Installing".
6 - Backrest Adjustment Motor
- Driver Backrest Adjustment Motor -V45-
- Front Passenger Backrest Adjustment Motor -V46-
- Overview. Refer to → Chapter "Overview - Front Backrest, Backrest Adjustment Motor".
7 - Lumbar Support
- Driver Seat Lumbar Support Curvature Adjustment Motor -V125-
- Driver Seat Lumbar Support Height Adjustment Motor -V129-
- Front Passenger Seat Lumbar Support Curvature Adjustment Motor -V126-
- Front Passenger Seat Lumbar Support Height Adjustment Motor -V130-
- Removing and installing. Refer to → Chapter "Lumbar Support Adjustment Motors -V125-/-V126-/-V129-/-V130-, Removing and Installing".
8 - Backrest fan
- Driver Seat Backrest Blower Fan -V388-
- Front Passenger Seat Backrest Blower Fan -V389-
- Removing and installing. Refer to → Chapter "Backrest Fan, Removing and Installing".
9 - Front Thorax Airbag
- With
- Driver Thorax Airbag Igniter -N199-
- Front Passenger Thorax Airbag Igniter -N200-
 WARNING
Risk of injury due to involuntary deployment.
Pay attention to the safety precautions when working with pyrotechnic components. Refer to → Chapter "Safety Precautions when Working with Pyrotechnic Components".
- Overview. Refer to → Chapter "Overview - Front Thorax Airbag".
10 - Rear Footwell Lamp
- Left Rear Footwell Lamp -W45-
- Right Rear Footwell Lamp -W46-
- Removing and installing. Refer to → Electrical Equipment; Rep. Gr.96; Lamps; Rear Footwell Lamps W45/W46 Removing and Installing.
11 - Seat Cushion Fan
- Driver Seat Cushion Blower Fan -V390-
Overview - Front Seat
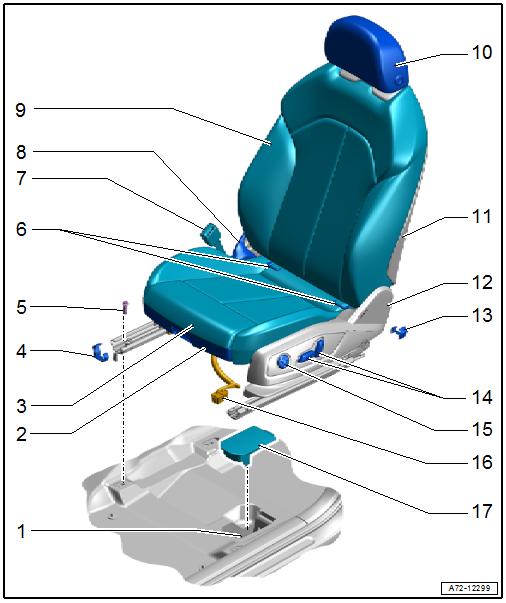
1 - Connector Station
- Connector assignment. Refer to → Wiring diagrams, Troubleshooting & Component locations.
2 - Seat Trim in Front
- Overview. Refer to → Chapter "Overview - Seat Pan, Trim Panels".
3 - Seat Pan
- Overview. Refer to → Chapter "Overview - Seat Pan".
4 - Front Cover
- For the seat rail
- Removing and installing. Refer to → Chapter "Front and Rear Seat Rail Cover, Removing and Installing".
5 - Bolt
- 50 Nm
- Quantity: 4
- Front seat, removing and installing. Refer to → Chapter "Front Seat, Removing and Installing".
6 - Child Seat Anchor
- For the front passenger seat only
- Overview. Refer to → Chapter "Overview - Front Child Seat Anchors".
7 - Front Seat Belt Latch
- Overview. Refer to → Chapter "Overview - Front Seat Belt Latch".
8 - Tunnel Side Seat Side Trim
- Overview. Refer to → Chapter "Overview - Seat Pan, Trim Panels".
9 - Backrest
- Overview. Refer to → Chapter "Overview - Front Backrest".
10 - Headrest
- Overview. Refer to → Chapter "Overview - Headrest".
11 - Backrest Cover
- Overview. Refer to → Chapter "Overview - Front Backrest".
12 - Seat Side Trim on Side Sill
- Overview. Refer to → Chapter "Overview - Seat Pan, Trim Panels".
13 - Rear Cover
- For the seat rail
- Removing and installing. Refer to → Chapter "Front and Rear Seat Rail Cover, Removing and Installing".
14 - Seat Adjustment Control Head
- Overview. Refer to → Chapter "Overview - Seat Pan, Power Seat Adjustment Actuator/Switch".
15 - Lumbar Support Adjustment Switch
- Overview. Refer to → Chapter "Overview - Seat Pan, Power Seat Adjustment Actuator/Switch".
16 - Connector
- With a corrugated tube for the modular wiring routing
- Modular wiring routing, disconnecting and connecting. Refer to → Chapter "Modular Wiring Routing, Disconnecting and Connecting".
17 - Cover
- For the connector station
Overview - Front Backrest
Overview - Front Backrest, Lumbar Support
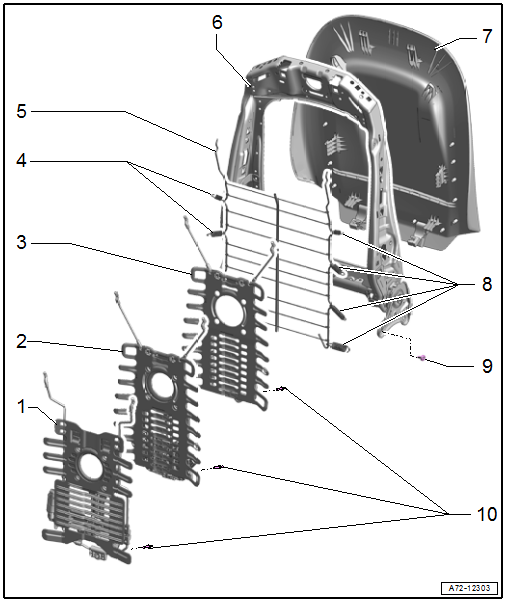
1 - Electro-Mechanical Lumbar Support
- Manufactured by Brose
- Removing and installing. Refer to → Chapter "Lumbar Support Adjustment Motors -V125-/-V126-/-V129-/-V130-, Removing and Installing".
2 - Electro-Mechanical Lumbar Support
- Manufactured by Schukra
- Removing and installing. Refer to → Chapter "Lumbar Support Adjustment Motors -V125-/-V126-/-V129-/-V130-, Removing and Installing".
3 - Fixed Lumbar Support
- No motors
- Equipped on some models: Power backrest adjustment without lumbar support
- Removing and installing. Refer to → Chapter "Lumbar Support Adjustment Motors -V125-/-V126-/-V129-/-V130-, Removing and Installing".
4 - Tension Springs
- For spring mat
- Note the different lengths
5 - Spring Mat
- Equipped on some models: Manual backrest adjustment without lumbar support
- Removing and installing. Refer to → Chapter "Spring Mat, Removing and Installing".
6 - Backrest
- Removing and installing. Refer to → Chapter "Front Backrest, Removing and Installing".
7 - Backrest Cover
- Removing and installing. Refer to → Chapter "Backrest Cover, Removing and Installing".
- Make sure it is engaged properly after installing
8 - Tension Springs
- For spring mat
- Note the different lengths
9 - Bolt
- 33 Nm
- Replace after removing
- Quantity: 4
- Self-locking
- Threaded holes for the bolts must be cleaned with a thread tap, For example
10 - Rivet
Overview - Front Backrest, Backrest Adjustment Motor
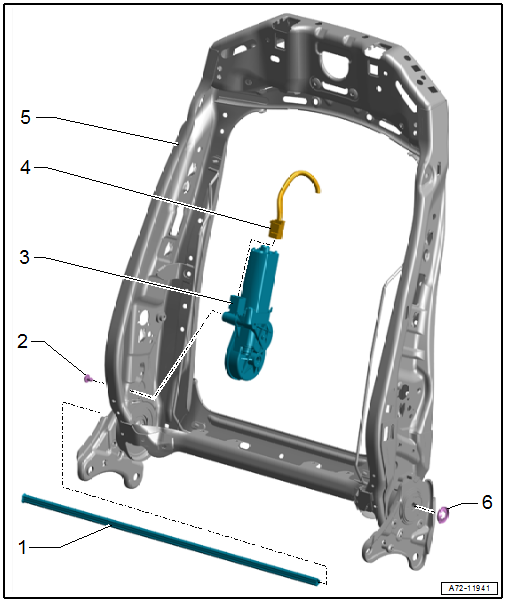
1 - Adjustment Shaft
2 - Bolt
- 7.5 Nm
3 - Backrest Adjustment Motor
- Removing and installing. Refer to → Chapter "Driver and Front Passenger Backrest Adjustment Motor -V45-/-V46-, Removing and Installing".
4 - Connector
5 - Backrest Frame
6 - Lock Washer
- Replace after removing
- Push onto the adjustment shaft so that there is still at least 1.0 mm of play
Overview - Headrest
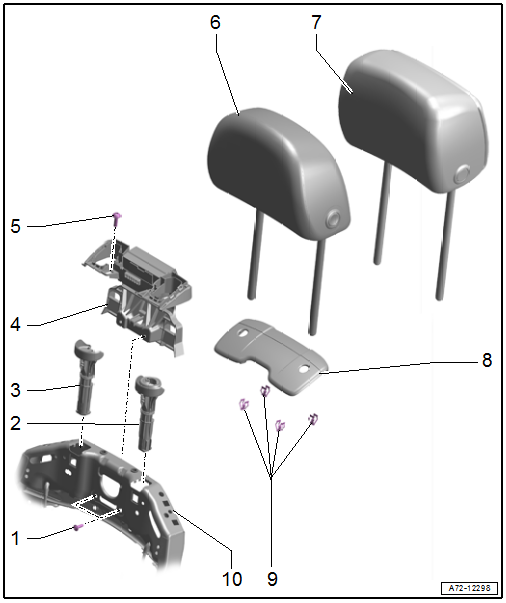
1 - Bolt
- 2.8 Nm
- Quantity: 2
2 - Left Headrest Guide
- With headrest release ring
- Removing and installing. Refer to → Chapter "Headrest Guide, Removing and Installing".
- Press until all three retainers are completely locked into the backrest frame
3 - Right Headrest Guide
- Removing and installing. Refer to → Chapter "Headrest Guide, Removing and Installing".
- Press until all three retainers are completely locked into the backrest frame
4 - Cover
- For headrest
- Removing and installing. Refer to → Chapter "Headrest Guide, Removing and Installing".
5 - Bolt
- 2.8 Nm
6 - Headrest
- With height and angle adjustment
- Cannot be disassembled
- Removing and installing. Refer to → Chapter "Headrest, Removing and Installing".
- Must be correctly locked in the headrest guides
7 - Headrest
- With height and depth adjustment
- Cannot be disassembled
- Removing and installing. Refer to → Chapter "Headrest, Removing and Installing".
- Must be correctly locked in the headrest guides
8 - Trim
- For headrest
- Removing and installing. Refer to → Chapter "Headrest, Removing and Installing".
9 - Clips
10 - Backrest Frame
Overview - Seat Pan
Overview - Seat Pan, Trim Panels

1 - Seat Side Trim on Side Sill
- For manual seat
- Removing and installing. Refer to → Chapter "Seat Side Trim on Side Sill Side, Removing and Installing".
- Press on until it clicks into place on the bracket and on the front seat trim
2 - Bolt
- 3.5 Nm
- Quantity: 2
3 - Adapter
- For the manual seat height adjustment lever
4 - Front Cover
- For the seat rail
- Quantity: 2
- Removing and installing. Refer to → Chapter "Front and Rear Seat Rail Cover, Removing and Installing".
- Slide on carefully until it clicks into place
5 - Seat Trim in Front
- For versions with seat depth adjuster
- Removing and installing. Refer to → Chapter "Front Seat Trim, Removing and Installing".
- Press on until it engages audibly
6 - Expanding Clip
7 - Tunnel Side Seat Side Trim
- Removing and installing. Refer to → Chapter "Seat Side Trim on Tunnel Side, Removing and Installing".
8 - Rear Cover
- For the seat rail
- Quantity: 2
- Removing and installing. Refer to → Chapter "Front and Rear Seat Rail Cover, Removing and Installing".
- Slide on carefully until it clicks into place
9 - Expanding Clip
10 - Center Cover
- For the seat rail
- Removing and installing. Refer to → Chapter "Center Seat Rail Cover, Removing and Installing".
11 - Expanding Clip
12 - Seat Side Trim on Side Sill
- For the power seat
- Removing and installing. Refer to → Chapter "Seat Side Trim on Side Sill Side, Removing and Installing".
- Press on until it clicks into place on the bracket and on the front seat trim
13 - Hand Wheel
- For manual backrest adjustment
- Removing and installing. Refer to → Chapter "Backrest Adjustment Hand Wheel, Removing and Installing".
- Press on until it engages audibly.
14 - Expanding Clip
15 - Lever
- For manual seat height adjustment
- Removing and installing. Refer to → Chapter "Seat Height Adjuster, Removing and Installing, Seat Height Adjustment Handle".
- Before pressing on, check if the spring in inserted in the shaft for seat height adjustment
16 - Spring
- For the manual seat height adjustment lever
Overview - Seat Pan, Seat without Seat Depth Adjuster
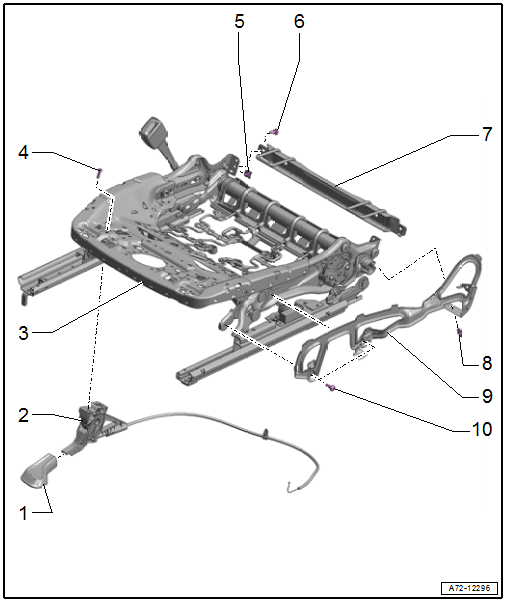
1 - Handle
- For manual seat forward/back adjustment
- Replace after removing
- Removing and installing. Refer to → Chapter "Seat Forward/Back Adjuster, Removing and Installing, Seat Forward/Back Adjustment Handle".
2 - Release Cable
- For manual seat forward/back adjustment
- Unit with lever
- Removing and installing. Refer to → Chapter "Seat Forward/Back Adjuster, Removing and Installing, Seat Forward/Back Adjuster Release Cable".
3 - Seat Pan
- Upper and lower frame cannot be separated
- To replace, install the electrical and electronic components and wires in the new seat pan
4 - Bolt
- 3.5 Nm
- Quantity: 2
5 - Spring Nut
- Quantity: 2
- Attached in the seat pan
- Replace any damaged or deformed spring nuts
6 - Bolt
- Quantity: 2
- Tightening specification -Item 4-
7 - Child Seat Anchor
- Front passenger seat only
- Bolted to the seat pan
- Check after an accident. Refer to → Chapter "Child Seat Anchors, Checking After Collision".
- Replace damaged or deformed child seat anchor
- Overview. Refer to → Chapter "Overview - Front Child Seat Anchors".
8 - Expanding Clip
9 - Bracket
- For seat side trim on side sill side
- Removing and installing. Refer to → Chapter "Seat Side Trim on Side Sill Side, Removing and Installing".
10 - Bolt
- 7.5 Nm
- Quantity: 2
Overview - Seat Pan, Seat with Seat Depth Adjuster
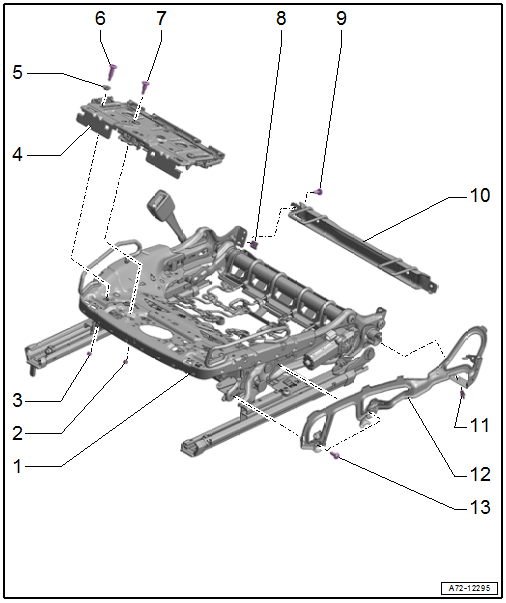
1 - Seat Pan
2 - Nut
- 6.5 Nm
- Quantity: 2
3 - Nut
- 6.5 Nm
- Quantity: 2
4 - Seat Depth Adjuster
- Removing and installing. Refer to → Chapter "Seat Depth Adjuster, Removing and Installing".
5 - Sleeve
- Quantity: 2
6 - Bolt
- Quantity: 2
7 - Bolt
- Quantity: 2
8 - Spring Nut
- Quantity: 2
- Attached in the seat pan
- Replace any damaged or deformed spring nuts
9 - Bolt
- Quantity: 2
- Tightening specification -Item 4-
10 - Child Seat Anchor
- Front passenger seat only
- Bolted to the seat pan
- Check after an accident. Refer to → Chapter "Child Seat Anchors, Checking After Collision".
- Replace damaged or deformed child seat anchor
- Overview. Refer to → Chapter "Overview - Front Child Seat Anchors".
11 - Expanding Clip
12 - Bracket
- For seat side trim on side sill side
- Removing and installing. Refer to → Chapter "Seat Side Trim on Side Sill Side, Removing and Installing".
13 - Bolt
- 7.5 Nm
- Quantity: 2
Overview - Seat Pan, Fire Extinguisher
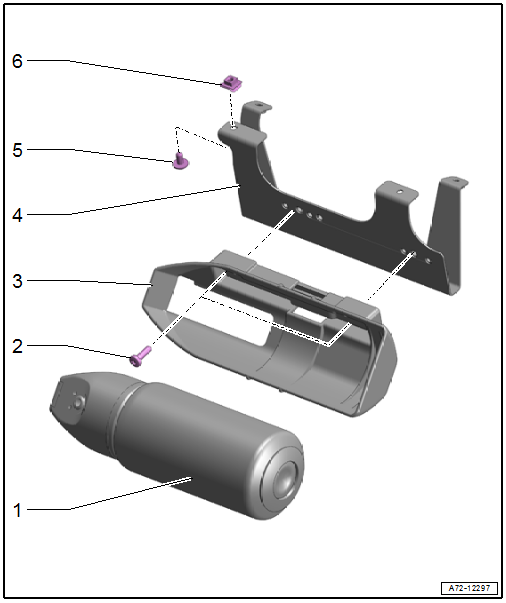
1 - Fire Extinguisher
2 - Bolt
- 7.5 Nm
- Quantity: 2
3 - Fire Extinguisher Mount
4 - Bracket
5 - Bolt
- 7.5 Nm
- Quantity: 4
6 - Spring Nut
- Quantity: 4
- Attached in the seat pan
- Replace any damaged or deformed spring nuts
Overview - Seat Pan, Power Seat Forward/Back Adjustment
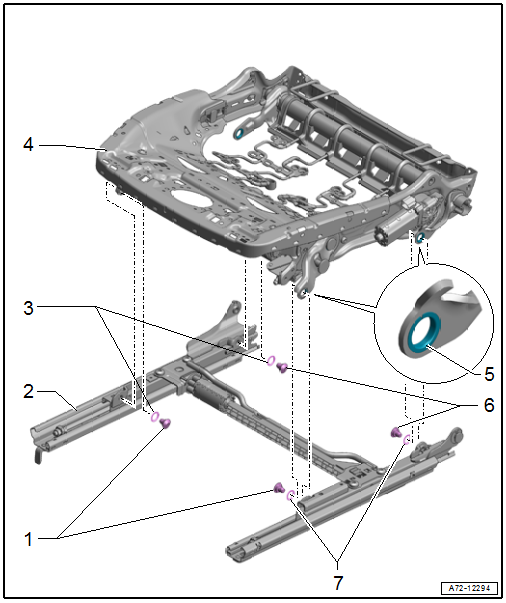
1 - Bolts
- 22 Nm
- Replace after removing
- Self-locking
- Clean the threaded hole for the bolt with For example a thread tap.
2 - Seat Pan Lower Frame
- With forward/back adjustment motor
- Removing and installing. Refer to → Chapter "Seat Forward/Back Adjuster, Removing and Installing, Seat Forward/Back Adjustment Motor".
3 - Thrust Washers
- No longer installed after removing
4 - Seat Pan Upper Frame
- Install all electrical and electronic components and wires in the new upper frame.
- Removing and installing. Refer to → Chapter "Seat Forward/Back Adjuster, Removing and Installing, Seat Forward/Back Adjustment Motor".
5 - Bushing
6 - Bolts
- 22 Nm
- Replace after removing
- Self-locking
- Clean the threaded hole for the bolt with For example a thread tap.
7 - Thrust Washers
- No longer installed after removing
Overview - Seat Pan, Seat Height Adjustment
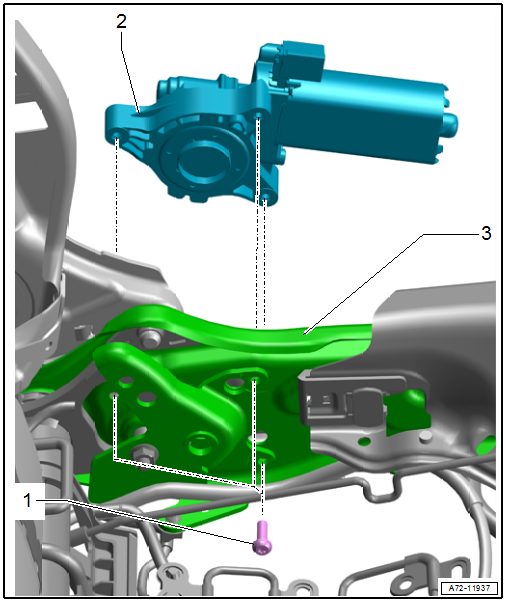
1 - Bolt
- 5 Nm
- Quantity: 3
2 - Height Adjustment Motor
- Power front seat
- Removing and installing. Refer to → Chapter "Seat Height Adjuster, Removing and Installing, Seat Height Adjustment Motor".
3 - Seat Pan
Overview - Seat Pan, Seat Angle Adjuster
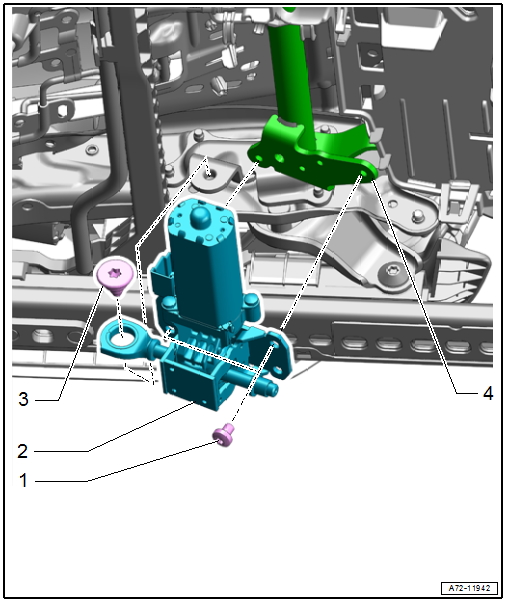
1 - Bolt
- 10 Nm
- Replace after removing
- Quantity: 2
- Self-locking
- Threaded holes for the bolts must be cleaned with a thread tap, for example
2 - Angle Adjustment Motor
- Removing and installing. Refer to → Chapter "Seat Angle Adjuster, Removing and Installing".
3 - Bolt
- 20 Nm
- Replace after removing
- Self-locking
- Clean the threaded hole for the bolt with for example a thread tap.
4 - Adjustment Shaft
Overview - Seat Pan, Power Seat Adjustment Actuator/Switch
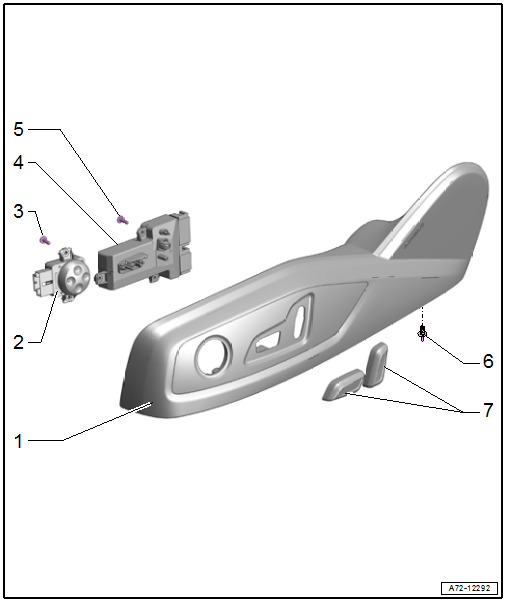
1 - Seat Side Trim on Side Sill
- Removing and installing. Refer to → Chapter "Seat Side Trim on Side Sill Side, Removing and Installing".
2 - Lumbar Support Adjustment Switch
- Removing and installing. Refer to → Chapter "Driver and Front Passenger Seat Lumbar Support Adjustment Switch -E176-/-E177-, Removing and Installing".
3 - Bolt
- 0.4 Nm
- Quantity: 2
4 - Seat Adjustment Control Head
- Removing and installing. Refer to → Chapter "Driver/Front Passenger Seat Adjustment Control Head -E470-/-E471-, Removing and Installing".
5 - Bolt
- 0.4 Nm
- Quantity: 3
6 - Expanding Clip
7 - Actuator
- For seat and backrest adjuster
- Clipped on
- Removing and installing. Refer to → Chapter "Driver/Front Passenger Seat Adjustment Control Head -E470-/-E471-, Removing and Installing".
- Press on until it engages audibly.
READ NEXT:
 Front Seat, Removing and Installing
Front Seat, Removing and Installing
Special tools and workshop equipment required
Universal Vehicle Protector -VAS871001-
Airbag Lockout Adapter -VAS6282-
Removing
WARNING
Risk of injury
Airbag Adapter, Connecting and Disconnecting
Special tools and workshop equipment required
Airbag Lockout Adapter -VAS6282-
Airbag Connector, Disconnecting
- Move the front seat all the way to the rear and then into its
highest position
Seat Forward/Back Adjuster, Removing and Installing
Seat Forward/Back Adjuster, Removing and Installing, Seat Forward/Back
Adjustment Handle
Removing
- Unscrew the front seat and tip to the rear with the wires
attached. Refer to
→ Chapte
SEE MORE:
Windshield washer
system
Fig. 163 Motor compartment: washer fluid reservoir cap
The windshield washer reservoir contains the
cleaning solution for the windshield/rear window*
and the headlight washer system. The reservoir capacity
can be found.
To reduce the risk of lime scale deposits on the
spray nozzles, use clean wat
Service Station, Connecting with No Connection on Low- and High Pressure
Side of Refrigerant Circuit
General Information
On the following vehicles, no service connection is provided
for the service station on the low-pressure side of the
refrigerant circuit; adapters must be used to connect the
service station to the refrigerant circuit on these vehicles:
Audi 80, Audi Cabrio, Audi Coupe
Audi
