Audi A4: Fuses
Replacing fuses
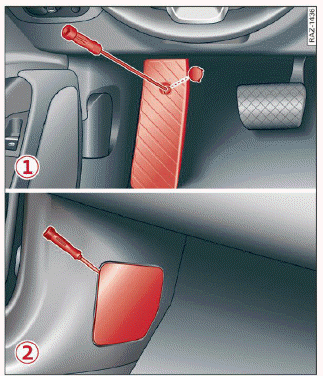
Fig. 181 Driver's side footwell (left-hand drive vehicles):
footrest 1, front passenger's side footwell (right-hand
drive vehicles): cover 2
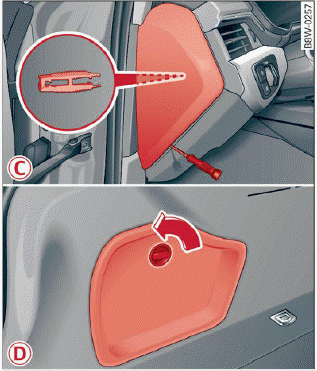
Fig. 182 Driver's side cockpit (left-hand drive/right-hand
drive vehicles): cover (C), left side of luggage compartment:
cover (D)
Fuses are installed in various locations in your vehicle.
The following information only lists fuses that you can change yourself. To have other fuses changed, contact an authorized Audi dealer or authorized Audi Service Facility. The following table does not list fuse locations that are not used.
A fuse that has blown will have metal strips that have burned through.
The fuses are located in the footwell under the footrest (left-hand drive vehicle) (1) or behind the cover (right-hand drive vehicle) (2). Additional fuses are located on the front side of the cockpit (driver's side) (C) and under the left cover in the luggage compartment (D).
- Switch the ignition and all electrical equipment off.
- Check the table that follows to see which fuse belongs to the affected equipment.
- Remove the screwdriver and the reversible Torx bit from the vehicle tool kit.
- Remove the footrest or the corresponding cover.
- Remove the colored plastic clip from the fuse panel, if necessary fig. 183.
- Remove the clip from the rear side of the cover (C).
- Remove the fuse using the clip.
- Replace the blown fuse only with a fuse that has the same amp rating.
- Reinstall the plastic bracket, if present.
- Reattach the footrest or the cover.
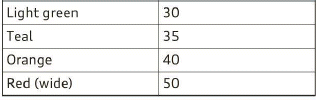
Fuse color identification

WARNING
Do not repair fuses and never replace a blown fuse with one that has a higher amp rating.
This can cause damage to the electrical system and increases the risk of fire.
Note
If a new fuse burns out again shortly after you have installed it, have the electrical system checked as soon as possible by an authorized Audi dealer or authorized Audi Service Facility.
Tips
Some of the equipment listed in the following tables applies only to certain model versions or certain optional equipment.
READ NEXT:
 Fuse assignment - footwell
Fig. 183 Driver's footwell (left-hand drive vehicle): fuse
panel with plastic clip
Fig. 184 Front passenger's footwell (right-hand drive vehicle):
fuse panel with plastic clip
Fuse panel (A) (brown)
SEE MORE:
Care and cleaning
General information
Regular, proper care helps to maintain your vehicle's
value. It can also be a requirement when
submitting warranty claims for corrosion damage
and paint defects on the body.
The required cleaning and care products can be
obtained from an authorized Audi dealer or authorized
Serv
Speaker Trim in Door Trim Panels, Removing and Installing
Special tools and workshop equipment required
Pry Lever -80-200-
Front Bass Speaker Trim, Removing
- Carefully pry out the speaker trim -1-
along the door trim panel seam using the Pry Lever -80-200- in
the direction of -arrow A-.
- Disengage the speaker trim at the rear from the door
