Audi A4: Peripheral Camera Control Module -J928-, Removing and Installing
The Peripheral Camera Control Module -J928- is located behind the left luggage compartment trim panel.
 Note
Note
If replacing the control module, select the "Replace control module" function for the corresponding control module on the Vehicle Diagnostic Tester.
Removing
- Turn off the ignition and all electrical equipment and remove the ignition key.
- Remove the cover from the left luggage compartment side trim panel. Refer to → Body Interior; Rep. Gr.70; Luggage Compartment Trim Panels; Overview - Luggage Compartment Side Trim Panel.
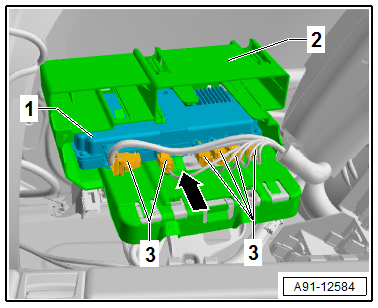
- Release and disconnect the connectors -3-.
- Push the catch -arrow- downward.
- Remove the Peripheral Camera Control Module -J928--1- to the center from the bracket -2-.
Installing
- Install in reverse order of removal. Note the following:
- Perform the calibration. Refer to → Chapter "Peripheral Camera, Calibrating".
Rear Peripheral Camera -R246-, Removing and Installing
Rear Peripheral Camera -R246-, Removing and Installing, Sedan
The Rear Peripheral Camera -R246- is installed in the rear lid handle button. It is permanently attached to the button.
The handle button must be replaced when replacing the Rear Peripheral Camera -R246-.
Removing
- Turn off the ignition and all electrical equipment and remove the ignition key.
- Remove the rear lid lower trim panel. Refer to → Body Interior; Rep. Gr.70; Luggage Compartment Trim Panels; Rear Lid Lower Trim Panel, Removing and Installing.
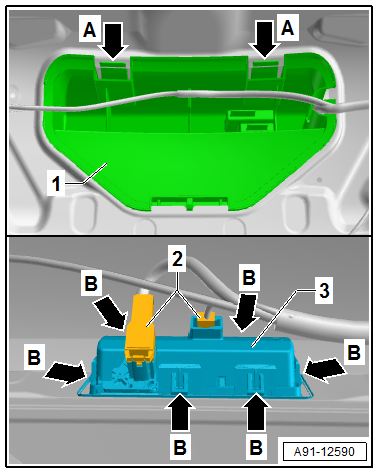
- Release the retainers -A arrows-.
- Remove the anti-theft protection -1- from the rear lid.
- Release and disconnect the connectors -2-.
- Release the catches -arrows B-.
- Remove the handle button -3- from the rear lid.
Installing
- Install in reverse order of removal. Note the following:
- Close the rear lid.
- Perform the calibration. Refer to → Chapter "Front Peripheral Camera -R243-, Removing and Installing".
Rear Peripheral Camera -R246-, Removing and Installing, Avant
The Rear Peripheral Camera -R246- is installed in the rear lid handle button. It is permanently attached to the button.
The handle button must be replaced when replacing the Rear Peripheral Camera -R246-.
Removing
- Turn off the ignition and all electrical equipment and remove the ignition key.
- Remove the rear lid lower trim panel. Refer to → Body Interior; Rep. Gr.70; Luggage Compartment Trim Panels; Rear Lid Lower Trim Panel, Removing and Installing.
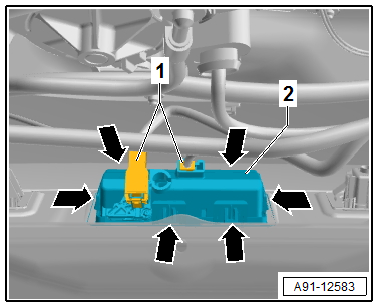
- Release and disconnect the connectors -1-.
- Release the retainers -arrows-.
- Remove the handle button -2- from the rear lid.
Installing
- Install in reverse order of removal. Note the following:
- Close the rear lid.
- Perform the calibration. Refer to → Chapter "Front Peripheral Camera -R243-, Removing and Installing".
READ NEXT:
 Front Peripheral Camera -R243-, Removing and Installing
The Front Peripheral Camera -R243- is installed in the
radiator grille under the Audi rings.
Removing
- Turn off the ignition and all electrical equipment and
remove the ignition key.
- Re
Peripheral Camera, Calibrating
Calibration System -VAS721001-, Installing and Aligning
After performing service work on the vehicle, it may be
necessary to calibrate the peripheral camera system. In detail,
this is the case after
Mobile Online Services
Overview - Mobile Online Services
The mobile online service (1W3) consist of the eCall,
connected Gateway, and the Data Bus on Board Diagnostic
Interface -J533-.
The Data Bus on Board Diagnostic Int
SEE MORE:
Refrigerant Circuit
Refrigerant Circuit with Expansion Valve and Evaporator
The following illustration shows only the principle of a
refrigerant circuit, the design of the refrigerant circuit in
the respective vehicle can be found in the vehicle-specific
repair manual. Refer to
→ Heating, Ventilation and Air
Rearview Camera -R189-, Removing and Installing
Rearview Camera -R189-, Removing and Installing, Sedan
The Rearview Camera -R189- is inside the rear lid handle
button. It permanently attached to the handle button.
If the Rearview Camera -R189- must be replaced, then the
handle button must also be replaced.
Removing
- Turn off the ignition
