Audi A4: Parking Lock Emergency Release Cable, Removing and Installing
Removing
 WARNING
There is a risk of an accident from the vehicle starting to roll.
Pull the parking brake button to activate the electro-mechanical parking brake.
- Remove the selector mechanism. Refer to → Chapter "Selector Mechanism, Removing and Installing".
- Remove the noise insulation.
- Remove the nuts -1 and 3- and free up the mount -2- for the emergency release.
- Release the catches in direction of -arrows- and lower the bracket -4- for the emergency release.
- Vehicles with 6-cylinder TDI engine: remove the rear noise insulation. Refer to → Body Exterior; Rep. Gr.66; Noise Insulation; Noise Insulation, Removing and Installing.
- Loosen the heat shield for the tunnel and place on the driveshaft. Refer to → Body Exterior; Rep. Gr.66; Trim Strips / Trim / Extensions / Trim Panels; Overview - Heat Shield.
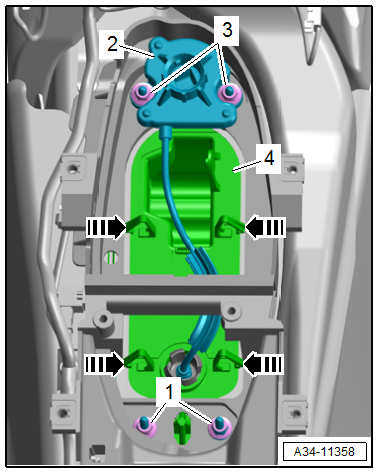
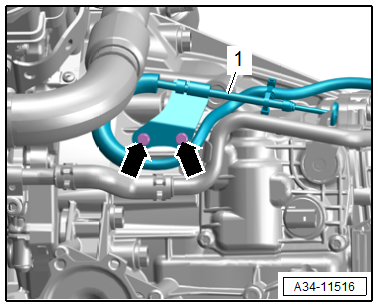
- Remove the bolts -arrows- and free up and remove the parking lock emergency release cable -1-.
 Note
Note
A vehicle with a 6-cylinder TDI engine is shown.
Installing
Install in the reverse order of removal while noting the following:
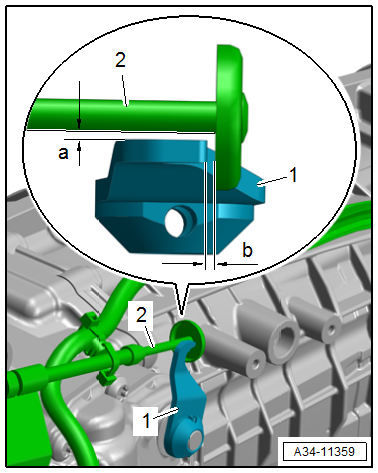
- Make sure that the distance between the emergency release cable -2- and lever -1- is maintained.
- Dimension -a- = minimum 1 mm.
- Dimension -b- = minimum 1 mm.
- Check the parking lock emergency release. Refer to → Chapter "Emergency Release from P".
Tightening Specifications
- Refer to → Chapter "Overview - Parking Lock Emergency Release"
- Refer to → Body Exterior; Rep. Gr.66; Trim Strips / Trim / Extensions / Trim Panels; Overview - Heat Shield.
- Refer to → Body Exterior; Rep. Gr.66; Noise Insulation; Overview - Noise Insulation.
Parking Lock Solenoid -N486-/Parking Lock Sensor -G747-, Removing and Installing
Special tools and workshop equipment required
- Spring Pin Drift
Removing
- Remove the rear noise insulation. Refer to → Body Exterior; Rep. Gr.66; Noise Insulation; Noise Insulation, Removing and Installing.
- Remove the Mechatronic. Refer to → Chapter "Mechatronic, Removing and Installing".
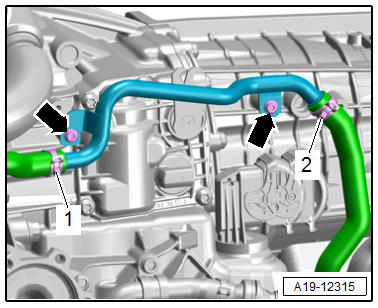
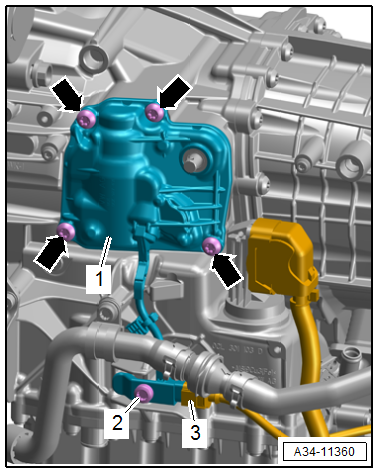
- Remove the bolts -arrows- and push the coolant pipe for the transmission to the side.
- Remove the bolts -arrows- and move the parking lock emergency release cable -1- to the side.
- Remove the bolt -2-.
- Disconnect the connector -3-.
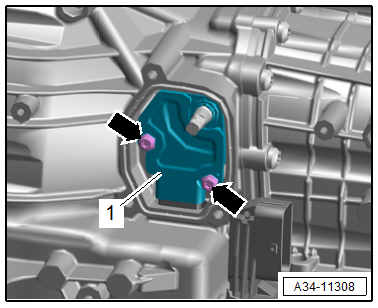
- Remove the bolts -arrows- and the parking lock cover -1-.
- Remove the seal for the parking lock shaft from the cover.
- Remove the bolts -arrows- and the Parking Lock Solenoid - N486--1-.
Installing
Install in the reverse order of removal while noting the following:
- Install the seal for the parking lock shaft. Refer to → Chapter "Parking Lock Shaft Seal, Replacing".
Tightening Specifications
- Refer to → Chapter "Overview - Selector Mechanism"
- Refer to → Servicing - Engine; Rep. Gr.19; Coolant Pipes; Overview - Coolant Pipes
- Refer to → Body Exterior; Rep. Gr.66; Noise Insulation; Overview - Noise Insulation.
Parking Lock Shaft Seal, Replacing
Special tools and workshop equipment required
- Spring Pin Drift
- Seal Installer - Selector Shaft -T10135-
Procedure
- Remove the rear noise insulation. Refer to → Body Exterior; Rep. Gr.66; Noise Insulation; Noise Insulation, Removing and Installing.
- Remove the bolts -arrows- and push the coolant pipe for the transmission to the side.
Note
Ignore -1 and 2-.
- Remove the bolts -arrows- and move the parking lock emergency release cable -1- to the side.
- Drive out the spring pin -arrow- with the spring pin drift and remove the lever -1- for the parking lock.
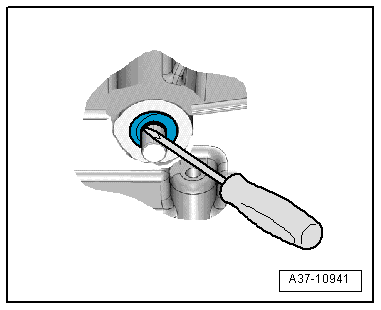
 Caution
There is a risk of damaging the running surface of the shaft for the parking lock.
Position the screwdriver carefully.
- Pierce the seal using a small screwdriver and pull it out.
- Apply ATF to the outer edge and the space between the sealing lips of the new seal.
- Installation position: open side of the seal faces the transmission.
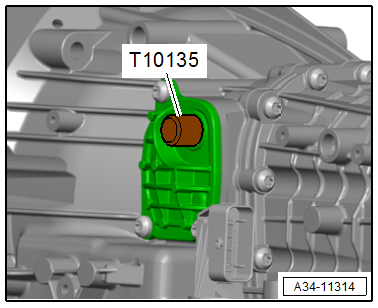
- Push the seal on the shaft for the parking lock.
- Install the seal all the way in using the Seal Installer - Selector Shaft -T10135-. Do not tilt the seal when installing.
- Push on the lever for the parking lock and tighten.
Tightening Specifications
- Refer to → Chapter "Overview - Selector Mechanism"
- Refer to → Servicing - Engine; Rep. Gr.19; Coolant Pipes; Overview - Coolant Pipes
- Refer to → Body Exterior; Rep. Gr.66; Noise Insulation; Overview - Noise Insulation.
READ NEXT:
 Transmission, Removing
Special tools and workshop equipment required
Hose Clamps - Up To 25 mm -3094-
Torque Wrench 1332 Insert - Ring Wrench - 16mm -VAG1332/14-
Engine and Gearbox Jack -VAS6931-
Torque Wrench Adapter
Transmission, Installing
Special tools and workshop equipment required
Clutch Module Assembly Aid -T40169-
Clutch Module Transportation Lock -T40170-
As well as all the special tools listed for the removal.
Procedure
&
Transmission Tightening Specifications
Note
The tightening specifications apply only to lightly greased,
oiled, phosphated or blackened nuts and bolts.
Additional lubricants, such as engine oil or transmission
fluid are permit
SEE MORE:
Air Intake Grille, Removing and Installing
Air Intake Grille, Removing and Installing, Center
Removing
- Remove the front bumper cover end plate. Refer to
→ Chapter "Front Bumper Cover End Plate, Removing and
Installing".
- Free up the wiring harness -3-.
- Remove the bolts -2-.
- Release the retainers in the dire
Steering
Description
Electromechanical steering supports the driver's
steering movements by electronically adapting
the power steering depending on the vehicle
speed. The settings depend on the selected Audi
drive select* mode.
Dynamic steering
Applies to: vehicles with dynamic steering
The driving dynamic
