Audi A4: Subframe Mount
Overview - Subframe Mount
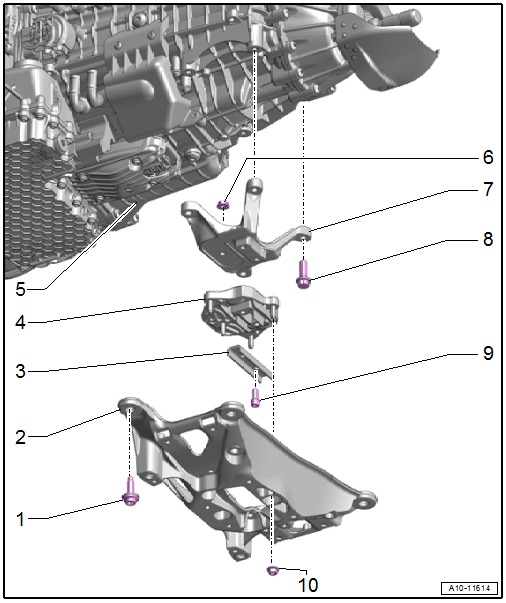
1 - Bolt
- 70 Nm for FWD vehicles (M10x40 10.9)
- 40 Nm +90º for AWD vehicles (M10x40 8.8)
2 - Tunnel Crossmember
- Removing and installing. Refer to → Chapter "Tunnel Crossmember, Removing and Installing".
3 - Stop
- For the transmission mount
4 - Transmission Mount
- Removing and installing. Refer to → Rep. Gr.10; Subframe Mount; Transmission Mount, Removing and Installing.
5 - Transmission
6 - Nut
- 20 Nm
7 - Transmission Support
- Removing and installing. Refer to → Rep. Gr.10; Subframe Mount; Transmission Mount, Removing and Installing.
8 - Bolt
- 40 Nm
9 - Bolt
- 20 Nm +90º
- Replace after removing
10 - Nut
- 20 Nm
Tunnel Crossmember, Removing and Installing
Special tools and workshop equipment required
- Engine and Gearbox Jack -VAS6931-
- Engine/Gearbox Jack - Gearbox Support -T10337-
Removing
- Remove the rear noise insulation. Refer to → Body Exterior; Rep. Gr.66; Noise Insulation; Noise Insulation, Removing and Installing.
- Place the Engine/Gearbox Jack - Gearbox Support -T10337- on the Engine and Gearbox Jack -VAS6931- and set it on the bottom of the transmission, as shown in the image.
- Raise the transmission slightly.
 WARNING
There is the risk of an accident.
The Engine and Gearbox Jack -VAS6931- may only be used during assembly and must not sit unsupervised under the vehicle.
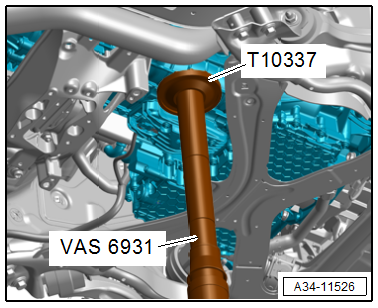
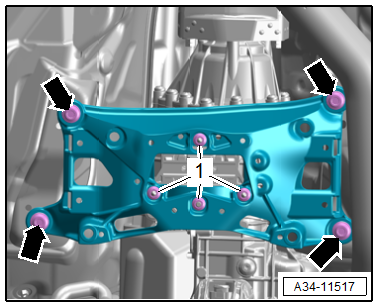
- Remove the bolts -arrows- and the nuts -1- and remove the tunnel crossmember.
Installing
Install in reverse order of removal.
Tightening Specifications
- Refer to → Chapter "Overview - Subframe Mount"
- Refer to → Body Exterior; Rep. Gr.66; Noise Insulation; Overview - Noise Insulation.
READ NEXT:
 Transmission Fluid Circuit
Overview - Transmission Fluid Circuit
1 - Plug/Plugs
For the ATF check and fill hole -item 1-
→ Item
2 - Plug
35 Nm
Replace after removing
For the transmission flui
ATF Circuit
Overview - ATF Circuit
Caution
Risk of damaging the transmission.
Remove all the plugs on the ATF lines and on the
transmission that were installed during removal.
The ATF cooling functio
Transmission Fluid
Transmission Fluid Level, Checking
Special tools and workshop equipment required
Torx Socket - T60 -T40087-
Protective Eyewear
Procedure
Note
General repair instructions. Refer to
→&n
SEE MORE:
Rearview Camera -R189-, Removing and Installing
Rearview Camera -R189-, Removing and Installing, Sedan
The Rearview Camera -R189- is inside the rear lid handle
button. It permanently attached to the handle button.
If the Rearview Camera -R189- must be replaced, then the
handle button must also be replaced.
Removing
- Turn off the ignition
General information
Park the vehicle as far as possible from moving
traffic in the event of a breakdown. In the event
of a flat tire, park the vehicle on a level surface.
If you are on a steep hill, be especially careful.
Set the parking brake.
Switch the emergency flashers on.
Have the passengers exit the vehi
