Audi A4: Transmission, Removing
Special tools and workshop equipment required
- Hose Clamps - Up To 25 mm -3094-
- Torque Wrench 1332 Insert - Ring Wrench - 16mm -VAG1332/14-
- Engine and Gearbox Jack -VAS6931-
- Torque Wrench Adapter -VAS6948-
- Gearbox Support -T40173-
- Wrench - 21mm -T40263-
- Adapter -T40314-
- Tensioning Strap -T10038-
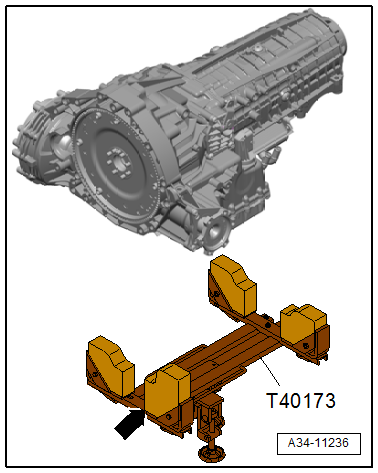
Preparing the Gearbox Support -T40173-:
- The bracket -arrow- must be turned so that the longer side faces upward, as shown.
Procedure
- Disable the ATF pump and drain the hydraulic pressure reservoir. Refer to → Chapter "ATF Pump, Deactivating and Draining the Hydraulic Pump Reservoir".
- Switch the ignition off.
- Bring the front wheels into the straight-ahead position and remove. Refer to → Suspension, Wheels, Steering; Rep. Gr.44; Wheels, Tires.
 Caution
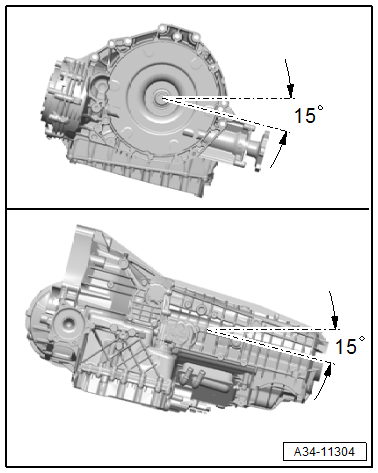
Risk of damaging the transmission by mixing ATF and transmission fluid (MTF) through the same bleeder.
- The transmission filled with ATF and (MTF) transmission fluid must be tilted a maximum of 15Âş in lateral and longitudinal direction.
- If more of an incline is needed, then the ATF and (MTF) transmission fluids must be drained. Refer to → Chapter "ATF, Draining and Filling" and → Chapter "Transmission Fluid, Draining and Filling".
- Remove the engine cover. Refer to → Rep. Gr.10; Engine Cover.
- Disconnect the battery ground cable. Refer to → Electrical Equipment; Rep. Gr.27; Battery; Battery, Disconnecting and Connecting.
- Remove the subframe crossbrace. Refer to → Suspension, Wheels, Steering; Rep. Gr.40; Subframe; Subframe Crossbrace, Removing and Installing.
Caution
Risk of damaging the suspension components.
Do not rest the vehicle on its wheels if the subframe mount, the steering gear or the subframe crossbrace are not installed correctly.
- Remove the front exhaust pipe. Refer to → Engine Mechanical; Rep. Gr.26; Exhaust Pipe/Muffler; Overview - Muffler.
Vehicles with 3.0L TDI Engine
- Remove the emissions control module. Refer to → Rep. Gr.26; Emissions Control; Emissions Control Module, Removing and Installing.
Continuation for All Vehicles
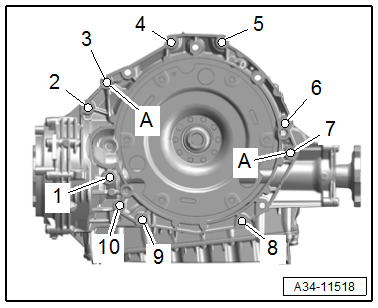
- Remove the bolts -2 through 5- connecting the engine to the transmission that are accessible from above.
AWD Vehicles
- Remove the driveshaft. Refer to → Rear Final Drive; Rep. Gr.39; Driveshaft; Driveshaft, Removing and Installing.
Continuation for All Vehicles
- Remove the steering intermediate shaft from the steering gear and the push together. Refer to → Suspension, Wheels, Steering; Rep. Gr.48; Steering Column; Steering Intermediate Shaft, Removing and Installing.
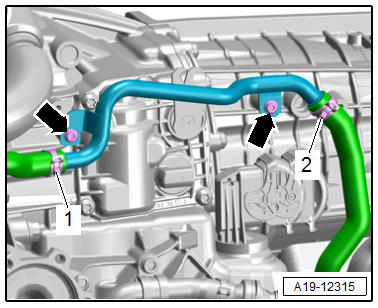
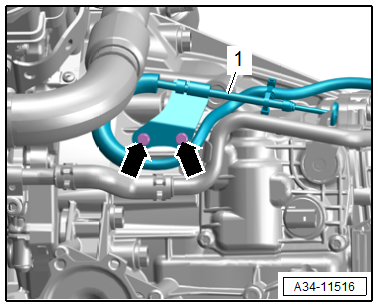
- Remove the bolts -arrows- for the coolant pipe for the transmission.
- Remove the bolts -arrows- and free up the parking lock emergency release cable -1-.
- Support the engine in the installation position. Refer to → Rep. Gr.10; Subframe Mount; Engine, Supporting in Installation Position.
 Note
Note
To catch escaping coolant, place a cloth underneath.
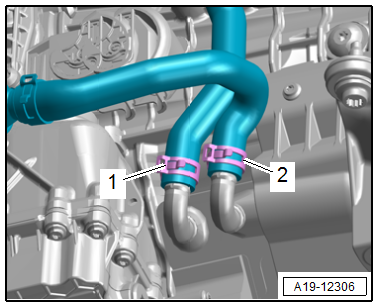
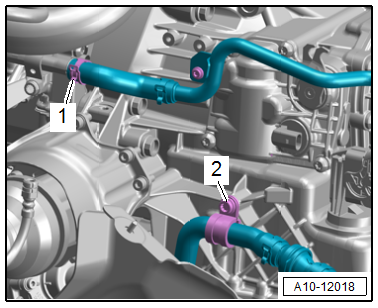
- Loosen the hose clamps -1 and 2- and then disconnect and remove the coolant hoses with Hose Clamps - Up To 25mm -3094-.
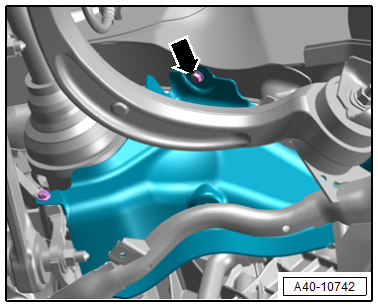
- Remove the subframe shield -arrow- under the right and left drive axle. Refer to → Suspension, Wheels, Steering; Rep. Gr.40; Subframe; Overview - Subframe.
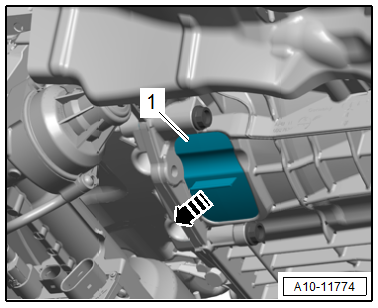
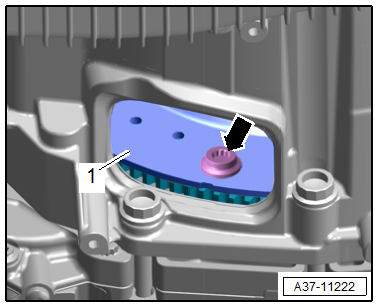
- Remove the lower cover -1- from the transmission in direction of -arrow-.
Caution
Danger of camshaft timing chain skipping.
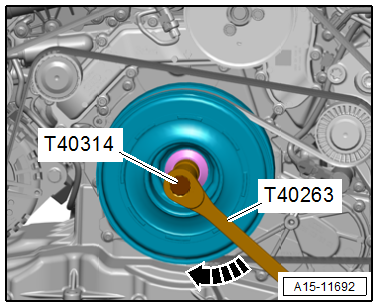
Turn the crankshaft only in the direction of engine rotation -arrow-.
- Turn the crankshaft with the Wrench - 21mm -T40263- and Adapter -T40314-.
Vehicles with 3.0L TDI Engine
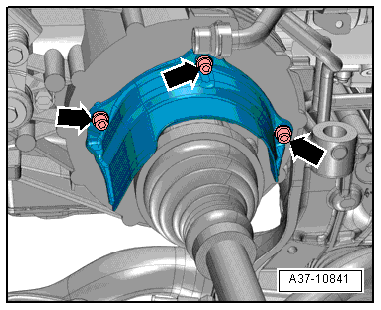
- Remove the six bolts -arrow- for the flywheel -1- while turning the crankshaft 60Âş further in the direction of engine rotation.
Vehicles with 4-Cylinder Engine
- Remove the three bolts -arrow- for the flywheel -1- while turning the crankshaft 120Âş further in the direction of engine rotation.
Continuation for All Vehicles
- Remove the right drive axle heat shield. Refer to → Suspension, Wheels, Steering; Rep. Gr.40; Drive Axle; Drive Axle Heat Shield, Removing and Installing.
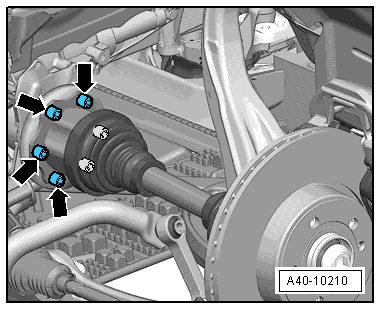
- Remove the left and right drive axle from the transmission flange shaft. Refer to → Suspension, Wheels, Steering; Rep. Gr.40; Drive Axle; Drive Axle, Removing and Installing.
- Remove the bolt -2- and move the coolant hose to the side.
Caution
There is a risk of destroying the transmission control module (Mechatronic) with electrostatic discharge.
- Always "discharge" the static electricity before working with connectors. Do this by touching a grounded object, for example vehicle ground, the heater or the hoist.
- Do not touch connector terminals in the transmission connector with hands.
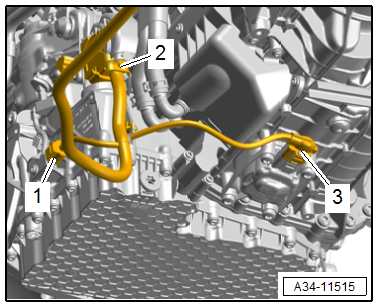
- Disconnect the connectors:
1 - For the Parking Lock Solenoid -N486-
2 - For the Transmission Control Module -J217-
3 - For the Transmission Electric Pump 2 -V553-
- Remove the bolt -1- with the Torque Wrench 1332 Insert - Ring Wrench - 16mm - VAG1332/14- and the Torque Wrench Adapter -VAS6948-.
- Remove the starter slightly from the transmission and leave it in the installation position.
- Remove remaining transmission to engine connecting bolts -6 through 10-.
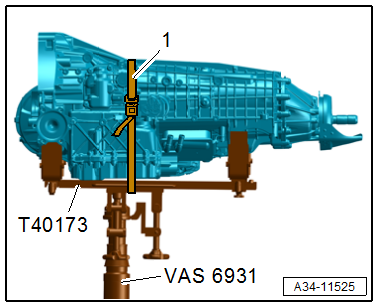
- Place the Engine and Gearbox Jack -VAS6931- with the prepared Gearbox Support -T40173- under the transmission and secure with the tensioning strap -1- as shown.
- Remove the tunnel crossmember. Refer to → Chapter "Tunnel Crossmember, Removing and Installing".
- Push the transmission off the engine and lower it carefully using the Engine and Gearbox Jack -VAS6931- while doing so pay attention to wires and the selective catalytic reduction line.
READ NEXT:
 Transmission, Installing
Special tools and workshop equipment required
Clutch Module Assembly Aid -T40169-
Clutch Module Transportation Lock -T40170-
As well as all the special tools listed for the removal.
Procedure
&
Transmission Tightening Specifications
Note
The tightening specifications apply only to lightly greased,
oiled, phosphated or blackened nuts and bolts.
Additional lubricants, such as engine oil or transmission
fluid are permit
Subframe Mount
Overview - Subframe Mount
1 - Bolt
70 Nm for FWD vehicles (M10x40 10.9)
40 Nm +90Âş for AWD vehicles (M10x40 8.8)
2 - Tunnel Crossmember
Removing and installing. Refer to
â
SEE MORE:
Selector Lever Handle, Removing and Installing
Note
Both the selector lever handle and the selector lever boot
are removed together.
Special tools and workshop equipment required
Trim Removal Wedge -3409-
Torque Wrench 1410 - VAG1410-
Removing
Ignition switched off.
- Remove the selector lever handle upper section
-1- upward
Rear Window, Removing and Installing
Undamaged Rear Window, Removing and Installing, Sedan
Special tools and workshop equipment
required
Cutting Tool for Bonded Windows -VAS6452-
Cutting Tool for Bonded Windows - Wire Reel -VAS6452/1-
Read the repair information. Refer to
→ Chapter "Repair Information"
Required tools and ma
