Audi A4: Left and Right Rear Treble Speaker -R14-/-R16-, Removing and Installing
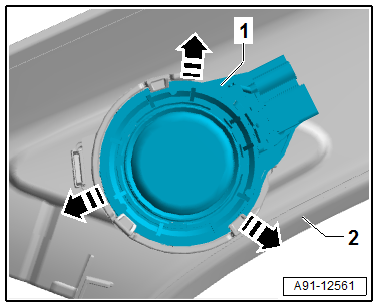
The Left Rear Treble Speaker -R14-/Right Rear Treble Speaker -R16--1- are inside the rear doors at the top.
Removing and installing is identical.
Removing
- Turn off the ignition and all electrical equipment and remove the ignition key.
- Remove the rear door trim panel. Refer to → Body Interior; Rep. Gr.70; Rear Door Trim Panels; Rear Door Trim Panel, Removing and Installing.
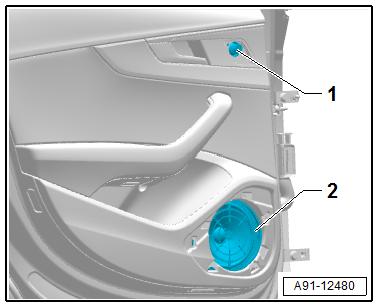
- Release and disconnect the connector from the Left Rear Treble Speaker -R14--1-.
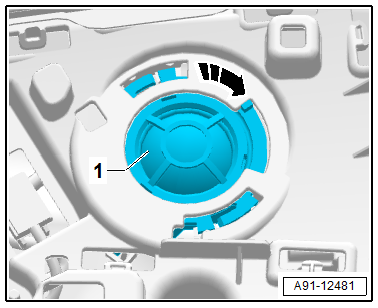
- Turn the Left Rear Treble Speaker -R14--1- in the direction of -arrow- until it can be removed from the door trim panel.
Installing
- Installation is identical in reverse order of removal.
Left and Right Front Treble Speaker -R20-/-R22-, Removing and Installing
Left and Right Front Treble Speaker -R20-/-R22-, Removing and Installing, 8RM/9VD
The Left Front Treble Speaker -R20--1- and Right Front Treble Speaker -R22--4- are located in the front instrument panel.
Removing and installing is identical.
Removing
- Turn off the ignition and all electrical equipment and remove the ignition key.
- Remove the side speaker mount with the speaker trim. Refer to → Body Interior; Rep. Gr.70; Instrument Panel; Overview - Instrument Panel.
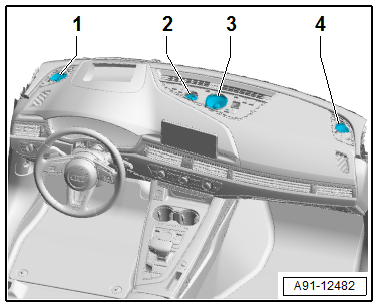
- Remove the bolts -1- on the Left Front Treble Speaker -R20--2- and remove the Left Front Treble Speaker -R20--2- upward.
- Release and disconnect the connector from the Left Front Treble Speaker -R20--2-.

Installing
- Install in reverse order of removal. Note the following:
Tightening Specifications
- Refer to → Chapter "Component Location Overview - Sound System, Speaker, Sedan"
- Refer to → Chapter "Component Location Overview - Sound System, Speaker, Avant"
Left and Right Front Treble Speaker -R20-/-R22-, Removing and Installing, 9VS
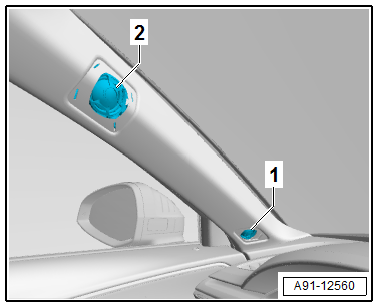
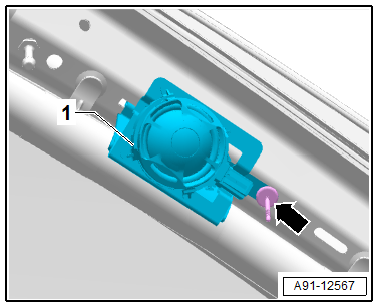
The Left Front Treble Speaker -R20-/Right Front Treble Speaker -R22--1- are located in the A-pillar trim panels.
Removing and installing is identical.
Removing
- Turn off the ignition and all electrical equipment and remove the ignition key.
- Remove the A-pillar trim panel. Refer to → Body Interior; Rep. Gr.70; Vehicle Interior Trim Panels; Overview - A-Pillar Trim Panel.
- Release and disconnect the connector from the Left Front Treble Speaker -R20--1-.
- Press the tabs in the direction of -arrow- until the Left Front Treble Speaker -R20--1- can be removed from the A-pillar trim panel -2-.
Installing
- Installation is identical in reverse order of removal.
Left and Right Front Treble Speaker 2 -R220-/-R221-, Removing and Installing
The Left Front Treble Speaker 2 -R220-/Right Front Treble Speaker 2 -R221--2- are located in the upper A-pillars.
Removing and installing is identical.
Removing
- Turn off the ignition and all electrical equipment and remove the ignition key.
- Remove the A-pillar trim panel. Refer to → Body Interior; Rep. Gr.70; Vehicle Interior Trim Panels; A-Pillar Trim Panel, Removing and Installing.
- Release and disconnect the connector from the Left Front Treble Speaker 2 -R220--1-.
- Remove the rivet -arrow- with a suitable drill bit.
- Remove the Left Front Treble Speaker 2 -R220--1-.
 Caution
Always remove any shavings resulting from the drilling otherwise they may cause corrosion damage later.
If the paint on the door frame gets damaged during drilling, touch-up immediately.
Installing
- Install in reverse order of removal. Note the following:
Use special pop rivets. Pay attention to the part number. Refer to the Parts Catalog.
READ NEXT:
 Front Midrange Speaker, Removing and Installing
The Left Front Midrange Speaker -R103-/Right Front Midrange
Speaker -R104--1- are located in
the center of the front doors.
Removing and installing is identical.
Removing
- Turn off the ignitio
Subwoofer -R211-, Removing and Installing
Subwoofer -R211-, Removing and Installing, Sedan
The Subwoofer -R211- is located in the rear shelf.
Removing
- Turn off the ignition and all electrical equipment and
remove the ignition key.
-&n
Effects Speaker, Removing and Installing
Left and Right Effects Speaker -R209-/-R210-, Removing and Installing,
Sedan
Special tools and workshop equipment required
Trim Removal Wedge -3409-
The Left Effects Speaker -R209-/Right Effects S
SEE MORE:
Bag Hook, Removing and Installing
Removing, Sedan
- Remove the bolts -arrows-, and
remove the hook -1-.
Removing, Avant
- Push the bag hook -1- into the bag
hook mount in the direction of -arrow A-.
- At the same time, turn the bag hook all the way
counter-clockwise in the direction of
-arrow B- and remove it.
&
Name Badges and Emblems
Overview - Name Badges and Emblems
1 -
Emblem
Removing and installing. Refer to
→ Chapter "Radiator Grille Name Badges and Emblems, Removing and
Installing".
2 -
quattro Name Badge
Equipped on some models
Removing and installing. Refer to
→ Chapter "Radiato
