Audi A4: Subwoofer -R211-, Removing and Installing
Subwoofer -R211-, Removing and Installing, Sedan
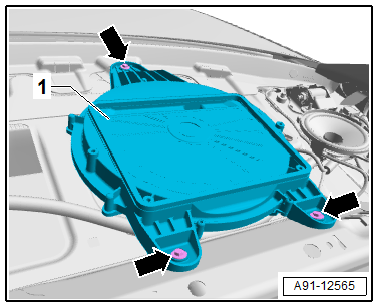
The Subwoofer -R211- is located in the rear shelf.
Removing
- Turn off the ignition and all electrical equipment and remove the ignition key.
- Remove the rear shelf. Refer to → Body Interior; Rep. Gr.70; Vehicle Interior Trim Panels; Rear Shelf, Removing and Installing.
- Release and disconnect the connector from the Subwoofer -R211--1-.
- Remove the bolts -arrows- from the Subwoofer -R211--1-.
- Remove the Subwoofer -R211--1- upward.
Installing
- Install in reverse order of removal. Note the following:
Tightening Specifications
- Refer to → Chapter "Component Location Overview - Sound System, Speaker, Sedan"
Subwoofer -R211-, Removing and Installing, Avant
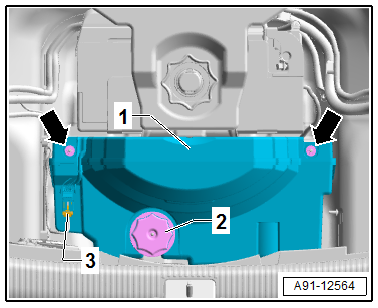
The Subwoofer -R211- is located in the spare tire well.
Removing
- Turn off the ignition and all electrical equipment and remove the ignition key.
- Remove the luggage compartment floor.
- Release and disconnect the connector -3- from the Subwoofer -R211--1-.
- Remove the bolt -2- from the Subwoofer -R211--1-.
- Remove the nuts -arrows- from the Subwoofer -R211--1-.
- Remove the Subwoofer -R211--1- upward out of the spare tire well.
Installing
- Install in reverse order of removal. Note the following:
Tightening Specifications
- Refer to → Chapter "Component Location Overview - Sound System, Speaker, Avant"
Subwoofer -R211-, Removing and Installing
Subwoofer -R211-, Removing and Installing, Sedan
The Subwoofer -R211- is located in the rear shelf.
Removing
- Turn off the ignition and all electrical equipment and remove the ignition key.
- Remove the rear shelf. Refer to → Body Interior; Rep. Gr.70; Vehicle Interior Trim Panels; Rear Shelf, Removing and Installing.
- Release and disconnect the connector from the Subwoofer -R211--1-.
- Remove the bolts -arrows- from the Subwoofer -R211--1-.
- Remove the Subwoofer -R211--1- upward.
Installing
- Install in reverse order of removal. Note the following:
Tightening Specifications
- Refer to → Chapter "Component Location Overview - Sound System, Speaker, Sedan"
Subwoofer -R211-, Removing and Installing, Avant
The Subwoofer -R211- is located in the spare tire well.
Removing
- Turn off the ignition and all electrical equipment and remove the ignition key.
- Remove the luggage compartment floor.
- Release and disconnect the connector -3- from the Subwoofer -R211--1-.
- Remove the bolt -2- from the Subwoofer -R211--1-.
- Remove the nuts -arrows- from the Subwoofer -R211--1-.
- Remove the Subwoofer -R211--1- upward out of the spare tire well.
Installing
- Install in reverse order of removal. Note the following:
Tightening Specifications
- Refer to → Chapter "Component Location Overview - Sound System, Speaker, Avant"
READ NEXT:
 Effects Speaker, Removing and Installing
Left and Right Effects Speaker -R209-/-R210-, Removing and Installing,
Sedan
Special tools and workshop equipment required
Trim Removal Wedge -3409-
The Left Effects Speaker -R209-/Right Effects S
Overview - Antenna Systems
Overview - Antenna Systems, Sedan, USA
The antenna systems consist of window antennas, a Roof
Antenna - R216- and bumper antennas.
Window Antennas
Antenna -R11- (AM/FM1)/TV Antenna 1 -R55- (TV1) to
SEE MORE:
ATF Circuit
Overview - ATF Circuit
Caution
Risk of damaging the transmission.
Remove all the plugs on the ATF lines and on the
transmission that were installed during removal.
The ATF cooling function will not work and the transmission
will be damaged if the plugs are forgotten.
WARNING
Refresh Charging with Battery Charger -VAS5903-
WARNING
Risk of injury. Follow all warning messages and
safety precautions. Refer to
→ Chapter "Warnings and Safety Precautions".
WARNING
Do not check or charge a Battery -A- when the visual
indicator has "no color or is
bright yellow". Jump starting must not be used!
Th
