Audi A4: Rear Bumper Cover, Removing and Installing
Special tools and workshop equipment required
- Body Socket -T40078-
- Depending on the equipment version, the following additional work must be performed.
Removing
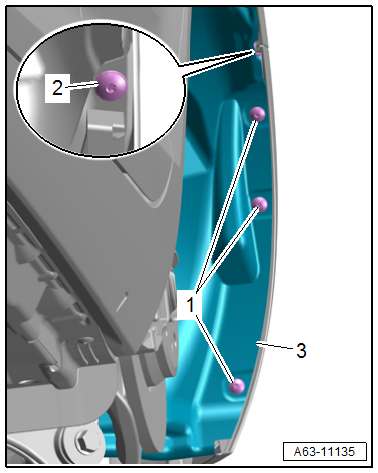
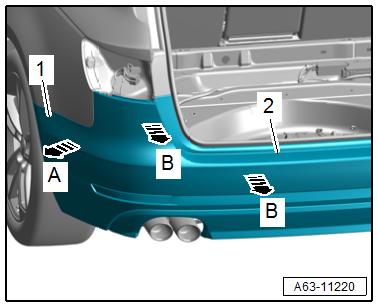
- Remove the bolts -1-.
- Push the wheel housing liner -3- to the side.
- Remove the bolt -2-.
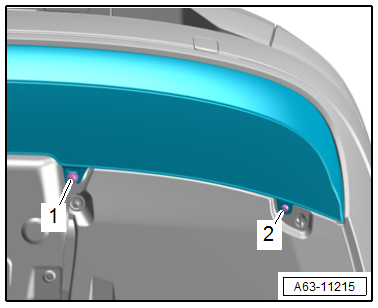
- Remove the nuts -1- and bolt -2-.
- Remove the tail lamps. Refer to → Electrical Equipment; Rep. Gr.94; Tail Lamps; Tail Lamp, Removing and Installing.
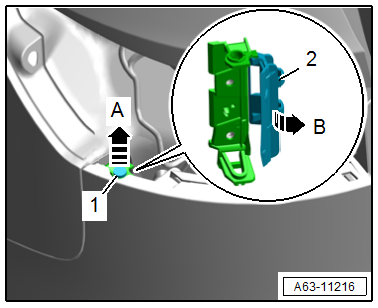
- Pull the locking mechanism -1- upward in the direction of -arrow A-.
- Open the mount -2- up to the locking mechanism in the direction of -arrow B-.
- Remove the rear lid end trim panel. Refer to → Body Interior; Rep. Gr.70; Luggage Compartment Trim Panels.
- Open the luggage compartment side trim panel cover.
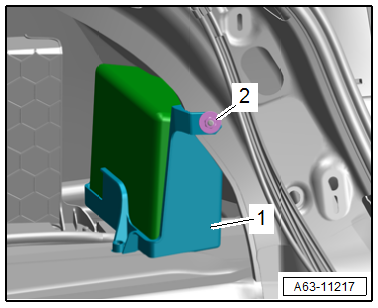
- Versions with first aid kit mount: Remove the nut -2- and remove the mount -1-.
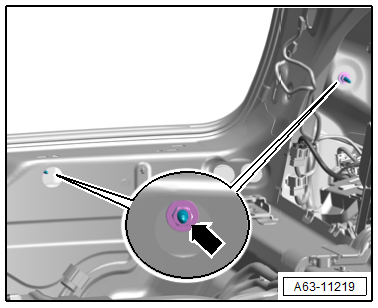
- Disconnect the connector -1-.
- Press the grommet -2- outward.

- Remove the nuts -arrow- using the -T40078-.
- Disengage the side bolster -1- outward from the side panel in the direction of -arrow A- and remove the bumper cover -2- in the direction of -arrows B-.
- Lay the bumper cover on a soft surface.
Installing
Install in reverse order of removal and note the following:
For versions with lane change assistance, the following additional work is required: Refer to
- Calibrate the lane change assistance, Lane Change Assistance Control Module -J769-/Lane Change Assistance Control Module 2 -J770-. Refer to → Electrical Equipment; Rep. Gr.96; Lane Change Assistance; Lane Change Assistance, Calibrating.
Tightening Specifications
- Refer to → Chapter "Overview - Bumper Cover"
- Refer to → Chapter "Overview - Rear Wheel Housing Liner"
READ NEXT:
 Rear Bumper Cover Mount, Removing and Installing
Bumper Cover Mount, Removing and Installing, Upper
Removing
- Remove the rear bumper cover. Refer to
→ Chapter "Bumper Cover, Removing and Installing".
- Remove the bolts -arrows-.
-
Repair Information
Minimum Curing Times for Bonded Windows
For safety reasons, use only non-conductive two-part adhesive
when installing windshield and rear window with the materials
listed below.
The vehicle can onl
SEE MORE:
Upper Control Arm, Removing and Installing
Special tools and workshop equipment required
Vehicle Diagnostic Tester
Torque Wrench 1331 5-50Nm -VAG1331-
Torque Wrench 1331 Insert - Ring Wrench - 16mm -VAG1331/12-,
not illustrated
Torque Wrench 1332 40-200Nm -VAG1332-
Engine and Gearbox Jack -VAS6931-
Engine/Gearbox Jack Adapter - Wheel
Moldings, Trims, Extensions and Trim Panels
Overview - Trim Molding and Covers
Overview - Trim Molding
1 -
Front Door
2 -
Front Door Trim Molding
Removing and installing. Refer to
→ Chapter "Trim Molding, Removing and Installing, Front Door".
3 -
Rear Door
4 -
Rear Door Trim Molding
Remo
