Audi A4: Seat Pan Cover and Cushion, Removing and Installing
Special tools and workshop equipment required
- Backrest Panel Tool -3370-
- Hook Tool -T40207-
- Engine/Transmission Holder - Seat Repair Fixture -VAS6136-
 Caution
This procedure contains mandatory replaceable parts. Refer to component overview and parts catalog prior to starting procedure.
Mandatory Replacement Parts
- Upholstery Clip - Cover to Cushion
Removing
 WARNING
Risk of injury due to involuntary deployment.
- Pay attention to the safety precautions when working with pyrotechnic components. Refer to → Chapter "Safety Precautions when Working with Pyrotechnic Components".
- Before handling pyrotechnic components (For example, disconnecting the connector), the person handling it must "discharge static electricity". For example, this can be done by briefly touching the door striker.
- Remove the front seat. Refer to → Chapter "Front Seat, Removing and Installing".
- Fasten the front seat on the -VAS6136-. Refer to → Chapter "Front Seat, Mounting on Fixture for Seat Repair".
- Remove the tunnel-side seat side trim. Refer to → Chapter "Seat Side Trim on Tunnel Side, Removing and Installing".
- Remove the side sill side seat side trim and the bracket. Refer to → Chapter "Seat Side Trim on Side Sill Side, Removing and Installing".
- Equipped on some models: Remove the child seat anchor. Refer to → Chapter "Front Child Seat Anchor, Removing and Installing".
- Disconnect and free up the connectors. If required, disconnect the modular wiring routing. Refer to → Chapter "Modular Wiring Routing, Disconnecting and Connecting".
Vehicles with Seat Depth Adjuster
- Remove the front seat trim. Refer to → Chapter "Front Seat Trim, Removing and Installing".
- Disconnect the connector -1-.
- Release the hooks -arrows- and fold the retaining plate with the cushion and cover toward the rear.
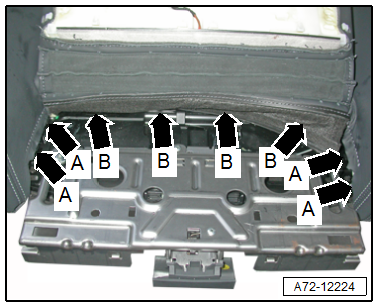
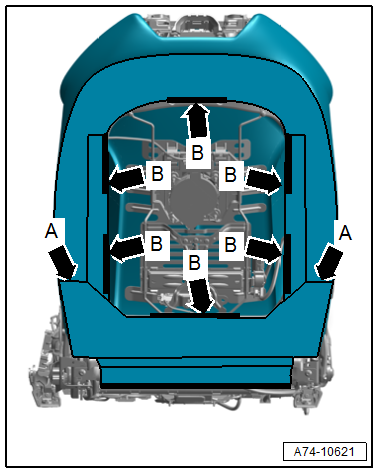
- Disengage the contour wire from the hooks -arrows A- on the left and right sides.
- Using the -T40207-, disengage the cover clamping strip from the hooks -arrows B-.
Versions without Seat Depth Adjuster
- Disengage the cover molding -1- using the -3370-.
Continuation for All Seat Versions
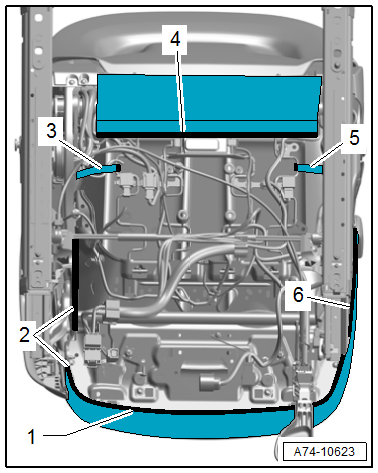
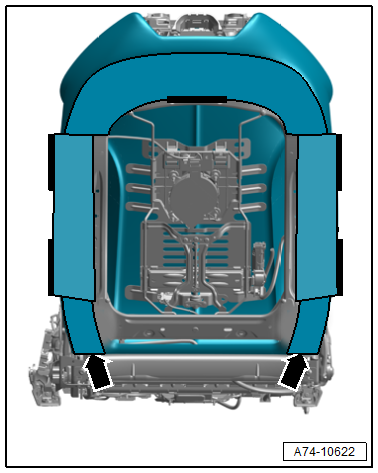
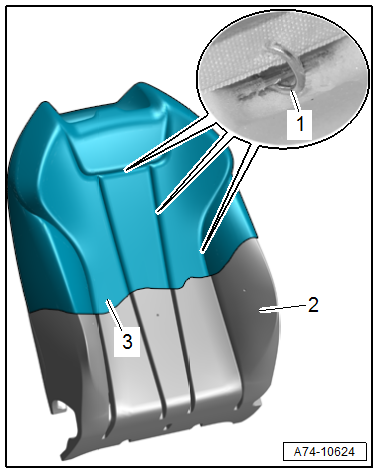
- Disengage the cover molding -2, 4 and 6- in the front and side areas using the -3370-.
- Disengage the left and right hooks -3 and 5-.
- Remove the cover and cushion from the seat pan, while guiding the seat heating wiring harness out at the same time.
Installing
WARNING
Risk of injury due to involuntary deployment.
- Pay attention to the safety precautions when working with pyrotechnic components. Refer to → Chapter "Safety Precautions when Working with Pyrotechnic Components".
- Before handling pyrotechnic components (For example, connecting a connector), the person handling it must "discharge static electricity". For example, this can be done by briefly touching the door striker.
- Follow all the instructions when installing the front seat. Refer to → Chapter "Front Seat, Removing and Installing".
Install in reverse order of removal.
Installation instructions: For example tightening specifications, replacing components. Refer to → Chapter "Overview - Seat Pan Cover and Cushion".
Backrest Cover and Cushion, Removing and Installing
Special tools and workshop equipment required
- Pry Lever -80-200-
- Trim Removal Wedge -3409-
- Engine/Transmission Holder - Seat Repair Fixture -VAS6136-
Caution
This procedure contains mandatory replaceable parts. Refer to component overview and parts catalog prior to starting procedure.
Mandatory Replacement Parts
- Upholstery Clip - Cover to Cushion
Removing
WARNING
Risk of injury due to involuntary deployment.
- Pay attention to the safety precautions when working with pyrotechnic components. Refer to → Chapter "Safety Precautions when Working with Pyrotechnic Components".
- Before handling pyrotechnic components (For example, disconnecting the connector), the person handling it must "discharge static electricity". For example, this can be done by briefly touching the door striker.
- Remove the front seat. Refer to → Chapter "Front Seat, Removing and Installing".
- Fasten the front seat on the -VAS6136-. Refer to → Chapter "Front Seat, Mounting on Fixture for Seat Repair".
- Remove the headrest. Refer to → Chapter "Headrest, Removing and Installing".
- Remove the backrest cover. Refer to → Chapter "Backrest Cover, Removing and Installing".
- Disconnect the backrest heating wiring harness on the seat pan and free it up.
- Remove the tunnel-side seat side trim. Refer to → Chapter "Seat Side Trim on Tunnel Side, Removing and Installing".
- Remove the side sill side seat side trim and the bracket. Refer to → Chapter "Seat Side Trim on Side Sill Side, Removing and Installing".
- Equipped on some models: Remove the child seat anchor. Refer to → Chapter "Front Child Seat Anchor, Removing and Installing".
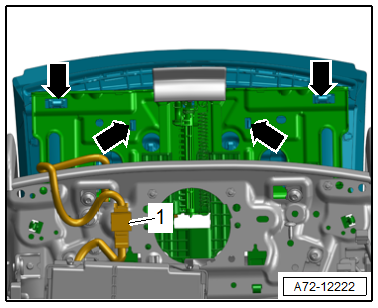
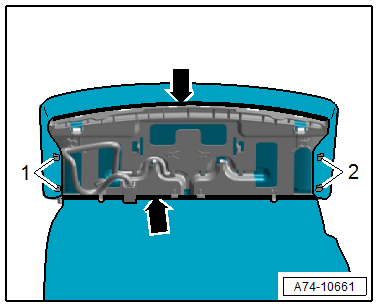
- Disengage the hooks on the backrest frame -arrows-.
- Disengage the hooks from the cover -arrows A-.
- Disengage the molding on the backrest frame -arrows B-.
- Remove the front thorax airbag. Refer to → Chapter "Front Thorax Airbag with Igniter, Removing and Installing".
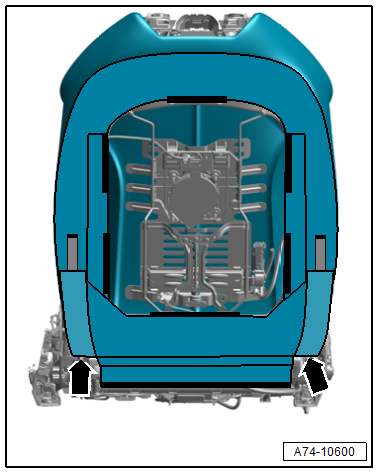
- Disengage the hooks for the side bolsters -arrows-.
- Loosen the cover and cushion from the backrest frame and remove forward carefully.
Installing
WARNING
Risk of injury due to involuntary deployment.
- Pay attention to the safety precautions when working with pyrotechnic components. Refer to → Chapter "Safety Precautions when Working with Pyrotechnic Components".
- Before handling pyrotechnic components (For example, connecting a connector), the person handling it must "discharge static electricity". For example, this can be done by briefly touching the door striker.
- Follow all the instructions when installing the front seat. Refer to → Chapter "Front Seat, Removing and Installing".
Install in reverse order of removal.
Installation instructions: For example tightening specifications, replacing components. Refer to → Chapter "Overview - Backrest Cover and Cushion".
Seat Pan Cover and Cushion, Separating
Special tools and workshop equipment required
- Upholstery Clip Pliers -VAG1634-
Removing
- Remove the cover and cushion. Refer to → Chapter "Seat Pan Cover and Cushion, Removing and Installing".
- Remove the cover -2- from the cushion -1- and cut upholstery clips -arrows- using pliers
Vehicles with Seat Depth Adjuster
- Disengage the cover from the seat depth adjuster hooks -1 and 2-.
- Release and disengage the molding -arrows-.
- Remove the seat depth adjuster cushion from the cover.
Installing
Install in reverse order of removal and note the following:
- Equipment versions with seat heating: Apply a new seat heating element when replacing the cushion. Refer to → Chapter "Seat Heating Element, Removing and Installing, Seat Depth Adjuster".
Installation instructions: For example tightening specifications, replacing components. Refer to → Chapter "Overview - Seat Pan Cover and Cushion".
Backrest Cover and Cushion, Separating
Special tools and workshop equipment required
- Upholstery Clip Pliers -VAG1634-
Removing
- Remove the cover and cushion. Refer to → Chapter "Backrest Cover and Cushion, Removing and Installing".
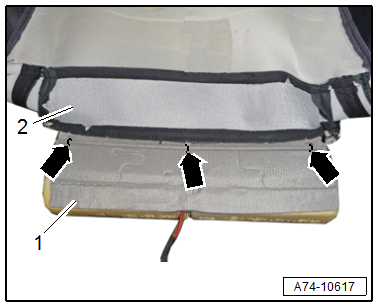
- Pull off cover -3- from the cushion -2- as far as possible and cut upholstery clips -1- using pliers.
Installing
Install in reverse order of removal and note the following:
- Versions with seat heating: Apply a new backrest heating element when replacing the cushion. Refer to → Chapter "Seat Heating Element, Removing and Installing, Seat Depth Adjuster".
Installation instructions: For example tightening specifications, replacing components. Refer to → Chapter "Overview - Backrest Cover and Cushion".
READ NEXT:
 Driver and Front Passenger Seat Heating Element -Z6-/-Z8-, Removing and
Installing
Driver and Front Passenger Seat Heating Element -Z6-/-Z8-, Removing and
Installing
Seat Heating Element, Removing and Installing, Seat Cushion
Procedure
- Separate the cover and cushion. Refer to
→ Chapter "Seat Pan Cover and Cushion, Separating".
- Clip the wires
Rear Seat Covers and Cushions
Overview - Cover and Cushion
Overview - Cover and Cushion, Sport Bench Seat
1 - Seat Frame
With the molded piece
2 - Upholstery Clip
For securing the cover to the cushion
Re
Cover and Cushion, Removing and Installing
Cover and Cushion, Removing and Installing, Bench Seat
Special tools and workshop equipment required
Pry Lever -80-200-
Caution
This procedure contains mandatory replaceable parts.
Refer
SEE MORE:
Special driving situations
Driving uphill and downhill
When driving uphill, downhill, or at high altitudes,
note the following information:
Drive slowly and carefully.
Do not try to turn around if you cannot safely
drive on an incline or hill. Instead, drive in reverse.
When driving down hills, you can activate the
hill
Cylinder Block, Belt Pulley Side
Overview - Cylinder Block, Belt Pulley Side
All components are described under:
→ Servicing - 4-Cylinder 2.0L 4V TFSI Engine; Rep. Gr.13; Cylinder Block Belt
Pulley Side; Overview - Cylinder Block Belt Pulley Side.
Ribbed Belt, Removing and Installing
All procedures are described
