Audi A4: Attachments, Removing and Installing
Lock Carrier Cover, Removing and Installing
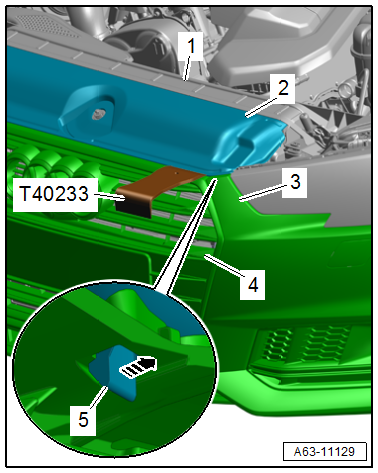
Special tools and workshop equipment required
- Removal Wedge -T40233-
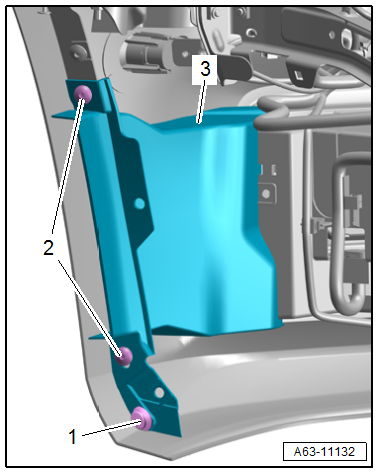
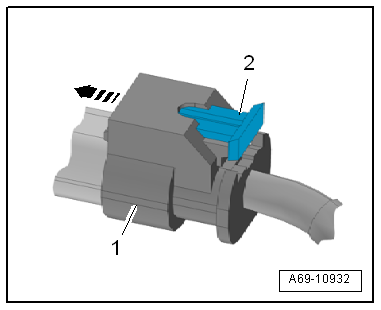
Removing
- Remove the hook release lever. Refer to → Chapter "Hook Release Lever, Removing and Installing".
- Release the lock carrier cover catches -5- on the radiator grille -4- and on the bumper cover -3- using the -T40233- in the direction of -arrow-.
- Remove the lock carrier cover -2- from the groove in the lock carrier -1-.
- Remove the lock carrier cover.
Installing
Install in reverse order of removal and note the following:
- Slide the lock carrier cover into the groove in the lock carrier and then push it onto the radiator grille and bumper cover.
Front Bumper Cover End Plate, Removing and Installing
Removing
- Remove the bolts -arrows- from the front bumper cover end plate -1-.
- If equipped, push the front bumper cover end plate -1- downward as far as possible and free up the wiring harness -2- in the direction of -arrows-.
- Remove the front bumper cover end plate toward the rear.
Installing
Install in reverse order of removal.
Tightening Specifications
- Refer to → Chapter "Overview - Covers and Air Guides"
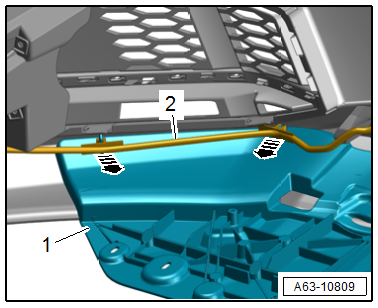
Side Air Duct, Removing and Installing
Removing
- Remove the wheel spoiler. Refer to → Chapter "Front Wheel Spoiler, Removing and Installing".
Air Duct Standard Equipment
- Remove the bolts -1 and 2-.
- Remove the air duct -3- to the rear.
S line Air Duct
- Remove the bolts -2-.
- Remove the expanding rivet -1-.
- Remove the air duct -3- to the rear.
Installing
Install in reverse order of removal.
Tightening Specifications
- Refer to → Chapter "Overview - Bumper Cover"
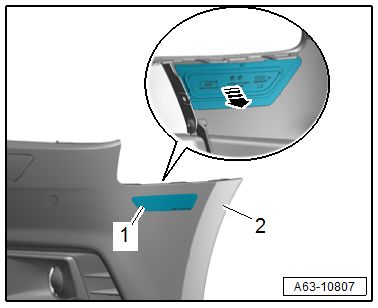
Headlamp Washer System Washer Nozzle Cover, Removing and Installing
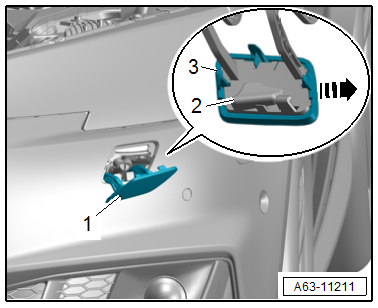
Removing
- Open the washer nozzle cover -1-.
- Using a screwdriver on the inner side, pry the washer nozzle cover -3- off the mount -2- in the direction of -arrow- and disengage it at the opposite side.
Installing
Install in reverse order of removal and note the following:
- Press the washer nozzle cover on until it engages audibly.
Molded Foam Part, Removing and Installing
- Follow the safety precautions. Refer to → Body Interior; Rep. Gr.00; Safety Precautions; Safety Precautions when Working on Pyrotechnic Components.
Removing
- Remove the front bumper cover. Refer to → Chapter "Bumper Cover, Removing and Installing".
 CAUTION
Pyrotechnic components may deploy unintentionally.
Risk of injury.
- Discharge static electricity by briefly touching the door striker.
- Disconnect the connector -2- by removing the connector lock and pressing it down.
- Release the tabs in the direction of -arrows- and remove the molded foam part -1- from the impact member.
Installing
Install in reverse order of removal and note the following:
- Engage the pedestrian protection crash sensor -1- into the molded foam part -3-.
 NOTICE
Risk of damaging the pressure hose by deforming it.
- Never kink or stretch the pressure hose.
- Insert the pressure hose -2- into the recess in the molded foam part.
- The pressure hose must be inserted without any tension.
CAUTION
Pyrotechnic components may deploy unintentionally.
Risk of injury.
- Discharge static electricity by briefly touching the door striker.
- Attach the connector -1- to the crash sensor until it clicks into place -arrow-.
- Push in the connector lock -2- to secure the connector.
Reflector, Removing and Installing
Special tools and workshop equipment required
- Wiring Harness Repair Set - Hot Air Blower -VAS1978/14A-
- Cleaning Solution -D 009 401 04-
- Applicator -D 009 500 25-
- Bonding Agent -D 366 PR1 A1-
Removing
- Remove the bumper cover. Refer to → Chapter "Bumper Cover, Removing and Installing".
- Carefully warm the reflector -1- using the -VAS1978/14A-.
- Carefully remove the reflector from the bumper cover -2--arrow-.
Installing
Install in reverse order of removal and note the following:
- Clean the adhesive surface using the Cleaning Solution -D 009 401 04-.
- Apply Bonding Agent -D 366 PR1 A1- evenly in a single stroke to the adhesive surface -2- using the applicator -3-
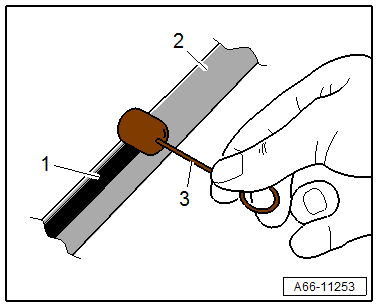
- Remove the protective films from the adhesive tape -1-.
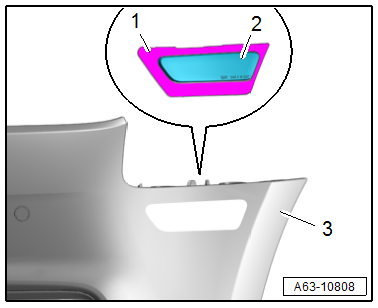
- Position the reflector -2- and press it onto the bumper cover -3-.
- Resting time is at least 3.5 hours at room temperature.
READ NEXT:
 Rear Bumper
Overview - Rear Bumper Cover, Standard Equipment
Overview - Bumper Cover
1 -
Bumper Cover Lower Section
There are different versions. Refer to the Parts Catalog.
Removing and installing.
Rear Bumper Cover, Removing and Installing
Special tools and workshop equipment
required
Body Socket -T40078-
Depending on the equipment version, the following additional work must be
performed.
Removing
- Remove the bolts -1-.
-&nb
Rear Bumper Cover Mount, Removing and Installing
Bumper Cover Mount, Removing and Installing, Upper
Removing
- Remove the rear bumper cover. Refer to
→ Chapter "Bumper Cover, Removing and Installing".
- Remove the bolts -arrows-.
-
SEE MORE:
Subframe, Lowering
Special tools and workshop equipment required
Torque Wrench 1331 5-50Nm -VAG1331-
Torque Wrench 1332 40-200Nm -VAG1332-
Tensioning Straps -T10038-
Engine and Gearbox Jack -VAS6931-
Locating Pins -T40327-
Procedure
Note
During installation, all cable ties must be installed at the
same
Airbag System
Component Location Overview - Airbag System
1 - Pedestrian Protection Trigger 2 -G599-
Overview. Refer to
→ Chapter "Overview - Pedestrian Protection".
2 - Front Passenger Airbag Deactivation Key Switch -E224-
Not for NAR
3 - Front Passenger Airbag
With
