Audi A4: Bench Seat/Single Seat, Removing and Installing
Removing
- Move the front seats all the way forward.
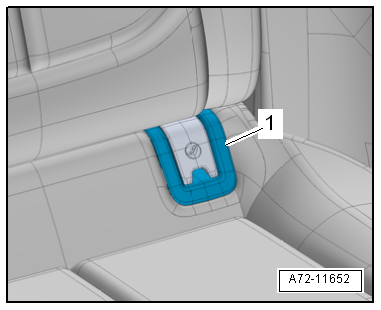
- Unclip the child seat anchor guides (quantity: four) -1- from anchorages. Refer to → Chapter "Lower Child Seat Anchor Guide, Removing and Installing".
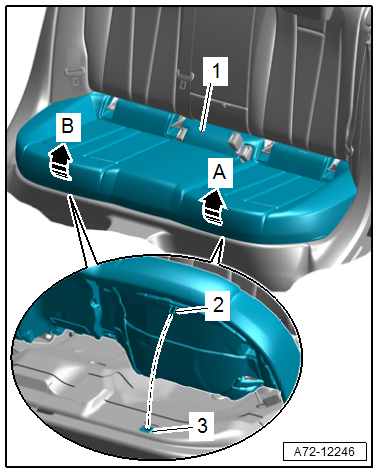
- With both hands, grasp the bench seat -1- under the seat frame -2-.
- Use both hands to firmly pull the side of the bench seat upward with a jerk in the direction of -arrow A-. This will disengage the seat frame from the front mount -3-.
- Repeat the procedure on the other side of the bench seat in the direction of -arrow B-.
- Push the side of the bench seat toward the rear. This will disengage the seat frame from the mount.
- Equipped on some models: Disconnect the seat heating connector.
- Remove the bench seat.
Installing
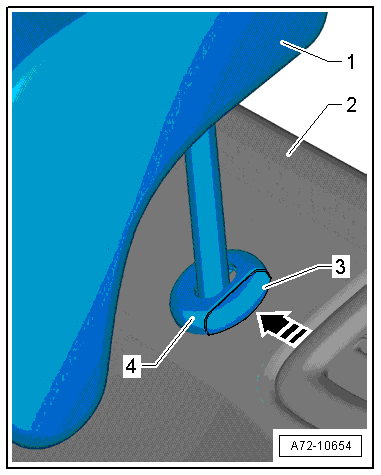
- Insert the bench seat, thread in the seat belt latch and push the seat frame -2- firmly into the mounts -3-.
Further installation is the reverse order of removal.
Installation instructions: For example tightening specifications, replacing components. Refer to → Chapter "Overview - Bench Seat/Single Seat".
Headrest, Removing and Installing
Removing
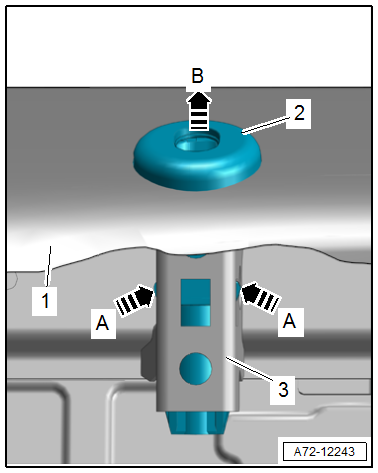
- Press the height adjustment release button -3- on the headrest guide -4- in the direction of -arrow- and remove the headrest -1- all the way from the rear seat backrest -2- at the same time.
- Using a small flat-head screwdriver, press the locking spring as far as the stop through the opening -arrow- in the headrest guide -1-.
- At the same time, remove the headrest -2- from the rear seat backrest -3-.
Installing
Install in reverse order of removal.
Installation instructions: For example tightening specifications, replacing components. Refer to → Chapter "Overview - Headrest and Headrest Guide".
Headrest Guide, Removing and Installing
Headrest Guide, Removing and Installing, Fixed Rear Seat Backrest
Removing
- Remove the headrest. Refer to → Chapter "Headrest, Removing and Installing".
- Detach the cover and cushion from the backrest frame. Refer to → Chapter "Cover and Cushion, Removing and Installing, Fixed Rear Seat Backrest".
- Fold the cover -1- and cushion far enough upward until the headrest tube -2- with the headrest guide -4- in the backrest frame -3- is visible.
- Push the tab -arrow A- downward and at the same time, remove the headrest guide from the backrest frame.
Installing
Install in reverse order of removal and note the following:
- The tab -arrow A- must be engaged securely in the cut-out -arrow B-.
Installation instructions: For example tightening specifications, replacing components. Refer to → Chapter "Overview - Headrest and Headrest Guide".
Headrest Guide, Removing and Installing, Outer Folding Backrest
Removing
- Remove the rear headrest. Refer to → Chapter "Headrest, Removing and Installing".
- Detach the cover and cushion from the backrest frame. Refer to → Chapter "Cover and Cushion, Removing and Installing, Folding Backrest".
- Fold the cover and cushion -1- far enough upward until the headrest tube -3- with the headrest guide -2- is visible.
- Push the headrest guide tabs inward using pliers in the direction of -arrows A- and at the same time, remove the headrest guide from the backrest frame in the direction of -arrow B-.
Installing
Install in reverse order of removal.
Installation instructions: For example tightening specifications, replacing components. Refer to → Chapter "Overview - Headrest and Headrest Guide".
Headrest Guide, Removing and Installing, Center Folding Backrest
Special tools and workshop equipment required
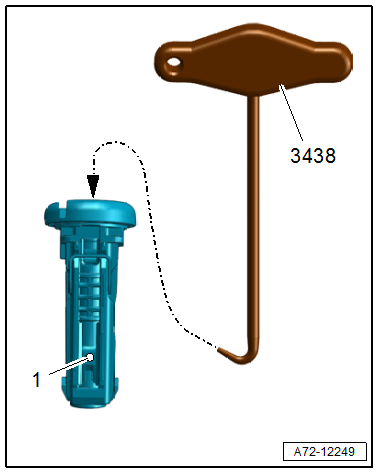
- T-Handle Hook -3438-
 Note
Note
Headrest guide cannot be removed without destroying it.
Removing
- Remove the rear headrest. Refer to → Chapter "Headrest, Removing and Installing".
- Guide the -3438- into the headrest guide from above -arrow- and insert it into die retainer hole -1-.
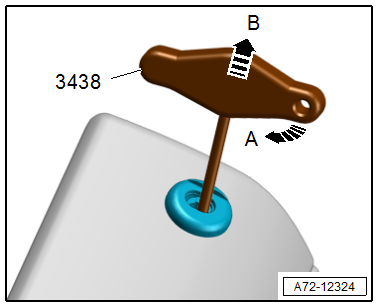
- Turn the -3438- 90º in the direction of -arrow A-.
- The hook must not slide out of the hole.
Note
Any rotational movement will bend the retainer sideways and cause it to no longer mesh.
- Pull the headrest guide out of the backrest using the hook in the direction of -arrow B-.
Installing
- Insert the headrest guide and push it into the mounts until the tabs engage properly with the backrest frame.
Further installation is the reverse order of removal.
Installation instructions: For example tightening specifications, replacing components. Refer to → Chapter "Overview - Rear Seat Backrest, Center Folding Backrest".
READ NEXT:
 Rear Seat Backrest, Removing and Installing
Rear Seat Backrest, Removing and Installing, Fixed Rear Seat Backrest
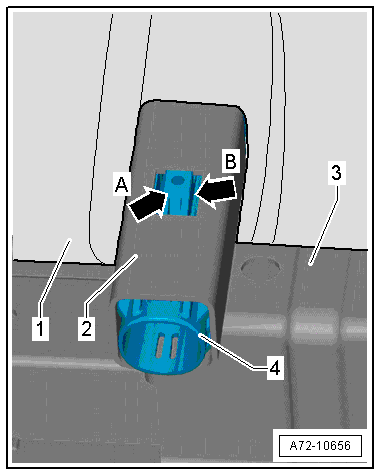
Removing
- Remove the screws -1- in the
luggage compartment.
- Remove the bench seat. Refer to
→ Chapter "Bench
Locking Mechanism Trim, Removing and Installing
Special tools and workshop equipment required
Trim Removal Wedge -3409-
Removing
- Unlock the rear seat backrest.
- Make sure the button -2-
(indicator) is in the "up" position.
- P
Center Folding Backrest Trim Panel, Removing and Installing
Special tools and workshop equipment required
Pry Lever -80-200-
Removing
- Remove the center armrest. Refer to
→ Chapter "Center Armrest, Removing and Installing".
- Remove the c
SEE MORE:
Door, Removing and Installing
Removing
- Disconnect the door cut-off connector -1-
at the B-pillar. Refer to
→ Electrical Equipment; Rep. Gr.97; Connectors.
- Tape off the B-pillar in the door arrester area using adhesive
tape, so that the paint will not be damaged.
- Remove the door arrester b
Service Station, Connecting with No Connection on Low- and High Pressure
Side of Refrigerant Circuit
General Information
On the following vehicles, no service connection is provided
for the service station on the low-pressure side of the
refrigerant circuit; adapters must be used to connect the
service station to the refrigerant circuit on these vehicles:
Audi 80, Audi Cabrio, Audi Coupe
Audi
