Audi A4: Rear Seat Backrest, Removing and Installing
Rear Seat Backrest, Removing and Installing, Fixed Rear Seat Backrest
Removing
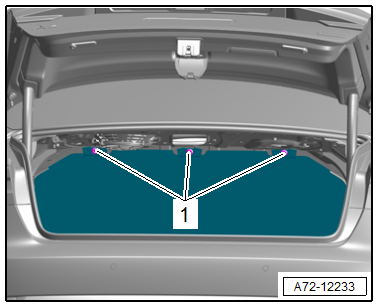
- Remove the screws -1- in the luggage compartment.
- Remove the bench seat. Refer to → Chapter "Bench Seat/Single Seat, Removing and Installing".
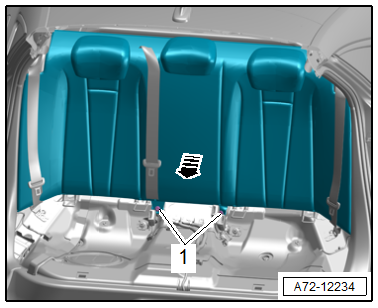
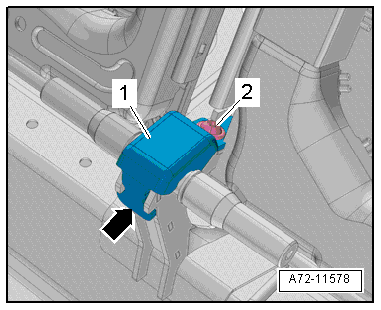
- Remove the bolts -1-.
- Remove the backrest at the lower edge upward and then forward -arrow-.
- Remove the backrest from the vehicle.
Installing
Install in reverse order of removal.
Installation instructions: For example tightening specifications, replacing components. Refer to → Chapter "Overview - Rear Seat Backrest, Fixed".
Rear Panel Trim Panel, Removing and Installing, Fixed Rear Seat Backrest
Special tools and workshop equipment required
- Pry Lever -80-200-
Removing
 Note
Note
In the illustrations the rear seat backrest is removed.
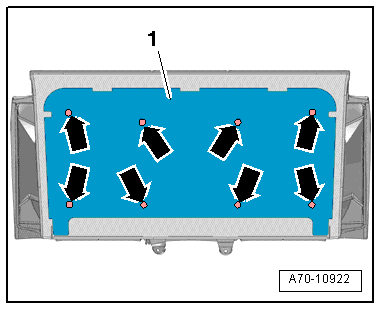
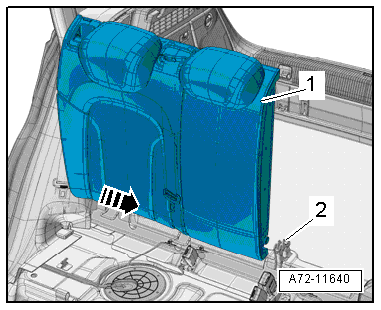
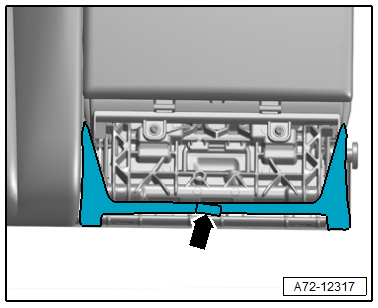
- Remove the clips -arrows- using the -80-200- and remove the rear panel trim panel -1-.
Installing
Install in reverse order of removal.
Installation instructions: For example tightening specifications, replacing components. Refer to → Chapter "Overview - Rear Seat Backrest, Fixed".
Rear Seat Backrest, Removing and Installing, Outer Folding Backrest
Removing
- Remove the rear bench seat. Refer to → Chapter "Bench Seat/Single Seat, Removing and Installing".
- Right folding backrest: Remove the center rear belt end fitting. Refer to → Chapter "Rear Seat Belt Latch, Removing and Installing".
Vehicles with Backrest Release
 Caution
Risk of malfunction.
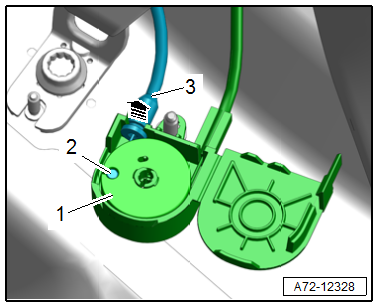
When removing and installing the release cable, never remove the idler roller -1- from the connector station.
- Open the connector station cover.
- Disengage the release cable mounting bracket -3- from the mount in the connector station -arrow-.
- Disengage the release cable nipple -2- from the idler roller -1-.
Continuation for All Vehicles
- Fold the folding backrests forward.
- Remove the bolt -2-.
- Remove the securing bracket -1- from the center support -arrow-.
Note
Shown without the cushion and cover for clarity.
- Fold the folding backrest -1- slightly forward.
- Remove the folding backrest from the center support -2-.
- Remove the folding backrest from the outer bearing -arrow- toward the center of the vehicle.
- Remove the backrest from the vehicle.
Installing
Install in reverse order of removal.
Installation instructions: For example tightening specifications, replacing components. Refer to → Chapter "Overview - Rear Seat Backrest, Folding Backrest".
Rear Seat Backrest, Removing and Installing, Center Folding Backrest
Removing
- Remove the right folding backrest. Refer to → Chapter "Rear Seat Backrest, Removing and Installing, Outer Folding Backrest".
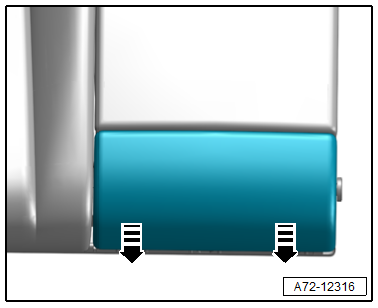
- Remove the center cushion downward in the direction of -arrows-.
- Detach the Velcro fastener -arrow- for the cloth trim.
- Disengage the pull tab -3- for the cloth trim.
- Disengage the cloth trim from the mounting pin -2-.
- Remove the screw -1- together with the bearing bushing.
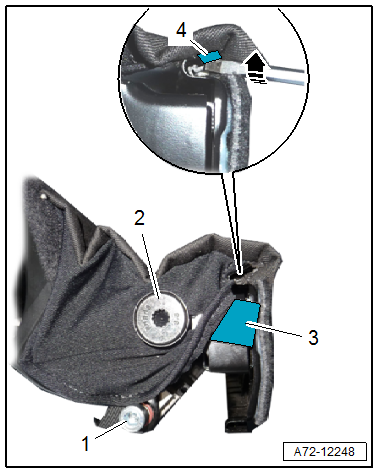
- Bend the metal tab -4- for the molding to the side in the direction of -arrow-.
- Remove the center folding backrest from the hinge pins while pulling the molding out of the guide at the same time.
Installing
Install in reverse order of removal.
Installation instructions: For example tightening specifications, replacing components. Refer to → Chapter "Overview - Rear Seat Backrest, Center Folding Backrest".
READ NEXT:
 Locking Mechanism Trim, Removing and Installing
Special tools and workshop equipment required
Trim Removal Wedge -3409-
Removing
- Unlock the rear seat backrest.
- Make sure the button -2-
(indicator) is in the "up" position.
- P
Center Folding Backrest Trim Panel, Removing and Installing
Special tools and workshop equipment required
Pry Lever -80-200-
Removing
- Remove the center armrest. Refer to
→ Chapter "Center Armrest, Removing and Installing".
- Remove the c
SEE MORE:
New tires or wheels
Audi recommends having all work
on tires or wheels performed by
an authorized Audi dealer or authorized
Audi Service Facility.
These facilities have the proper
knowledge and are equipped with
the required tools and replacement
parts.
New tires do not yet have the
optimal gripping properties.
Dr
Audi pre sense basic
Applies to: vehicles with Audi pre sense basic
Audi pre sense basic is automatically active at
speeds of approximately 20 mph (30 km/h) and
higher. Audi pre sense basic can trigger preemptive
safety measures during emergency braking
and dangerous braking maneuvers as well as in
unstable driving situ
