Audi A4: Center Console
Overview - Center Console
Overview - Center Console
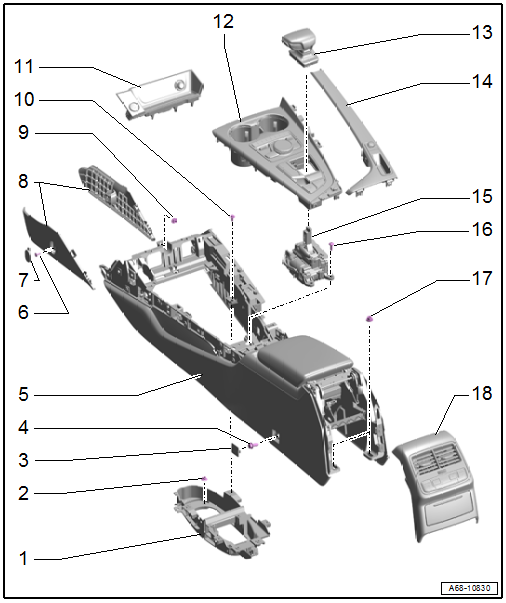
1 - Center Console Bracket
- Removing and installing. Refer to → Chapter "Center Console Bracket, Removing and Installing".
2 - Nut
- 8 Nm
- Quantity: 4
3 - Cap
- Push in the center console
4 - Bolt
- 20 Nm
5 - Center Console
- Removing and installing. Refer to → Chapter "Center Console, Removing and Installing".
6 - Bolt
- 1.5 Nm
7 - Cap
- Push into the center console trim panel
8 - Center Console Trim Panel
- Front footwell
- Removing and installing. Refer to → Chapter "Front Footwell Center Console Trim Panel, Removing and Installing".
9 - Nut
- 3 Nm
10 - Bolt
- 3 Nm
- Quantity: 4
11 - Front Storage Compartment
- Removing and installing. Refer to → Chapter "Front Storage Compartment, Removing and Installing".
- Press on until it engages audibly
12 - Center Console Insert
- Removing and installing. Refer to → Chapter "Center Console Insert, Removing and Installing".
- Replace damaged or deformed clips
- Press on until it engages audibly
13 - Selector Lever Handle
- Overview. Refer to → Rep. Gr.34; Gearshift Mechanism; Overview - Gearshift Mechanism.
14 - Center Console Decorative Trim
- Removing and installing. Refer to → Chapter "Center Console Decorative Trim, Removing and Installing".
- Replace damaged or deformed clips
- Press on until it engages audibly
15 - Gearshift Mechanism
- Overview. Refer to → Rep. Gr.34; Gearshift Mechanism; Overview - Gearshift Mechanism.
16 - Bolt
- Quantity: 4
- Tightening specification. Refer to → Rep. Gr.34; Gearshift Mechanism; Overview - Gearshift Mechanism.
17 - Nut
- 20 Nm
- Quantity: 2
18 - Rear Trim
- For the center console
- Removing and installing. Refer to → Chapter "Center Console Rear Trim, Removing and Installing".
- Replace damaged or deformed clips
- Press on until it engages audibly
Overview - Center Console, Insert
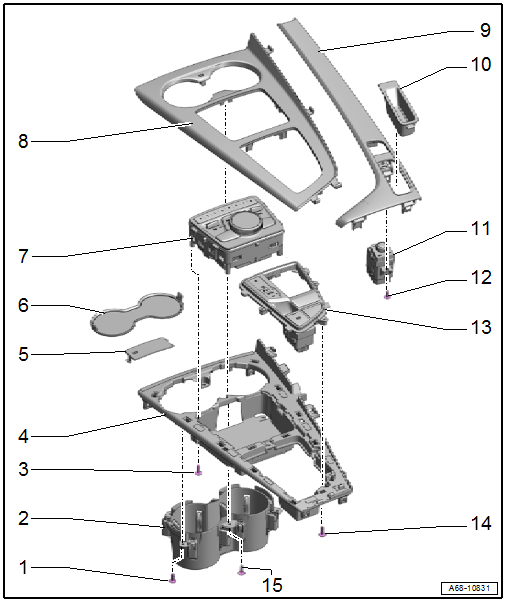
1 - Bolt
- 1.4 Nm
- Quantity: 4
2 - Cupholder
- Removing and installing. Refer to → Chapter "Cupholder, Removing and Installing".
3 - Bolt
- Quantity: 4
- Tightening specification. Refer to → Communication; Rep. Gr.91; Infotainment System; Component Location Overview - Infotainment System.
4 - Center Console Insert
- Removing and installing. Refer to → Chapter "Center Console Insert, Removing and Installing".
- Replace damaged or deformed clips
- Press on until it engages audibly
5 - Emergency Release Cover
- Engage in the cupholder and press on it until it engages audibly
6 - Cupholder Trim
7 - Multimedia System Control Head -E380-
- Component location overview. Refer to → Communication; Rep. Gr.91; Infotainment-System; Component Location Overview- Infotainment-System.
8 - Center Console Insert Decorative Trim
- Removing and installing. Refer to → Chapter "Center Console Insert Decorative Trim, Removing and Installing".
- Replace damaged or deformed clips
- Press on until it engages audibly
9 - Center Console Decorative Trim
- Removing and installing. Refer to → Chapter "Center Console Decorative Trim, Removing and Installing".
- Replace damaged or deformed clips
- Press on until it engages audibly
10 - Storage Compartment
- Engage in the decorative trim and press on it until it engages audibly
11 - Driver Volume Control -E67-
- Component location overview. Refer to → Communication; Rep. Gr.91; Infotainment-System; Component Location Overview- Infotainment-System.
12 - Bolt
- Quantity: 2
- Tightening specification. Refer to → Communication; Rep. Gr.91; Infotainment System; Component Location Overview - Infotainment System.
13 - Selector Lever Transmission Range Display -Y5-
- Removing and installing. Refer to → Electrical Equipment; Rep. Gr.96; Lamps; Component Location Overview - Lamps in Center Console.
14 - Bolt
- Quantity: 4
- Tightening specification. Refer to → Electrical Equipment; Rep. Gr.96; Lamps; Component Location Overview - Lamps in Center Console.
15 - Bolt
- 1.4 Nm
- Quantity: 2
Overview - Center Console, Storage Compartment

1 - Front Center Armrest
- Removing and installing. Refer to → Chapter "Front Center Armrest, Removing and Installing".
2 - Control Module Cover
- On the center tunnel
- Removing and installing. Refer to → Chapter "Airbag Control Module -J234-, Removing and Installing".
3 - Nut
- 3 Nm
- Quantity: 2
4 - Multimedia Device Storage Compartment
- Removing and installing. Refer to → Chapter "Multimedia Devices Storage Compartment, Removing and Installing".
5 - Bolt
- 1.4 Nm
- Quantity: 6
6 - Driver Side Center Console Trim Panel
- Removing and installing. Refer to → Chapter "Center Console Trim Panel, Removing and Installing".
- Replace damaged or deformed clips
- Press on until it engages audibly
7 - Front Passenger Side Center Console Trim Panel
- Removing and installing. Refer to → Chapter "Center Console Trim Panel, Removing and Installing".
- Replace damaged or deformed clips
- Press on until it engages audibly
8 - Center Console
- Removing and installing. Refer to → Chapter "Center Console, Removing and Installing".
9 - Rear Vent/Storage Compartment
- Removing and installing. Refer to → Chapter "Rear Center Console Vent, Removing and Installing".
- Replace damaged or deformed clips
- Insert in the installation opening an press on all the way.
10 - Rear Trim
- For the center console
- Removing and installing. Refer to → Chapter "Center Console Rear Trim, Removing and Installing".
- Replace damaged or deformed clips
- Press on until it engages audibly
11 - Storage Compartment
- Removing and installing.
- Press on until it engages audibly
READ NEXT:
 Center Console Rear Trim, Removing and Installing
Special tools and workshop equipment required
Wedge Set -T10383-
Wedge Set - Wedge 1 -T10383/1-
Removing
- Move the front seats all the way forward.
- Using either the -T10383/1- or by h
Front Center Console Storage Compartment, Removing and Installing
Front Storage Compartment, Removing and Installing
Removing
- Remove the center console insert. Refer to
→ Chapter "Center Console Insert, Removing and Installing".
- Remove the stor
Center Console, Removing and Installing
Removing
- Remove the front footwell center console trim panel. Refer to
→ Chapter "Front Footwell Center Console Trim Panel, Removing
and Installing".
- Remove the front center cons
SEE MORE:
Rear Window, Removing and Installing
Undamaged Rear Window, Removing and Installing, Sedan
Special tools and workshop equipment
required
Cutting Tool for Bonded Windows -VAS6452-
Cutting Tool for Bonded Windows - Wire Reel -VAS6452/1-
Read the repair information. Refer to
→ Chapter "Repair Information"
Required tools and ma
Battery Charger -VAS5903- Support Mode
General Information
The support mode provides the vehicle electrical system with
voltage when the Battery -A- is removed or disconnected.
For more information. Refer to the Battery Charger -VAS5903-
Operating Instructions.
The support mode is used for the following situations:
Vehicle electrical
