Audi A4: Center Console Rear Trim, Removing and Installing
Special tools and workshop equipment required
- Wedge Set -T10383-
- Wedge Set - Wedge 1 -T10383/1-
Removing
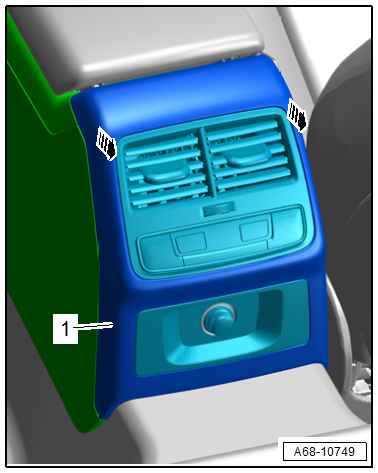
- Move the front seats all the way forward.
- Using either the -T10383/1- or by hand, unclip the trim -1- from the center console in the direction of -arrows-.
- Remove the trim toward the rear from the center console.
- Disconnect the connectors.
Installing
Install in reverse order of removal.
Installation instructions: For example tightening specifications, replacing components. Refer to → Chapter "Overview - Center Console".
Center Console Insert, Removing and Installing
Special tools and workshop equipment required
- Trim Removal Wedge -3409-
Removing
- Remove the center console decorative trim. Refer to → Chapter "Center Console Decorative Trim, Removing and Installing".
- Versions with gearshift lever: Lift the shift lever boot -1- by hand or carefully pry it out at the side using the -3409--arrows- and fold it upward.
- Versions with selector lever: Remove the selector lever handle. Refer to → Rep. Gr.34; Gearshift Mechanism; Selector Lever Handle, Removing and Installing.
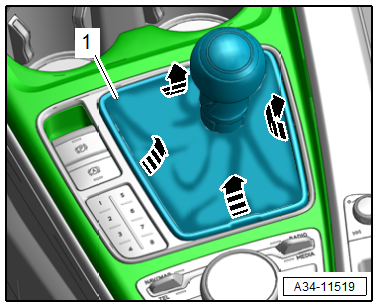
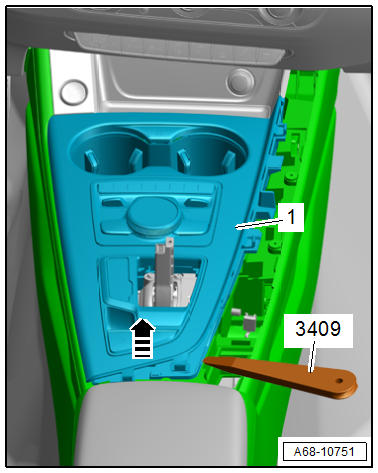
- Starting at the back, unclip the center console insert upward from the center console -arrow- using the -3409-.
- Disengage the remaining retainers for the center console insert.
- Carefully turn the center console insert -1-, disconnect the connectors and remove them.
Installing
Install in reverse order of removal.
Installation instructions: For example tightening specifications, replacing components. Refer to → Chapter "Overview - Center Console".
READ NEXT:
 Front Center Console Storage Compartment, Removing and Installing
Front Storage Compartment, Removing and Installing
Removing
- Remove the center console insert. Refer to
→ Chapter "Center Console Insert, Removing and Installing".
- Remove the stor
Center Console, Removing and Installing
Removing
- Remove the front footwell center console trim panel. Refer to
→ Chapter "Front Footwell Center Console Trim Panel, Removing
and Installing".
- Remove the front center cons
Front Center Armrest
Overview - Front Center Armrest
1 - Center Armrest Support Base
Removing and installing. Refer to
→ Chapter "Front Center Armrest, Removing and Installing".
2 - Front C
SEE MORE:
Subframe, Removing and Installing
Caution
This procedure contains mandatory replaceable parts.
Refer to component overview and parts catalog prior to
starting procedure.
Mandatory Replacement Parts
Bolt - Bonded Rubber Bushing for Subframe to Body
Bolt/Nut - Rear Final Drive to Subframe (AWD)
Removing
- Secure th
Suspension
Adaptive dampers
Applies to: vehicles with suspension control
The adaptive dampers are an electronically-controlled
damping system. The firmness of the suspension
will adapt to the driving conditions and
the driving situation. The settings depend on the
selected Audi drive select* mode.
Ground clear
