Audi A4: Front Center Console Storage Compartment, Removing and Installing
Front Storage Compartment, Removing and Installing
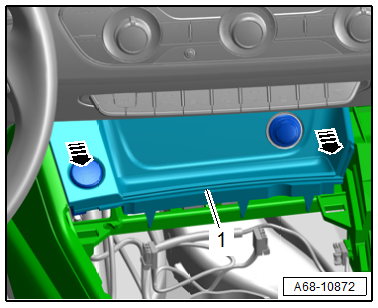
Removing
- Remove the center console insert. Refer to → Chapter "Center Console Insert, Removing and Installing".
- Remove the storage compartment -1- from the center console toward the rear in the direction of -arrows-.
- Disconnect the connectors.
Installing
Install in reverse order of removal.
Installation instructions: For example tightening specifications, replacing components. Refer to → Chapter "Overview - Center Console".
Rear Storage Compartment, Removing and Installing
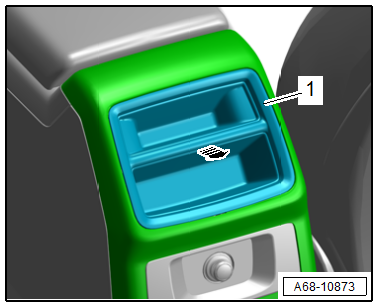
Removing
- Remove the storage compartment -1- from the center console by hand toward the rear in the direction of -arrow-.
Installing
Install in reverse order of removal.
Installation instructions: For example tightening specifications, replacing components. Refer to → Chapter "Overview - Center Console, Storage Compartment".
Multimedia Devices Storage Compartment, Removing and Installing
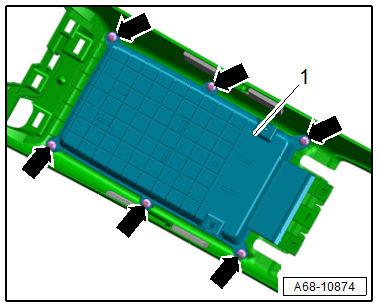
Removing
- Remove the front center armrest. Refer to → Chapter "Front Center Armrest, Removing and Installing".
- Place the center console on a soft surface.
- Remove the bolts -arrows-.
- Remove the storage compartment -1-.
- Remove the multimedia devices. Refer to → Communication; Rep. Gr.91; Infotainment-System; Component Location Overview- Infotainment-System.
Installing
Install in reverse order of removal.
Installation instructions: For example tightening specifications, replacing components. Refer to → Chapter "Overview - Center Console, Storage Compartment".
Center Console Trim Panel, Removing and Installing
Special tools and workshop equipment required
- Wedge Set -T10383-
- Wedge Set - Wedge 1 -T10383/1-
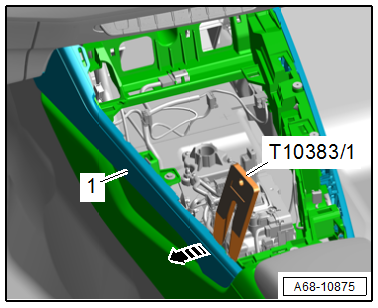
Removing
- Front passenger side: Remove the center console decorative trim. Refer to → Chapter "Center Console Decorative Trim, Removing and Installing".
- Driver side: Remove the front storage compartment in the center console. Refer to → Chapter "Front Storage Compartment, Removing and Installing".
- Starting at the back, unclip the center console trim panel -1- from the center console -arrow- using the -T10383/1-.
- Disengage the remaining retainers for the center console trim panel and remove the trim panel.
Installing
Install in reverse order of removal.
Installation instructions: For example tightening specifications, replacing components. Refer to → Chapter "Overview - Center Console, Storage Compartment".
Front Footwell Center Console Trim Panel, Removing and Installing
Special tools and workshop equipment required
- Trim Removal Wedge -3409-
Removing
- Move the front seat all the way back.
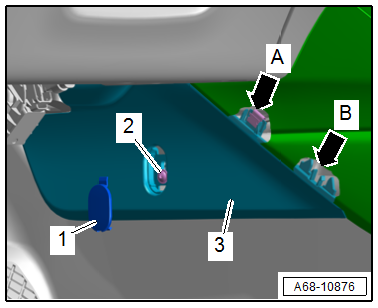
- Pry off the cap -1- with a small screwdriver.
- Remove the bolt -2- underneath.
- Remove the trim panel -3- downward from the clip -arrow A- and disengage the retainers -arrow B- from the center console using the -3409-.
Installing
Install in reverse order of removal.
Installation instructions: For example tightening specifications, replacing components. Refer to → Chapter "Overview - Center Console".
READ NEXT:
 Center Console, Removing and Installing
Removing
- Remove the front footwell center console trim panel. Refer to
→ Chapter "Front Footwell Center Console Trim Panel, Removing
and Installing".
- Remove the front center cons
Front Center Armrest
Overview - Front Center Armrest
1 - Center Armrest Support Base
Removing and installing. Refer to
→ Chapter "Front Center Armrest, Removing and Installing".
2 - Front C
Interior Rearview Mirror
Overview - Interior Rearview Mirror
1 - Front Cover
For the mirror base
Press on until it engages audibly
2 - Clip
For the interior rearview mirror
Replace after removing t
SEE MORE:
Motor compartment
General information
Special care is required if you are working in the
motor compartment
For work in the motor compartment, such as
checking and filling fluids, there is a risk of injury,
scalding, accidents, and burns. For this
reason, follow all the warnings and general
safety precautions provided
Front Seat Belt Guide, Removing and Installing
Removing
- Remove the B-pillar lower trim panel and bracket for the upper
B-pillar trim panel. Refer to
→ Chapter "B-Pillar Lower Trim Panel, Removing and Installing".
- Push the bracket together in the direction of
-arrows- and remove the belt guide
-1- upward.
- Guide out t
