Audi A4: Component Location Overview - Sound System
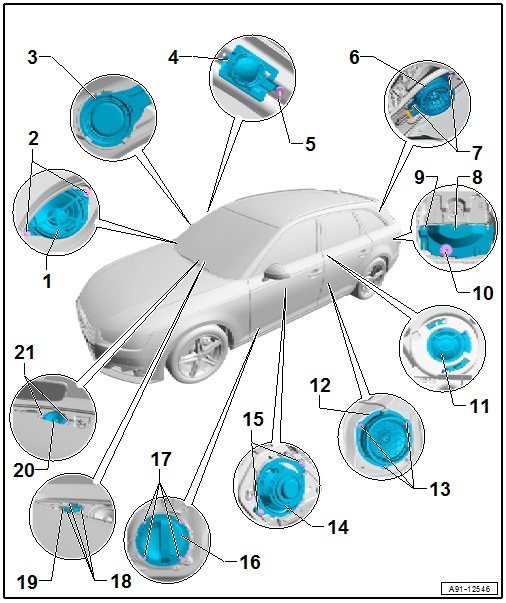
Component Location Overview - Sound System, Speaker, Sedan

1 - Left Front Treble Speaker -R20-/Right Front Treble Speaker -R22-, 8RM, 9VD
- Left Front Midrange Speaker 2 -R276-/Right Front Midrange Speaker 2 -R277-, 9VS
- Removing and installing. Refer to → Chapter "Left and Right Front Treble Speaker -R20-/-R22-, Removing and Installing".
2 - Bolt
- 2 Nm
- Quantity: 2
3 - Left Front Treble Speaker -R20-/Right Front Treble Speaker -R22-, 9VS
- Removing and installing. Refer to → Chapter "Left and Right Front Treble Speaker -R20-/-R22-, Removing and Installing, 9VS".
4 - Left Front Treble Speaker 2 -R220-/Right Front Treble Speaker 2 -R221-, 9VS
- Removing and installing. Refer to → Chapter "Left and Right Front Treble Speaker 2 -R220-/-R221-, Removing and Installing".
5 - Pop Rivet
- Refer to the Parts Catalog
6 - Left Effects Speaker -R209-/Right Effects Speaker -R210-, 9VS
- Removing and installing. Refer to → Chapter "Left and Right Effects Speaker -R209-/-R210-, Removing and Installing, Sedan".
7 - Bolt
- 2 Nm
- Quantity: 2
8 - Subwoofer -R211-, 9VD, 9VS
- Removing and installing. Refer to → Chapter "Subwoofer -R211-, Removing and Installing, Sedan".
9 - Bolt
- 2 Nm
- Quantity: 3
10 - Left Rear Treble Speaker -R14-/Right Rear Treble Speaker -R16-
- Removing and installing. Refer to → Chapter "Left and Right Rear Treble Speaker -R14-/-R16-, Removing and Installing".
11 - Left Rear Bass Speaker -R15-/Right Rear Bass Speaker -R17-
- Removing and installing. Refer to → Chapter "Left and Right Rear Bass Speaker -R15-/-R17-, Removing and Installing".
12 - Bolt
- 3 Nm
- Quantity: 3
13 - Left Front Bass Speaker -R21-/Right Front Bass Speaker -R23-
- Removing and installing. Refer to → Chapter "Left and Right Front Bass Speaker -R21-/-R23-, Removing and Installing".
14 - Bolt
- 3 Nm
- Quantity: 4
15 - Left Front Midrange Speaker -R103-/Right Front Midrange Speaker -R104-, 9VS
- Removing and installing. Refer to → Chapter "Front Midrange Speaker, Removing and Installing".
16 - Bolt
- 2 Nm
- Quantity: 2
17 - Center Speaker 2 -R219-, 9VS
- Removing and installing. Refer to → Chapter "Center Speaker 2 -R219-, Removing and Installing, 9VS".
18 - Retainers
19 - Center Speaker -R208-, 9VD, 9VS
- Removing and installing. Refer to → Chapter "Center Speaker -R208-, Removing and Installing, 9VD/9VS".
20 - Bolt
- 2 Nm
- Quantity: 2
Component Location Overview - Sound System, Speaker, Avant
1 - Left Front Treble Speaker -R20-/Right Front Treble Speaker -R22-, 8RM, 9VD
- Left Front Midrange Speaker 2 -R276-/Right Front Midrange Speaker 2 -R277-, 9VS
- Removing and installing. Refer to → Chapter "Left and Right Front Treble Speaker -R20-/-R22-, Removing and Installing".
2 - Bolt
- 2 Nm
- Quantity: 2
3 - Left Front Treble Speaker -R20-/Right Front Treble Speaker -R22-, 9VS
- Removing and installing. Refer to → Chapter "Left and Right Front Treble Speaker -R20-/-R22-, Removing and Installing, 9VS".
4 - Left Front Treble Speaker 2 -R220-/Right Front Treble Speaker 2 -R221-, 9VS
- Removing and installing. Refer to → Chapter "Left and Right Front Treble Speaker 2 -R220-/-R221-, Removing and Installing".
5 - Pop Rivet
- Refer to the Parts Catalog
6 - Left Effects Speaker -R209-/Right Effects Speaker -R210-, 9VS
- Removing and installing. Refer to → Chapter "Left and Right Effects Speaker -R209-/-R210-, Removing and Installing, Avant".
7 - Bolt
- 2 Nm
- Quantity: 2
8 - Subwoofer -R211-, 9VD, 9VS
- Removing and installing. Refer to → Chapter "Subwoofer -R211-, Removing and Installing, Avant".
9 - Nut
- 3 Nm
- Quantity: 3
10 - Bolt
- 10 Nm
11 - Left Rear Treble Speaker -R14-/Right Rear Treble Speaker -R16-
- Removing and installing. Refer to → Chapter "Left and Right Rear Treble Speaker -R14-/-R16-, Removing and Installing".
12 - Left Rear Bass Speaker -R15-/Right Rear Bass Speaker -R17-
- Removing and installing. Refer to → Chapter "Left and Right Rear Bass Speaker -R15-/-R17-, Removing and Installing".
13 - Bolt
- 3 Nm
- Quantity: 3
14 - Left Front Midrange Speaker -R103-/Right Front Midrange Speaker -R104-, 9VS
- Removing and installing. Refer to → Chapter "Front Midrange Speaker, Removing and Installing".
15 - Bolt
- 2 Nm
- Quantity: 2
16 - Left Front Bass Speaker -R21-/Right Front Bass Speaker -R23-
- Removing and installing. Refer to → Chapter "Left and Right Front Bass Speaker -R21-/-R23-, Removing and Installing".
17 - Bolt
- 3 Nm
- Quantity: 4
18 - Retainers
19 - Center Speaker 2 -R219-, 9VS
- Removing and installing. Refer to → Chapter "Center Speaker 2 -R219-, Removing and Installing, 9VS".
20 - Center Speaker -R208-, 9VD, 9VS
- Removing and installing. Refer to → Chapter "Center Speaker -R208-, Removing and Installing, 9VD/9VS".
21 - Bolt
- 2 Nm
- Quantity: 2
Component Location Overview - Sound System, Microphone, Amplifier
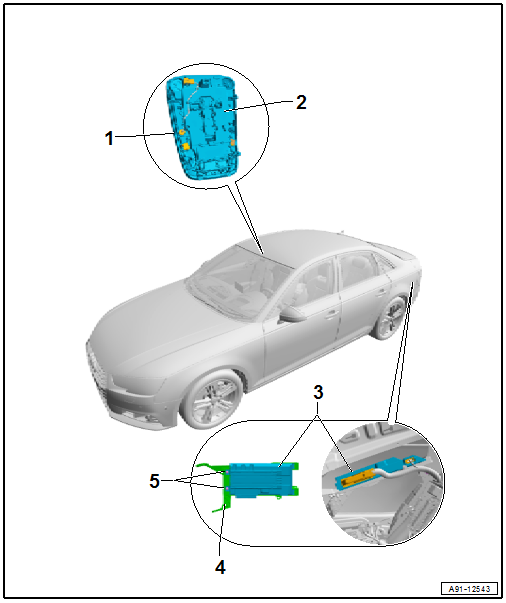
1 - Interior Microphone -R74-, 9VS
- Removing and installing. Refer to → Chapter "Microphone Unit in Front Roof Module -R164-, Removing and Installing".
2 - Front Interior Lamp -W1-
- Removing and installing. Refer to → Electrical Equipment; Rep. Gr.96; Controls; Front Interior/Reading Lamp, Removing and Installing.
- With Microphone Unit in Front Roof Module -R164-
- Removing and installing. Refer to → Chapter "Microphone Unit in Front Roof Module -R164-, Removing and Installing".
3 - Digital Sound System Control Module -J525-, 9VS
- Connector assignment. Refer to → Wiring diagrams, Troubleshooting & Component locations.
- Removing and installing. Refer to → Chapter "Control Module/Digital Sound System Amplifier, Removing and Installing".
4 - Bracket
- 3 Nm
- Nut, quantity 3
5 - Bolt
- 6 Nm
- Quantity: 2
READ NEXT:
 Control Module/Digital Sound System Amplifier, Removing and Installing
Special tools and workshop equipment required
Fiber-Optic Repair Set - Connector Protective Caps
-VAS6223/9-.
The Digital Sound System Control Module -J525--1-
is located behind the left luggage
Left and Right Rear Treble Speaker -R14-/-R16-, Removing and Installing
The Left Rear Treble Speaker -R14-/Right Rear Treble Speaker
-R16--1- are inside the rear doors
at the top.
Removing and installing is identical.
Removing
- Turn off the ignition and all electr
Front Midrange Speaker, Removing and Installing
The Left Front Midrange Speaker -R103-/Right Front Midrange
Speaker -R104--1- are located in
the center of the front doors.
Removing and installing is identical.
Removing
- Turn off the ignitio
SEE MORE:
Front Peripheral Camera -R243-, Removing and Installing
The Front Peripheral Camera -R243- is installed in the
radiator grille under the Audi rings.
Removing
- Turn off the ignition and all electrical equipment and
remove the ignition key.
- Remove the front bumper cover. Refer to
→ Body Exterior; Rep. Gr.63; Front Bumper; B
Exterior lighting
Switching the lights on and off
Fig. 42 Instrument panel: light switch with button
Light switch
Turn the light switch (1) to the corresponding position
when the ignition is switched on. The
symbol and the selected position will turn on (except
position 0).
O - The daytime running lights* will
