Audi A4: Coolant Pump, Removing and Installing
Removing
- Remove the engine cover. Refer to → Servicing - 4-Cylinder 2.0L 4V TFSI Engine; Rep. Gr.10; Engine Cover; Engine Cover, Removing and Installing.
- Drain the coolant. Refer to → Chapter "Coolant, Draining and Filling".
- Disconnect the connectors -2 to 5-.
 Note
Note
Ignore item -1-.
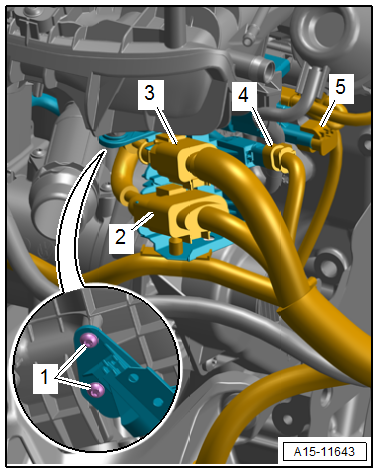
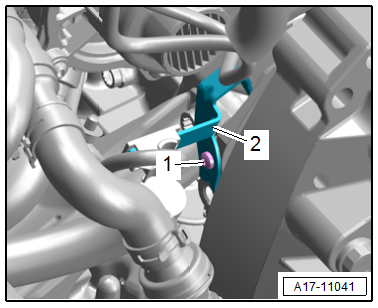
- Remove the bolt -1- and move the bracket -2- with the engine wiring harness to the side.
All additional procedures are described under: → Servicing - 4-Cylinder 2.0L 4V TFSI Engine; Rep. Gr.19; Coolant Pump/Coolant Thermostat; Coolant Pump, Removing and Installing.
Installing
Additional procedures:
- Connections and wire routing. Refer to → Wiring diagrams, Troubleshooting & Component locations.
Note
Used coolant cannot be used again.
- Fill with coolant. Refer to → Chapter "Coolant, Draining and Filling".
- Install the engine cover. Refer to → Servicing - 4-Cylinder 2.0L 4V TFSI Engine; Rep. Gr.10; Engine Cover; Engine Cover, Removing and Installing.
Coolant Pump Toothed Belt, Removing and Installing
Removing
- Remove the engine cover. Refer to → Servicing - 4-Cylinder 2.0L 4V TFSI Engine; Rep. Gr.10; Engine Cover; Engine Cover, Removing and Installing.
- Drain the coolant. Refer to → Chapter "Coolant, Draining and Filling".
- Remove the bolt -1- and move the bracket -2- with the engine wiring harness to the side.
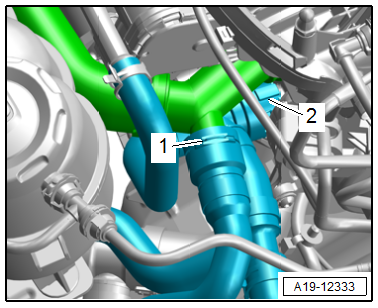
- Lift the clamps -1 and 2- and remove the coolant hoses and push them to the side.
All additional procedures are described under: → Servicing - 4-Cylinder 2.0L 4V TFSI Engine; Rep. Gr.19; Coolant Pump/Coolant Thermostat; Coolant Pump Toothed Belt, Removing and Installing.
Installing
Additional procedures:
- Connections and wire routing. Refer to → Wiring diagrams, Troubleshooting & Component locations.
- Connect the coolant hose to the connector coupling. Refer to → Fig. "Connect the Coolant Hose to the Connector Coupling".
Note
Used coolant cannot be used again.
- Fill with coolant. Refer to → Chapter "Coolant, Draining and Filling".
- Install the engine cover. Refer to → Servicing - 4-Cylinder 2.0L 4V TFSI Engine; Rep. Gr.10; Engine Cover; Engine Cover, Removing and Installing.
Engine Temperature Control Actuator -N493-, Removing and Installing
Removing
- Drain the coolant. Refer to → Chapter "Coolant, Draining and Filling".
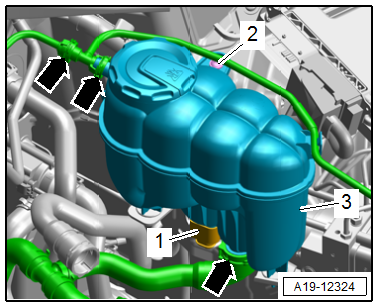
- Lift up the clamps -arrows- and remove and free up the coolant hoses.
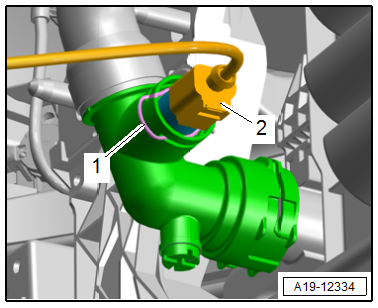
- Disconnect the connector -1- for the Engine Coolant Level Warning Switch -F66-.
- Remove the bolt -2- and remove the coolant expansion tank -3-.
All additional procedures are described under: → Servicing - 4-Cylinder 2.0L 4V TFSI Engine; Rep. Gr.19; Coolant Pump/Coolant Thermostat; Overview - Coolant Pump/Coolant Thermostat.
Installing
Additional procedures:
- Connect the coolant hose to the connector coupling. Refer to → Fig. "Connect the Coolant Hose to the Connector Coupling".
Note
Used coolant cannot be used again.
- Fill with coolant. Refer to → Chapter "Coolant, Draining and Filling".
Engine Coolant Temperature Sensor -G62-, Removing and Installing
All procedures are described under: → Servicing - 4-Cylinder 2.0L 4V TFSI Engine; Rep. Gr.19; Coolant Pump/Coolant Thermostat; Engine Coolant Temperature Sensor on Radiator OutletG83, Removing and Installing.
Engine Coolant Temperature Sensor on Radiator Outlet -G83-, Removing and Installing
Procedure
- The engine is cold.
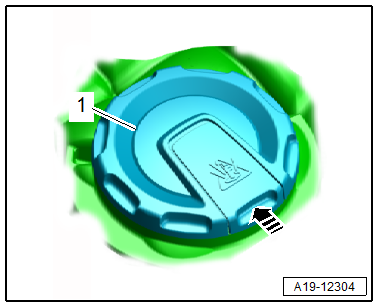
- To reduce the residual pressure in the cooling system, briefly open the coolant expansion tank cap -1- by releasing the retainer in the direction of -arrow-.
- Remove the front noise insulation. Refer to → Body Exterior; Rep. Gr.66; Noise Insulation; Overview - Noise Insulation.
- Disconnect the connector -2-.
Note
- Place a cloth underneath to catch any escaping coolant.
- Replace the O-ring after removing.
- Insert the new Engine Coolant Temperature Sensor on Radiator Outlet -G83- immediately in the connection to prevent coolant loss.
- Open the clamp -1- and remove the Engine Coolant Temperature Sensor on Radiator Outlet -G83-.
Install in reverse order of removal and note the following:
- Check the coolant level.
Tightening Specifications
- Refer to → Body Exterior; Rep. Gr.66; Noise Insulation; Overview - Noise Insulation.
Coolant Pipes
All procedures and components are described under: → Servicing - 4-Cylinder 2.0L 4V TFSI Engine; Rep. Gr.19; Coolant Pipes.
READ NEXT:
 Radiator/Radiator Fan
Overview - Radiator/Radiator Fan
1 - Radiator
Removing and installing. Refer to
→ Chapter "Radiator, Removing and Installing".
After replacing, replace entire amount of coolant
Radiator, Removing and Installing
Special tools and workshop equipment required
Coolant Collection System -VAS5014- or Shop Crane - Drip
Tray -VAS6208-
Elbow Assembly Tool -T10118-
Caution
This procedure contains mandato
Fan Shroud, Removing and Installing
Removing
- Remove the front noise insulation. Refer to
→ Body Exterior; Rep. Gr.66; Noise Insulation; Overview - Noise
Insulation.
- Remove the charge air cooler. Refer to
SEE MORE:
Axle Alignment Information
Wheel alignment must only performed using VW/Audi-approved
alignment equipment.
Each time wheels are aligned, both front and rear wheels
must be aligned. Otherwise, the correct driving handling of the
vehicle cannot be ensured.
Note
Axle alignment should not be performed until the vehic
Pedestrian Protection
Overview - Pedestrian Protection
1 - Driver Side Pedestrian Protection Crash Sensor 2 -G851-/Front Passenger
Side Pedestrian Protection Crash Sensor 2 -G852-
Unit with pressure hose
Component location: In the molded foam part on the impact member
Must be replaced when
The molded f
