Audi A4: Radiator/Radiator Fan
Overview - Radiator/Radiator Fan
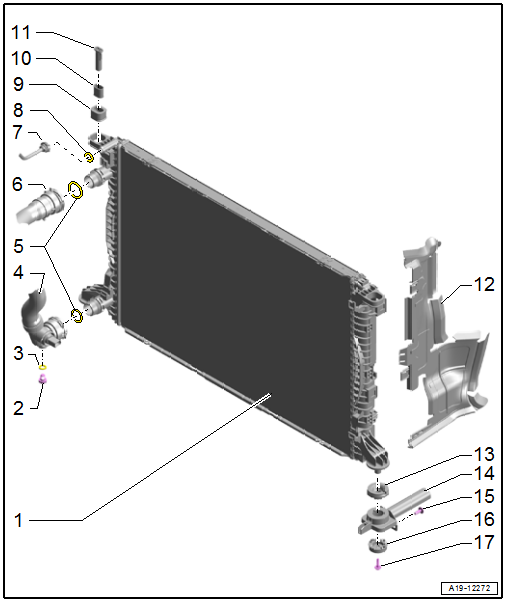
1 - Radiator
- Removing and installing. Refer to → Chapter "Radiator, Removing and Installing".
- After replacing, replace entire amount of coolant
2 - Drain Plug
- 1.5 to 3 Nm
3 - O-ring
- Replace after removing
4 - Coolant Hose
- Lift the clamp to remove
- Connecting. Refer to → Fig. "Connect the Coolant Hose to the Connector Coupling".
5 - O-rings
- Replace after removing
6 - Coolant Hose
- Lift the clamp to remove
- Connecting. Refer to → Fig. "Connect the Coolant Hose to the Connector Coupling".
7 - Coolant Line
- To the coolant expansion tank
- To remove, press the release ring
- Connecting. Refer to → Fig. "Connect the Coolant Hose to the Connector Coupling".
8 - O-ring
- Replace after removing
9 - Rubber Bushing
- For the radiator
10 - Sleeve
11 - Retaining Pin
- Disengage and remove using the screwdriver
12 - Air Duct
13 - Rubber Bushing
- For the radiator
14 - Radiator Bracket
15 - Bolt
- 5 Nm
16 - Backing Plate
17 - Bolt
- 4.5 Nm
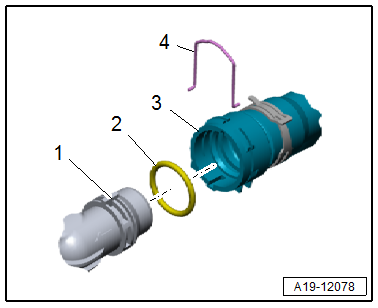
Connect the Coolant Hose to the Connector Coupling
 Note
Note
Replacing the damaged clip -4-.
- Remove the old O-ring -2- in the coolant hose -3-.
- Coat the new O-ring with coolant and insert it in the coolant hose.
- Press the coolant hose on to the coolant pipe -1- until it engages audibly.
- Press the coolant hose on again and pull to make sure the connector coupling is engaged correctly.
Fan Shroud and Radiator Fan

1 - Fan Shroud
- Removing and installing. Refer to → Chapter "Fan Shroud, Removing and Installing".
2 - Bolt
- 5 Nm
3 - Radiator Fan -V7-
- With Radiator Fan Control Module -J293-
- Removing and installing. Refer to → Chapter "Radiator Fan -V7-, Removing and Installing".
4 - Radiator Shutter
- There are different versions. Refer to the Parts Catalog.
READ NEXT:
 Radiator, Removing and Installing
Special tools and workshop equipment required
Coolant Collection System -VAS5014- or Shop Crane - Drip
Tray -VAS6208-
Elbow Assembly Tool -T10118-
Caution
This procedure contains mandato
Fan Shroud, Removing and Installing
Removing
- Remove the front noise insulation. Refer to
→ Body Exterior; Rep. Gr.66; Noise Insulation; Overview - Noise
Insulation.
- Remove the charge air cooler. Refer to
Turbocharger, G-Charger
Turbocharger
All procedures and components are described under:
→ Servicing - 4-Cylinder 2.0L 4V TFSI Engine; Rep. Gr.21; Turbocharger;
Turbocharger, Removing and Installing.
Charge
SEE MORE:
Additional Safety Precautions for Airbag Control Module
WARNING
After every removal and installation of the Airbag
Control Module -J234-, the "inertial sensor basic
setting" must be performed.
If the Airbag Control Module -J234- is replaced with a
new part, the basic setting is performed when
implementing the "15 - Replace airbag control
Gearshift Mechanism, Checking
WARNING
Risk of injury and accident by accidentally engaging
a selector lever position with the engine running.
Before working with the engine running, move the
transmission into "P" and pull the parking brake button
to activate the electro-mechanical parking brake.
Pay attention to t
