Audi A4: Driver Side Instrument Panel Cover, Removing and Installing
Removing
- Remove the driver side instrument panel side cover. Refer to → Chapter "Instrument Panel Side Cover, Removing and Installing".
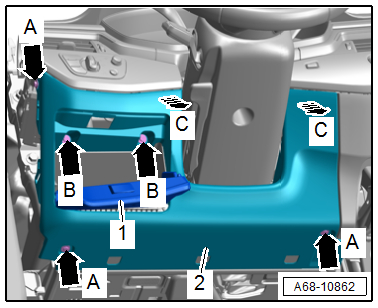
- Equipped on some models: Open the storage compartment cover -1- and remove the screws -arrows B-.
- Remove the screws -arrows A-.
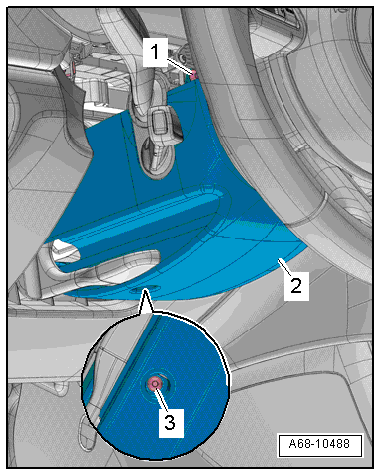
- Unclip the driver side instrument panel cover -2- from the instrument panel by hand in the direction of -arrows C-.
- Remove the driver side instrument panel cover.
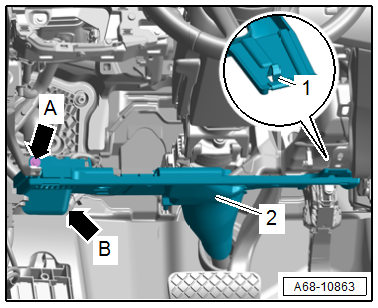
- Remove the screw -arrow A-.
- Using a screwdriver, release the retainer -1- and pull the driver side lower instrument panel cover -2- out of the mount -arrow B- toward the rear.
- Disengage the data link connector on the instrument panel cover.
- Equipped on some models: Disconnect the connectors for the footwell lamp, parking aid warning buzzer and the emergency call speaker.
Installing
Install in reverse order of removal.
Installation instructions: For example tightening specifications, replacing components. Refer to → Chapter "Overview - Driver Side Instrument Panel Cover".
Upper Steering Column Trim Panel, Removing and Installing
Special tools and workshop equipment required
- Trim Removal Wedge -3409-
Removing
- Move the steering wheel as far to the rear and down as possible. Use the full steering column adjustment range for this.
- Remove the light switch trim. Refer to → Chapter "Light Switch Trim, Removing and Installing".
- Remove the A/C display control head trim. Refer to → Chapter "Display Control Head Trim, Removing and Installing".
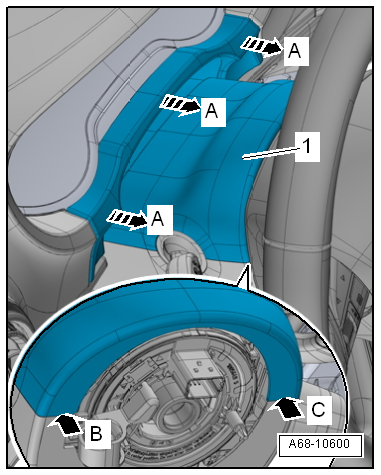
- Unclip the instrument cluster gap cover from the instrument panel vent and from the instrument cluster trim using the -3409- in the direction of -arrows A-.
- Turn the steering wheel counterclockwise 90º from the straight position.
- Carefully pry out the upper steering column trim panel -1- from the lower steering column trim panel -arrow B- using a small flat-head screwdriver.
- Turn the steering wheel back 180º and repeat the procedure on the opposite side -arrow C-.
- Disengage the upper steering column trim panel from the lower steering column trim panel and remove.
Installing
Install in reverse order of removal and note the following:
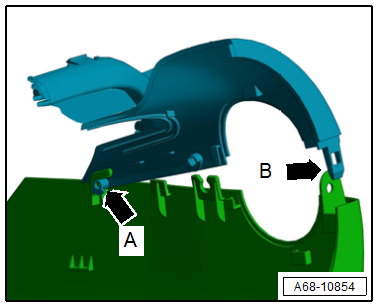
- First engage the upper steering column trim panel into the lower steering column trim panel -arrow A-.
- Make sure the retaining tab -arrow B- on the upper steering column trim panel engages at the pins on the lower steering column trim panel.
Installation instructions: For example tightening specifications, replacing components. Refer to → Chapter "Overview - Steering Column Trim Panel".
Lower Steering Column Trim Panel, Removing and Installing
Removing
- Remove the upper steering column trim panel. Refer to → Chapter "Upper Steering Column Trim Panel, Removing and Installing".
- Turn the steering wheel counterclockwise 90º from the straight position.
- Remove the screw -1-.
- Turn the steering wheel back 180º and remove bolt on the opposite side.
 Note
Note
If the screw -1- is not accessible, the steering wheel must be removed to continue the procedure. Refer to → Suspension, Wheels, Steering; Rep. Gr.48; Steering Wheel; Steering Wheel, Removing and Installing.
- Remove the screw -3- and remove the lower steering column trim panel -2-.
- Disengage the cable holder on the steering column trim panel.
Installing
Install in reverse order of removal.
Installation instructions: For example tightening specifications, replacing components. Refer to → Chapter "Overview - Steering Column Trim Panel".
READ NEXT:
 Glove Compartment Handle, Removing and Installing
Special tools and workshop equipment required
Locking Pin (3 pc.) -T40011-
Removing
- Insert the -T40011- through an opening on the side of the glove
compartment lid to release the hook for t
Extra Equipment
Overview - Screen Separator
1 - Screen Separator Mount Trim
Clip into the rear seat backrest
2 - Rubber Grommet
For the screen separator bracket
Slide over the bracket and i
Screen Separator Mounting Eye, Removing and Installing
Removing
- Remove the headliner and lay it on the seats. It is not
necessary to remove it from the vehicle. Refer to
→ Chapter "Headliner, Removing and Installing".
- Press the cap t
SEE MORE:
Vehicle Diagnosis, Testing and Information Systems
WARNING
During road tests using a vehicle diagnostic and
information system, there is the hazard of extreme to
lethal injuries!
If vehicle diagnostic and information system is
deposited in the action area of an airbag during a road
test, here is the hazard of extreme to lethal injuri
Rear Thorax Airbag with Igniter, Removing and Installing
Caution
This procedure contains mandatory replaceable parts.
Refer to component overview and parts catalog prior to
starting procedure.
Mandatory Replacement Parts
Nut - Rear Thorax Airbag to Side Cushion
Removing
WARNING
Risk of injury due to involuntary deployment.
Pay att
