Audi A4: Extra Equipment
Overview - Screen Separator
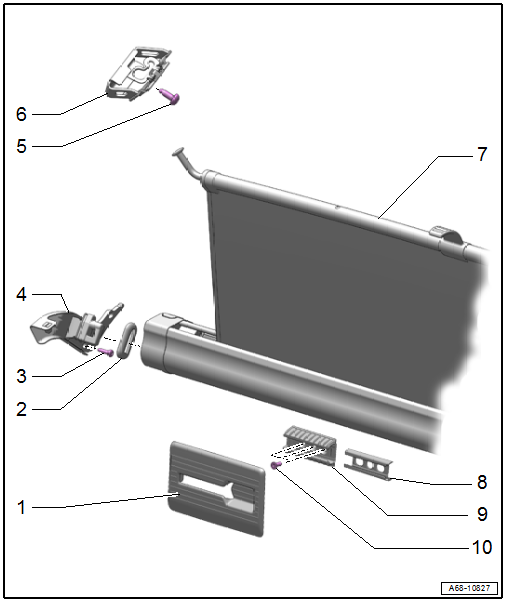
1 - Screen Separator Mount Trim
- Clip into the rear seat backrest
2 - Rubber Grommet
- For the screen separator bracket
- Slide over the bracket and insert into the trim panel
3 - Screw
- 4.5 Nm
- 3 each
4 - Screen Separator Bracket
- Quantity: 2
- Removing and installing. Refer to → Chapter "Screen Separator Bracket, Removing and Installing".
5 - Bolt
- 9 Nm
6 - Mounting Eye
- For the screen separator
- Quantity: 4
- Removing and installing. Refer to → Chapter "Screen Separator Mounting Eye, Removing and Installing".
- Position the securing tab on the mounting eye in the opening in the body
7 - Screen Separator
8 - Guide Rail
- Insert into the mount
9 - Screen Separator Mount
- Quantity: 2
- Installed on the rear seat backrest
- Removing and installing. Refer to → Chapter "Screen Separator Mount, Removing and Installing".
10 - Bolt
- 9 Nm
- Replace after removing
- 3 each
- Self-locking
- Threaded holes for the bolts must be cleaned with a thread tap, For example
Overview - Sun Visors
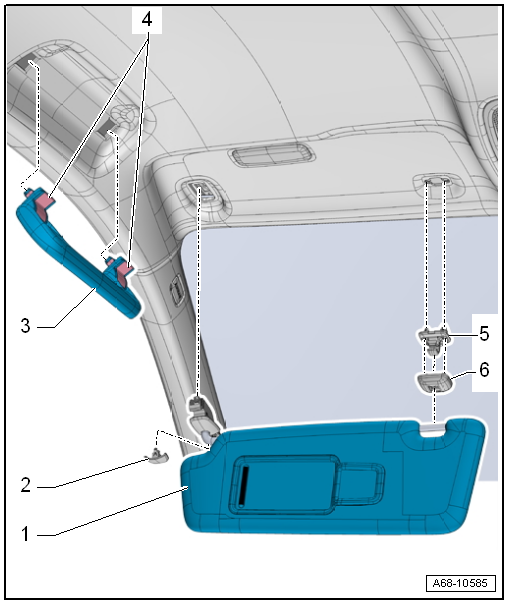
1 - Sun Visor
- Removing and installing. Refer to → Chapter "Sun Visor, Removing and Installing".
- Insert in the sun visor mount in the opening in the body
2 - Expanding Cap
- Clipped into the sun visor
- Press until it engages completely
3 - Roof Grab Handle
- Quantity: 4
- Removing and installing. Refer to → Chapter "Roof Grab Handle, Removing and Installing".
- Press until it engages completely
4 - Expanding Caps
- Press until it engages completely
5 - Center Support
- For the sun visor
- Removing and installing. Refer to → Chapter "Sun Visor Center Support, Removing and Installing".
- Do not damage spreader clips during insertion
6 - Expanding Cap
- Clipped into the sun visor center support
Overview - Sun Shade
1 - Rear Door Trim Panel
- Removing and installing. Refer to → Chapter "Rear Door Trim Panel, Removing and Installing".
2 - Sun Shade Cover
- Removing and installing. Refer to → Chapter "Sun Shade, Removing and Installing".
- Push into the door trim panel until it engages audibly
3 - Bolt
- 1.5 Nm
- Quantity: 2
4 - Sun Shade Mounting Eye
- Removing and installing. Refer to → Chapter "Sun Shade Mounting Eye, Removing and Installing".
5 - Sun Shade
- Removing and installing. Refer to → Chapter "Sun Shade, Removing and Installing".
6 - Bolts
- 1.2 Nm
- Quantity: 7
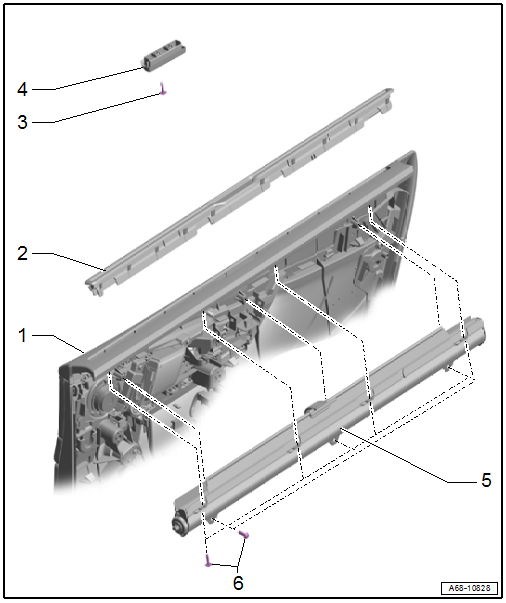
Overview - Luggage Compartment Roll Cover

1 - Luggage Compartment Cover Motor 1 -V473-
- Only available with -6-
- Removing and installing. Refer to → Chapter "Luggage Compartment Cover Motor, Removing and Installing".
2 - Rivet
3 - Locking Pin
- Not available separately from the repair kit. Refer to the Parts Catalog.
- Riveted with roll cover
4 - Roll Cover Catch
- Clipped into the guide rails
- Removing and installing. Refer to → Chapter "D-Pillar Trim Panel, Removing and Installing".
5 - Clip
- Insert into the roll cover guide rail
- Remove any remaining clips in the D-pillar mounting points using the Omega Clip Tool -T40280-. To install, insert into the roll cover guide rail.
- Replace damaged or deformed clips
6 - Roll Cover Guide Rail
- Only available together with -1-
- Removing and installing. Refer to → Chapter "Luggage Compartment Cover Motor, Removing and Installing".
READ NEXT:
 Screen Separator Mounting Eye, Removing and Installing
Removing
- Remove the headliner and lay it on the seats. It is not
necessary to remove it from the vehicle. Refer to
→ Chapter "Headliner, Removing and Installing".
- Press the cap t
Sun Visor, Removing and Installing
Special tools and workshop equipment required
Angled Screwdriver -VAS6416-
Removing
- Unclip the sun visor mount expanding cap
-1- in the direction of -arrow-
by sliding the -VAS6416- just a
Center Console
Overview - Center Console
Overview - Center Console
1 - Center Console Bracket
Removing and installing. Refer to
→ Chapter "Center Console Bracket, Removing and Installing".
2&nb
SEE MORE:
A/C System, Operating after Charging
Note
If the mechanically driven Air Conditioning (A/C) compressor
was removed, rotate it approximately 10 times by hand before
using it for the first time (during or after installing, for
example before installing the belt) to prevent damage caused by
liquid impact when first switched
Subframe with Steering Gear, Removing and Installing
Special tools and workshop equipment required
Torque Wrench 1331 5-50Nm -VAG1331-
Torque Wrench 1332 40-200Nm -VAG1332-
Engine and Gearbox Jack -VAS6931-
Ball Joint Splitter -VAS251805-, not illustrated
Tensioning Strap -T10038-
Puller - Ball Joint -T40043-
Locating Pins -T40327-
C
© 2019-2026 Copyright www.audia4b9.com
