Audi A4: Sun Visor, Removing and Installing
Special tools and workshop equipment required
- Angled Screwdriver -VAS6416-
Removing
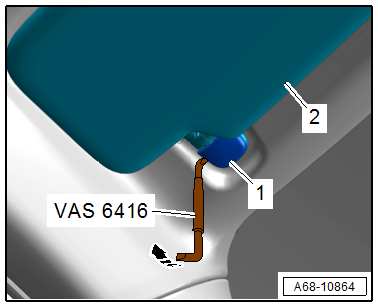
- Unclip the sun visor mount expanding cap -1- in the direction of -arrow- by sliding the -VAS6416- just approximately 1 mm under the cap.
 Note
Note
If the -VAS6416- is inserted farther, it will be located under the sun visor. It is not possible then to pry out the expanding cap.
- Disengage the sun visor -2- at the center support.
- Disengage the sun visor mount downward from the opening in the body and remove it.
- Equipped on some models: Disconnect the connector and remove the sun visor.
Installing
Install in reverse order of removal.
Installation instructions: For example tightening specifications, replacing components. Refer to → Chapter "Overview - Sun Visors".
Sun Visor Center Support, Removing and Installing
Special tools and workshop equipment required
- Angled Screwdriver -VAS6543-
Removing
- Disengage the sun visor at the sun visor center mount and flip to the side.
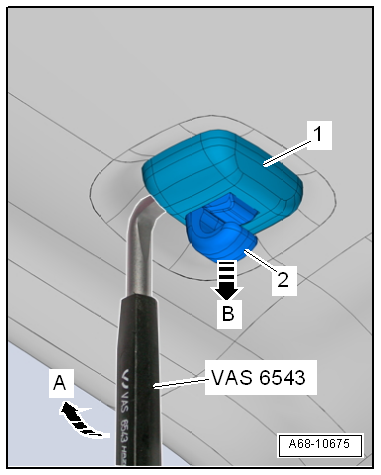
- Unclip the sun visor center support cover -1- by sliding the -VAS6543- only about 1 mm under the cap in the direction of -arrow A-.
Note
If the -VAS6543- is inserted farther, it will be located under the sun visor center support. It is not possible then to pry out the cover.
- Remove sun visor center support -2- in the direction of -arrow B-.
Installing
Install in reverse order of removal.
Installation instructions: For example tightening specifications, replacing components. Refer to → Chapter "Overview - Sun Visors".
Sun Shade, Removing and Installing
Special tools and workshop equipment required
- Wedge Set -T10383-
- Wedge Set - Wedge 1 -T10383/1-
Removing
- Remove the rear door trim panel. Refer to → Chapter "Rear Door Trim Panel, Removing and Installing".
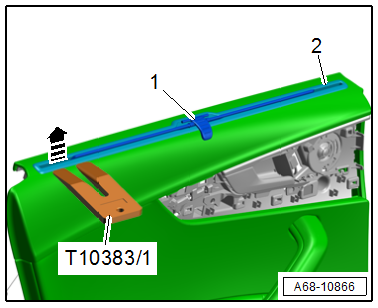
- Using the -T10383/1-, carefully unclip the sun shade cover -2- from the door trim panel -arrow-.
- Pull the sun shade -1- slightly out of the door trim panel and guide the tab out through the sun shade cover.
- Place the door trim panel on a soft surface.
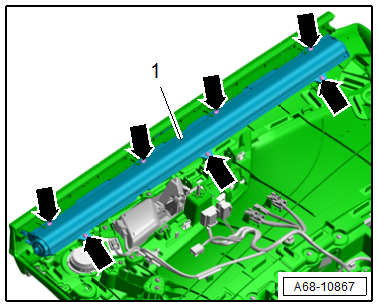
- Remove the bolts -arrows-.
- Guide the tab out through the door trim panel and remove the sun shade -1-.
Installing
Install in reverse order of removal.
Installation instructions: For example tightening specifications, replacing components. Refer to → Chapter "Overview - Sun Shade".
Sun Shade Mounting Eye, Removing and Installing
Removing
- Remove the screws -1- and remove the mounting eye -2- from the window frame.
Installing
Install in reverse order of removal.
Installation instructions: For example tightening specifications, replacing components. Refer to → Chapter "Overview - Sun Shade".
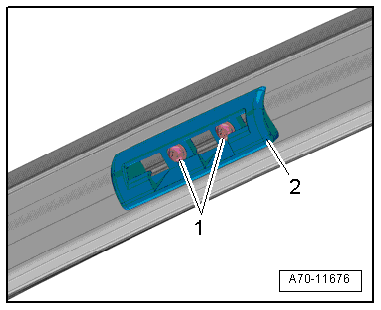
Roof Grab Handle, Removing and Installing
Special tools and workshop equipment required
- Angled Screwdriver -VAS6543-
Removing
 Caution
Risk of destroying the roof grab handle if the silicone brake and spring fall out.
Only unclip the expanding caps -2 and 3- up to their lock position. Do not remove them completely.
- Place the angled screwdriver -4- in the gap behind the clips -2-.
- Pivot the angled screwdriver in the direction of -arrow-, until the clips slides audibly into the rest position.
- Repeat the procedure on the two clips -3-.
- Remove the roof grab handle -1- from the body opening.
- Leave the expanding caps in the rest position in the roof grab handle.
Installing
Install in reverse order of removal and note the following:
- Insert the grab handle in the body cut-out.
- No clips should be between the handle and the roof trim.
- Push in the clips.
Installation instructions: For example tightening specifications, replacing components. Refer to → Chapter "Overview - Sun Visors".
READ NEXT:
 Center Console
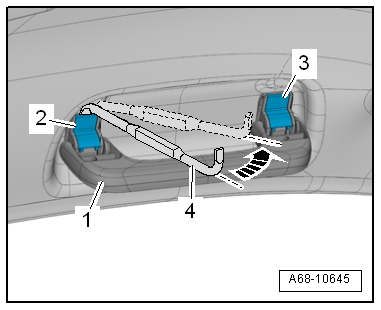
Overview - Center Console
Overview - Center Console
1 - Center Console Bracket
Removing and installing. Refer to
→ Chapter "Center Console Bracket, Removing and Installing".
2&nb
Center Console Rear Trim, Removing and Installing
Special tools and workshop equipment required
Wedge Set -T10383-
Wedge Set - Wedge 1 -T10383/1-
Removing
- Move the front seats all the way forward.
- Using either the -T10383/1- or by h
Front Center Console Storage Compartment, Removing and Installing
Front Storage Compartment, Removing and Installing
Removing
- Remove the center console insert. Refer to
→ Chapter "Center Console Insert, Removing and Installing".
- Remove the stor
SEE MORE:
Inner CV Joint, Checking
It is necessary to disassemble the joint whenever replacing
the grease or if the ball surfaces show wear or damage.
Disassembling
Note
Ball hub and joint are paired and should be identified
before removal. Do not interchange ball race allocation.
- Tilt the ball hub and ball cage.
-&n
Jump starting
Preparation
You should only perform the steps that follow if
you have the necessary tools and technical expertise.
If the engine does not start because the vehicle
battery is drained, you can jump start your vehicle
using another vehicle. Jump start cables are
needed to do this.
Both vehicle batter
