Audi A4: Screen Separator Mounting Eye, Removing and Installing
Removing
- Remove the headliner and lay it on the seats. It is not necessary to remove it from the vehicle. Refer to → Chapter "Headliner, Removing and Installing".
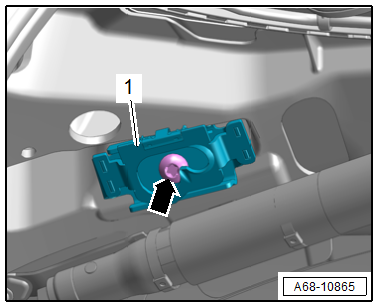
- Press the cap toward the rear, remove the screw -arrow- that is located behind it and then remove the screen separator mounting eye -1-.
Installing
 WARNING
Risk of injury due to involuntary deployment.
Pay attention to the safety precautions when working with pyrotechnic components. Refer to → Chapter "Safety Precautions when Working with Pyrotechnic Components".
Install in reverse order of removal.
Installation instructions: For example tightening specifications, replacing components. Refer to → Chapter "Overview - Screen Separator".
Screen Separator Mount, Removing and Installing
Special tools and workshop equipment required
- Trim Removal Wedge -3409-
 Caution
This procedure contains mandatory replaceable parts. Refer to component overview and parts catalog prior to starting procedure.
Mandatory Replacement Parts
- Bolt - Screen Separator Mount to Rear Seat Backrest
Removing
- Fold the outer folding backrest forward.
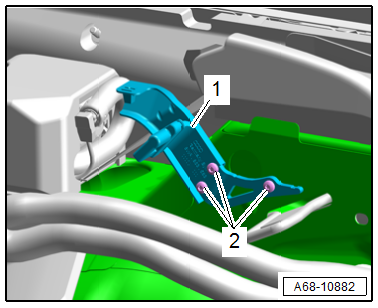
- Unclip the trim -1- for the screen separator mount from the rear seat backrest using the -3409-.
- Remove the bolts -2-.
- Remove the screen separator mount -3-.

Installing
Install in reverse order of removal.
Installation instructions: For example tightening specifications, replacing components. Refer to → Chapter "Overview - Screen Separator".
Screen Separator Bracket, Removing and Installing
Removing
- Remove the luggage compartment side trim panel. Refer to → Chapter "Luggage Compartment Side Trim Panel, Removing and Installing".
- Remove the bolts -2-.
- Remove the bracket -1- for the screen separator.
Installing
Install in reverse order of removal.
Installation instructions: For example tightening specifications, replacing components. Refer to → Chapter "Overview - Screen Separator".
READ NEXT:
 Sun Visor, Removing and Installing
Special tools and workshop equipment required
Angled Screwdriver -VAS6416-
Removing
- Unclip the sun visor mount expanding cap
-1- in the direction of -arrow-
by sliding the -VAS6416- just a
Center Console
Overview - Center Console
Overview - Center Console
1 - Center Console Bracket
Removing and installing. Refer to
→ Chapter "Center Console Bracket, Removing and Installing".
2&nb
Center Console Rear Trim, Removing and Installing
Special tools and workshop equipment required
Wedge Set -T10383-
Wedge Set - Wedge 1 -T10383/1-
Removing
- Move the front seats all the way forward.
- Using either the -T10383/1- or by h
SEE MORE:
Engine, Installing
Special tools and workshop equipment required
Clutch Module Assembly Aid -T40169-
Clutch Module Transportation Lock -T40170-
as well as when removing with listed special tools
Engine Support Bridge - Spindle -10-222A/11-
Shop Crane -VAS6100-
Engine Sling -2024A-
Torque Wrench 1332 Insert - R
General information
Applies to: vehicles with Audi connect
Depending on the country and the vehicle equipment,
the following functions may be available:
Audi connect Infotainment
Audi connect vehicle control
WARNING
To reduce the risk of an accident, only use
Audi connect services and the Wi-Fi hotspot
only if
