Audi A4: Glove Compartment Handle, Removing and Installing
Special tools and workshop equipment required
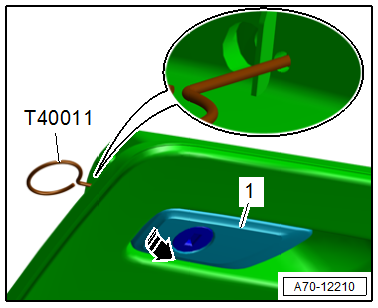
- Locking Pin (3 pc.) -T40011-
Removing
- Insert the -T40011- through an opening on the side of the glove compartment lid to release the hook for the glove compartment handle.
- At the same time, unclip the glove compartment handle -1- from the glove compartment lid -arrow- and remove it.
Installing
Install in reverse order of removal.
Installation instructions: For example tightening specifications, replacing components. Refer to → Chapter "Overview - Glove Compartment".
Glove Compartment, Removing and Installing
Removing
- Remove the front passenger side instrument panel side cover. Refer to → Chapter "Instrument Panel Side Cover, Removing and Installing".
- Remove the footwell lamp. Refer to → Electrical Equipment; Rep. Gr.96; Lamps; Component Location Overview - Instrument Panel Lamps.
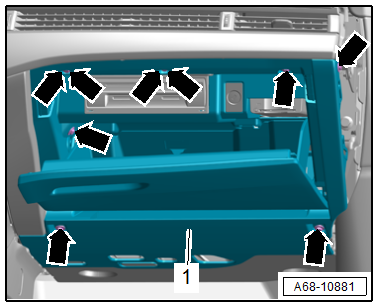
- Open the glove compartment lid and remove the screws -arrows-.
- Carefully remove the glove compartment -1- slightly and disconnect the connector.
- Equipped on some models: Remove the connection for the glove compartment cooling.
Installing
Install in reverse order of removal.
Installation instructions: For example tightening specifications, replacing components. Refer to → Chapter "Overview - Glove Compartment".
Glove Compartment Lid, Removing and Installing
Special tools and workshop equipment required
- Drift Punch
- Drill
- 10 mm Drill Bit
- Protective Eyewear
Removing
- Remove the glove compartment. Refer to → Chapter "Glove Compartment, Removing and Installing".
- Remove the glove compartment lid damping element. Refer to → Chapter "Glove Compartment Lid Dampening Mechanism, Removing and Installing".
- Place the glove compartment on a soft surface.
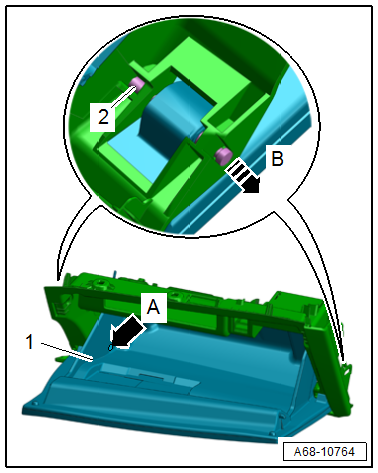
- Open the glove compartment lid and drill a hole in the glove compartment lid from the inside -arrow- at the height of the hinge pin -1- as shown using a 10 mm drill bit.
- Repeat the procedure on the opposite side.

- Using the drift punch, drive the hinge pin -2- out through the hole -arrow A- in the glove compartment lid in the direction of -arrow B-.
- Repeat the procedure on the opposite hinge pin.
- Remove the glove compartment lid -1- from the glove compartment.
Installing
Install in reverse order of removal.
Installation instructions: For example tightening specifications, replacing components. Refer to → Chapter "Overview - Glove Compartment".
Glove Compartment Lid Dampening Mechanism, Removing and Installing
Removing
- Remove the glove compartment. Refer to → Chapter "Glove Compartment, Removing and Installing".
- Disconnect the connector -2-.
- Press the operating arm -3- out of the locking mechanism -arrow A-.
- Release the switch -1- counter-clockwise -arrow B- and remove it.

Installing
Install in reverse order of removal and note the following:
- Insert the switch and press the operating arm in until it clicks into place.
Installation instructions: For example tightening specifications, replacing components. Refer to → Chapter "Overview - Glove Compartment".
READ NEXT:
 Extra Equipment
Overview - Screen Separator
1 - Screen Separator Mount Trim
Clip into the rear seat backrest
2 - Rubber Grommet
For the screen separator bracket
Slide over the bracket and i
Screen Separator Mounting Eye, Removing and Installing
Removing
- Remove the headliner and lay it on the seats. It is not
necessary to remove it from the vehicle. Refer to
→ Chapter "Headliner, Removing and Installing".
- Press the cap t
Sun Visor, Removing and Installing
Special tools and workshop equipment required
Angled Screwdriver -VAS6416-
Removing
- Unclip the sun visor mount expanding cap
-1- in the direction of -arrow-
by sliding the -VAS6416- just a
SEE MORE:
Subframe, Lowering
Special tools and workshop equipment required
Torque Wrench 1331 5-50Nm -VAG1331-
Torque Wrench 1332 40-200Nm -VAG1332-
Tensioning Straps -T10038-
Engine and Gearbox Jack -VAS6931-
Locating Pins -T40327-
Procedure
Note
During installation, all cable ties must be installed at the
same
Windshield
Overview - Windshield
1 -
Windshield
Removing and installing. Refer to
→ Chapter "Windshield, Removing and Installing".
Distance to roof: Dimension -c- = 2.5 mm
Distance to A-pillars: Dimension -e- =
greater than 3 mm; center if necessary
2 -
Adhesive Bead
Observe
