Audi A4: Subframe, Securing
Special tools and workshop equipment required
- Torque Wrench 1331 5-50Nm -VAG1331-
- Torque Wrench 1332 40-200Nm -VAG1332-
- Engine and Gearbox Jack -VAS6931-
- Gearbox Support -T40173-
- Locating Pins -T40327-
Procedure
- Equipped on some models: Remove the left and right diagonal brace. Refer to → Body Exterior; Rep. Gr.66; Underbody Trim Panel; Diagonal braces, removing and installing
- Remove the muffler. Refer to → Rep. Gr.26; Exhaust Pipes/Mufflers; Muffler, Removing and Installing.
- Remove the left and right spring. Refer to → Chapter "Spring, Removing and Installing".
AWD Equipment Versions with Rear Final Drive Installed:
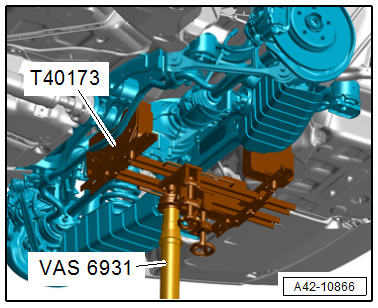
- Support the subframe using the -VAS6931- and -T40173- as shown on the rear final drive and on the subframe.
FWD or AWD Equipment Versions with Rear Final Drive Removed
- If necessary, bring the stabilizer bar into the installation position and secure it with bolts.
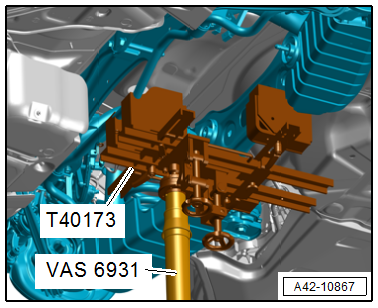
- Support the subframe using the -VAS6931- and -T40173- as shown on the subframe.
Continuation for All Versions
- Secure the subframe with the tensioning strap from the -VAS6931-.
 Caution
There is a risk of damaging the threads on the subframe threaded connection to the body.
- The subframe bolts on the body must not be loosened or tightened with an impact wrench.
- Always install all bolts by hand for the first few turns.
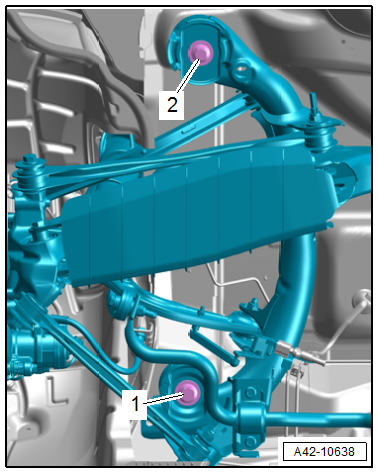
- Remove the left and right bolt -2- from the rear subframe one after the other and install a locating pin from the -T40327-.
 Note
Note
If the locating pin cannot be inserted, rework the stop plate in the subframe mount near the retaining tabs slightly with a file.
- Tighten locating pin to 20 Nm.
- The subframe position is now secured.
- Remove the left and right bolts -1- from the subframe.
Remove the -T40327-
Removal is performed in the reverse order. Note the following:
Caution
There is a risk of damaging the threads on the subframe threaded connection to the body.
- The subframe bolts on the body must not be loosened or tightened with an impact wrench.
- Always install all bolts by hand for the first few turns.
 WARNING
Risk of accident!
If the vehicle will be driving on the streets, all bolts and nuts must be tightened properly according to the guidelines.
- Install the springs. Refer to → Chapter "Spring, Removing and Installing".
- A road test must be performed after completing repairs. If the steering wheel is crooked, the wheels must be aligned. Refer to → Chapter "Axle Alignment".
Tightening Specifications
- Refer to → Chapter "Overview - Subframe"
- Refer to → Rep. Gr.26; Exhaust Pipes/Mufflers; Overview - Muffler.
- Refer to → Body Exterior; Rep. Gr.66; Underbody Trim Panel; Overview - Underbody Trim Panels.
- Refer to → Chapter "Wheels and Tires"
READ NEXT:
 Subframe, Removing and Installing
Caution
This procedure contains mandatory replaceable parts.
Refer to component overview and parts catalog prior to
starting procedure.
Mandatory Replacement Parts
Bolt - Bonded Rubber Bu
Stabilizer Bar
Overview - Stabilizer Bar
1 - Bolt
25 Nm + 90º
Replace after removing
Tighten in the curb weight position. Refer to
→ Chapter "Wheel Bearing in Curb Weight Position, Lifting Ve
SEE MORE:
General Information
Vehicles with a High Voltage System (Hybrid Vehicles)
Extremely Dangerous Due to High-Voltage
The high-voltage system is under high-voltage. Death or serious
bodily injury by electric shock.
- Individuals with electronic/medical life- and health sustaining
machines in or on their person canno
Rear Window, Removing and Installing
Undamaged Rear Window, Removing and Installing, Sedan
Special tools and workshop equipment
required
Cutting Tool for Bonded Windows -VAS6452-
Cutting Tool for Bonded Windows - Wire Reel -VAS6452/1-
Read the repair information. Refer to
→ Chapter "Repair Information"
Required tools and ma
