Audi A4: Impact Member, Removing and Installing
- Follow the safety precautions. Refer to → Body Interior; Rep. Gr.00; Safety Precautions; Safety Precautions when Working on Pyrotechnic Components.
- Remove the bumper cover. Refer to → Chapter "Bumper Cover, Removing and Installing".
- Remove the washer nozzle for the headlamp washer system and set it aside with the washer fluid hose still connected. Refer to → Electrical Equipment; Rep. Gr.92; Headlamp Washer System; Washer Nozzles, Removing and Installing.
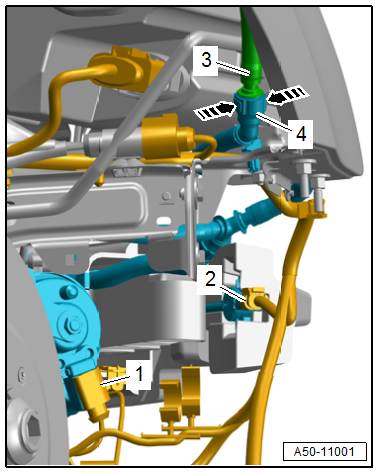
- If equipped, place the drip tray under the separating point and disconnect the washer fluid hose -3- by pressing the release buttons in the direction of -arrows-.
- Free up the washer fluid hose -4-.
 CAUTION
Pyrotechnic components may deploy unintentionally.
Risk of injury.
- Discharge static electricity by briefly touching the door striker.
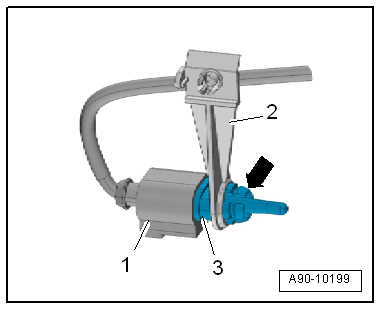
- Vehicles with pedestrian protection: Disconnect the connector -2- from the pedestrian protection crash sensor.
- Disconnect the connector -1- from the Outside Air Temperature Sensor -G17--3- and free up the wiring harness.
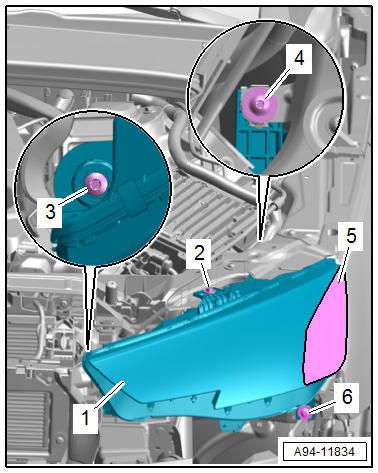
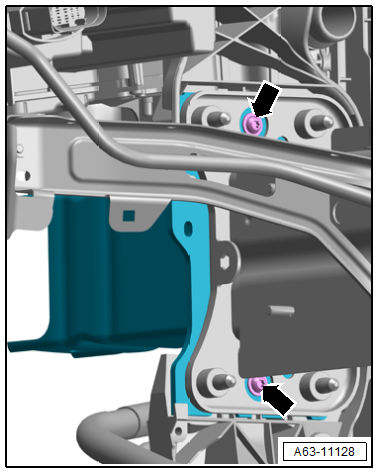
- Loosen the threaded connection -1 through 4- and remove the bolts -A- upward.
If the Bolts cannot be Removed

- Apply adhesive tape -5- to the headlamp -1- near the fender.
- Remove the bolts -2, 3, 4 and 6-.
Continuation for All Vehicles
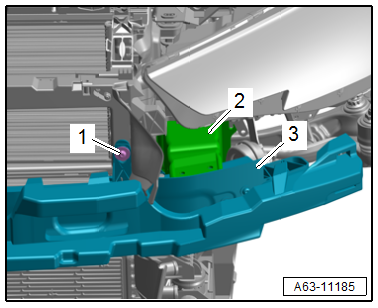
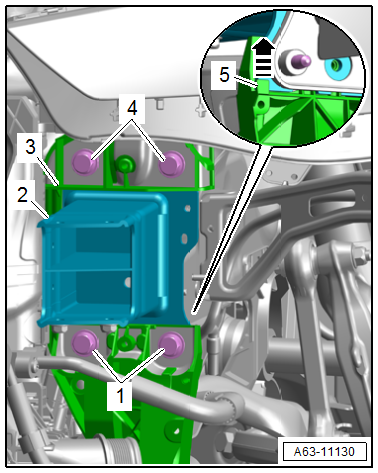
- Remove the bolt -1-.
- Remove the impact member -3- from the mount -2-.
Impact Member Mount, Removing
- Remove the horn bracket. Refer to → Electrical Equipment; Rep. Gr.90; Horn; Overview - Horn.
- Remove the bolts -arrows-.
- Remove the bolts -1 and 4-.
- Pull the lock carrier -3- slightly forward, push the impact member mount -2- upward and out of the guide -5- in the direction of -arrow- and remove it to the side.
Installing
Install in reverse order of removal and note the following:
- Adjust the spring element. Refer to → Chapter "Height, Adjusting using Spring Element".
Tightening Specifications
- Refer to → Chapter "Overview - Impact Member"
- Refer to → Chapter "Overview - Lock Carrier"
READ NEXT:
 Attachments, Removing and Installing
Lock Carrier Cover, Removing and Installing
Special tools and workshop equipment
required
Removal Wedge -T40233-
Removing
- Remove the hook release lever. Refer to
→ Chapter "Hook Rele
Rear Bumper
Overview - Rear Bumper Cover, Standard Equipment
Overview - Bumper Cover
1 -
Bumper Cover Lower Section
There are different versions. Refer to the Parts Catalog.
Removing and installing.
Rear Bumper Cover, Removing and Installing
Special tools and workshop equipment
required
Body Socket -T40078-
Depending on the equipment version, the following additional work must be
performed.
Removing
- Remove the bolts -1-.
-&nb
SEE MORE:
Overview - Suspension Strut, Shock Absorber, Spring
Overview - Spring
1 - Rear Lower Transverse Link
Removing and installing. Refer to
→ Chapter "Rear Lower Transverse Link, Removing and Installing".
2 - Coil Spring
Removing and installing. Refer to
→ Chapter "Spring, Removing and Installing".
Installation p
Level Control System Sensor
Overview - Front Level Control System Sensor
1 - Bolt
9 Nm
2 - Front Level Control System Sensor
Left Front Level Control System Sensor -G78-
Right Front Level Control System Sensor -G289-
With coupling rod and retaining plate
Removing and installing. Refer to
→&nbs
